|
|
Post by mawdo81 on Apr 20, 2015 20:28:05 GMT
Brill, thanks
|
|
|
|
Post by mawdo81 on Apr 22, 2015 8:13:17 GMT
Quick question for Sonic builders please on bulkhead locations.
The front and rear bulkheads, do they go forward or rearward of the chassis rails please?
Thanks
James
|
|
|
|
Post by mawdo81 on Apr 22, 2015 18:24:56 GMT
Narrow escape there, just ordering alupanel for the sheet work and assumed the rear bulkhead was within the frame. Any one got the measurements please?
|
|
|
|
Post by daydreamer on Apr 22, 2015 22:50:59 GMT
Front bulkhead located on the inside surface of the chassis, facing the thingypit 
Rear bulkhead 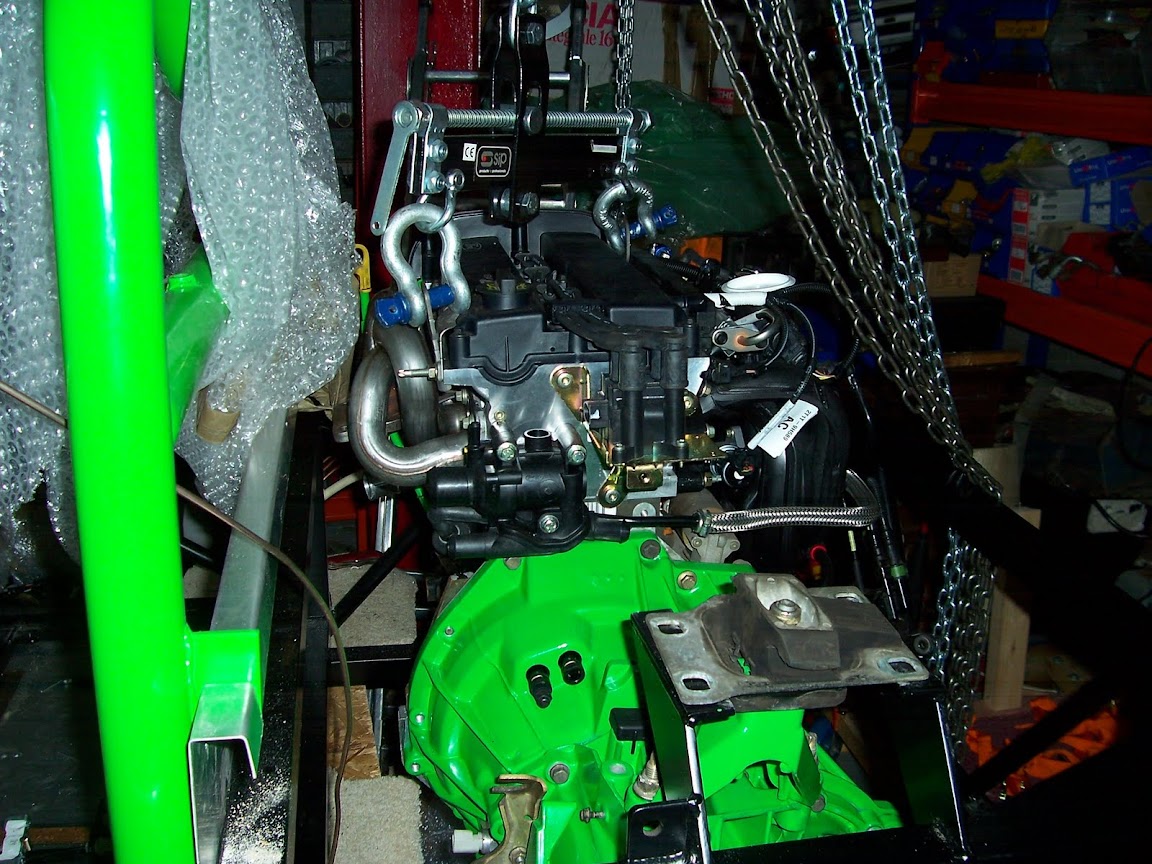
Note:rear bulkhead comes up past the top of the chassis and is folded over. You will need to get a metal shop to fold this for you or your going to have to clamp it to a floor board and panel beat it over. It is folded at the top to create a surface that aligns with the engine cover 

|
|
|
|
Post by mawdo81 on Apr 23, 2015 12:22:45 GMT
Thanks DayDreamer, you don't have measurements for the rear bulk head do you please?
Is anything after the first fold load bearing? I'm going for Aluminium composite so the choice is angle/U shape aluminium for the fold or v-cut the rear and bend - but that only leaves 0.3mm aluminium as the structural support for whatever is being held.
|
|
|
|
Post by kiwicanfly on Apr 23, 2015 21:06:12 GMT
If you where to vee the panel, fold and glue the joint you would regain the strength.
You could also put packers in the channel and screw into those, a bit of hollow square and rivnuts.
Would be a lot neater than using just angle and as least as strong as the original material.
|
|
|
|
Post by mawdo81 on Apr 24, 2015 8:29:32 GMT
Brilliant Kiwi, thats the plan.
Rivnuts, washers button heads and panels all ordered yesterday for deivery early next week.
Want to paint the engine & re-arrange the garage this weekend. Timed it badly though, its the boss's birthday ;-)
|
|
|
|
Post by daydreamer on Apr 24, 2015 18:34:11 GMT
I'll make measurements this evening. It's easy to measure.
From my personal observation I think the folded top section serves several purposes.
Provides a suitable flat surface to rest the engine cover on. First fold also makes the unsupported upper part of the bulk head more rigid and resistant to pressure that would otherwise let that section above the upper chassis flex and bend across the width of the car/bulkhead. Second fold makes the narrow surface that the engine cover sits on more rigid just as the first fold does for the bulkhead surface..
On mine I have a closed cell foam strip between the engine cover and the top of the bulkhead to make a good seal and dampen vibration
If a third fold was added, I think that would be tricky without a press and mould, then you'd almost have a box section at the top and that would be quite strong if seam welded or stitched. But , in this bulkhead application I don't think that any extra strength is called for.
Anyway' I'll get the measurements. |
|
|
|
Post by daydreamer on Apr 24, 2015 19:19:18 GMT
My rear bulkhead is 50cm high to the first fold, it is raised about 1mm up from the floor panel. The key point is that the top surface created by the first fold aligns with the engine cover support flange on the side panels. Those side panels, in my experience are aligned to the bulkhead. So in that chicken and egg scenario fix the rear bulkhead first and pull up the side panels to match they will go up or down by 15 cm or so.
The rear bulkhead width on my car is 105.5cm. You should take your measurement from the inside of the chassis, I expect it will be similar.
The folds are about 2.5cm each.
To re-iterate, and this is my personal opinion. Fit rear bulkhead first before any body panels, align side panels to that. Do not fix, rivet, bolt, drill, cut or otherwise do anything to the fibreglass side panels until you have the rear bulkhead fitted. I think you take all your bodywork panel fit and alignment from that rear bulkhead.
Apologies that was a bit pedantic and laboured but... I've been there and taken a couple of others through it.
|
|
|
|
Post by davef on Apr 25, 2015 17:41:14 GMT
Guy is absolutely right don't cut or trim the fibreglass before the rear bulkhead, fit the bulkhead first and work from there.
|
|
|
|
Post by mawdo81 on Apr 25, 2015 17:48:44 GMT
Thanks guys, don't have my panels yet so no risk of premature trimming yet ;-)
|
|
|
|
Post by mawdo81 on Apr 28, 2015 17:22:58 GMT
Kid at Christmas time again! Beautiful alupanel arrived yesterday, and so did the fixings... Will try to put up a picture soon.
|
|
|
|
Post by mawdo81 on Jun 10, 2015 20:02:32 GMT
Been waiting for a good session to do the floor. The op followed by holiday has meant v little progress for a month. Although I have shaped the floor. Then the weekend hit and I was expecting a write off despite the weather as it was my oldest's 5th birthday - how time flys.
Anyway I got an hour or two with some warm weather so finally painted the engine and I'm really pleased with the result so far.
|
|
|
|
Post by mawdo81 on Jun 12, 2015 7:30:09 GMT
Hey all:
Option 1 Get engine fully built up (alternator, idle pulley, cat, aux belt, condenser & coil) on the stand and then attach GB to drop in or
Option 2 attach gb & drop in then add the rest...
If #1 need to source more bolts, extra idle pulley & belt before I can move on with this.
Rear bulkhead is removable & not fitted yet anyway...
Thanks for the advice in advance...
J
|
|
|
|
Post by Johnsto on Jun 12, 2015 13:04:05 GMT
Option 2. Get it in. It is easy to work on in place, plenty of room. Whilst it's in place it will give you chance to plan other things, like the routing of the cooling, wiring loom run, fit driveshafts and lots of other stuff whilst you wait for delivery of pulleys etc  |
|


