|
|
Post by miket on Jun 9, 2015 10:28:58 GMT
Finished faffing about with the fuel tank drip-tray. I think it's over elaborate but it's given me some panel bending practise!  Some of the fixings have been able to double up as wiring p-clips and earth point. The lowered draining point is where the tank's sump reduces clearance to a minimum. Connected up the wiring to the tank which raised the question of how, if at all, to clip the wiring (and indeed the fuel hoses) as they sit across the tank. 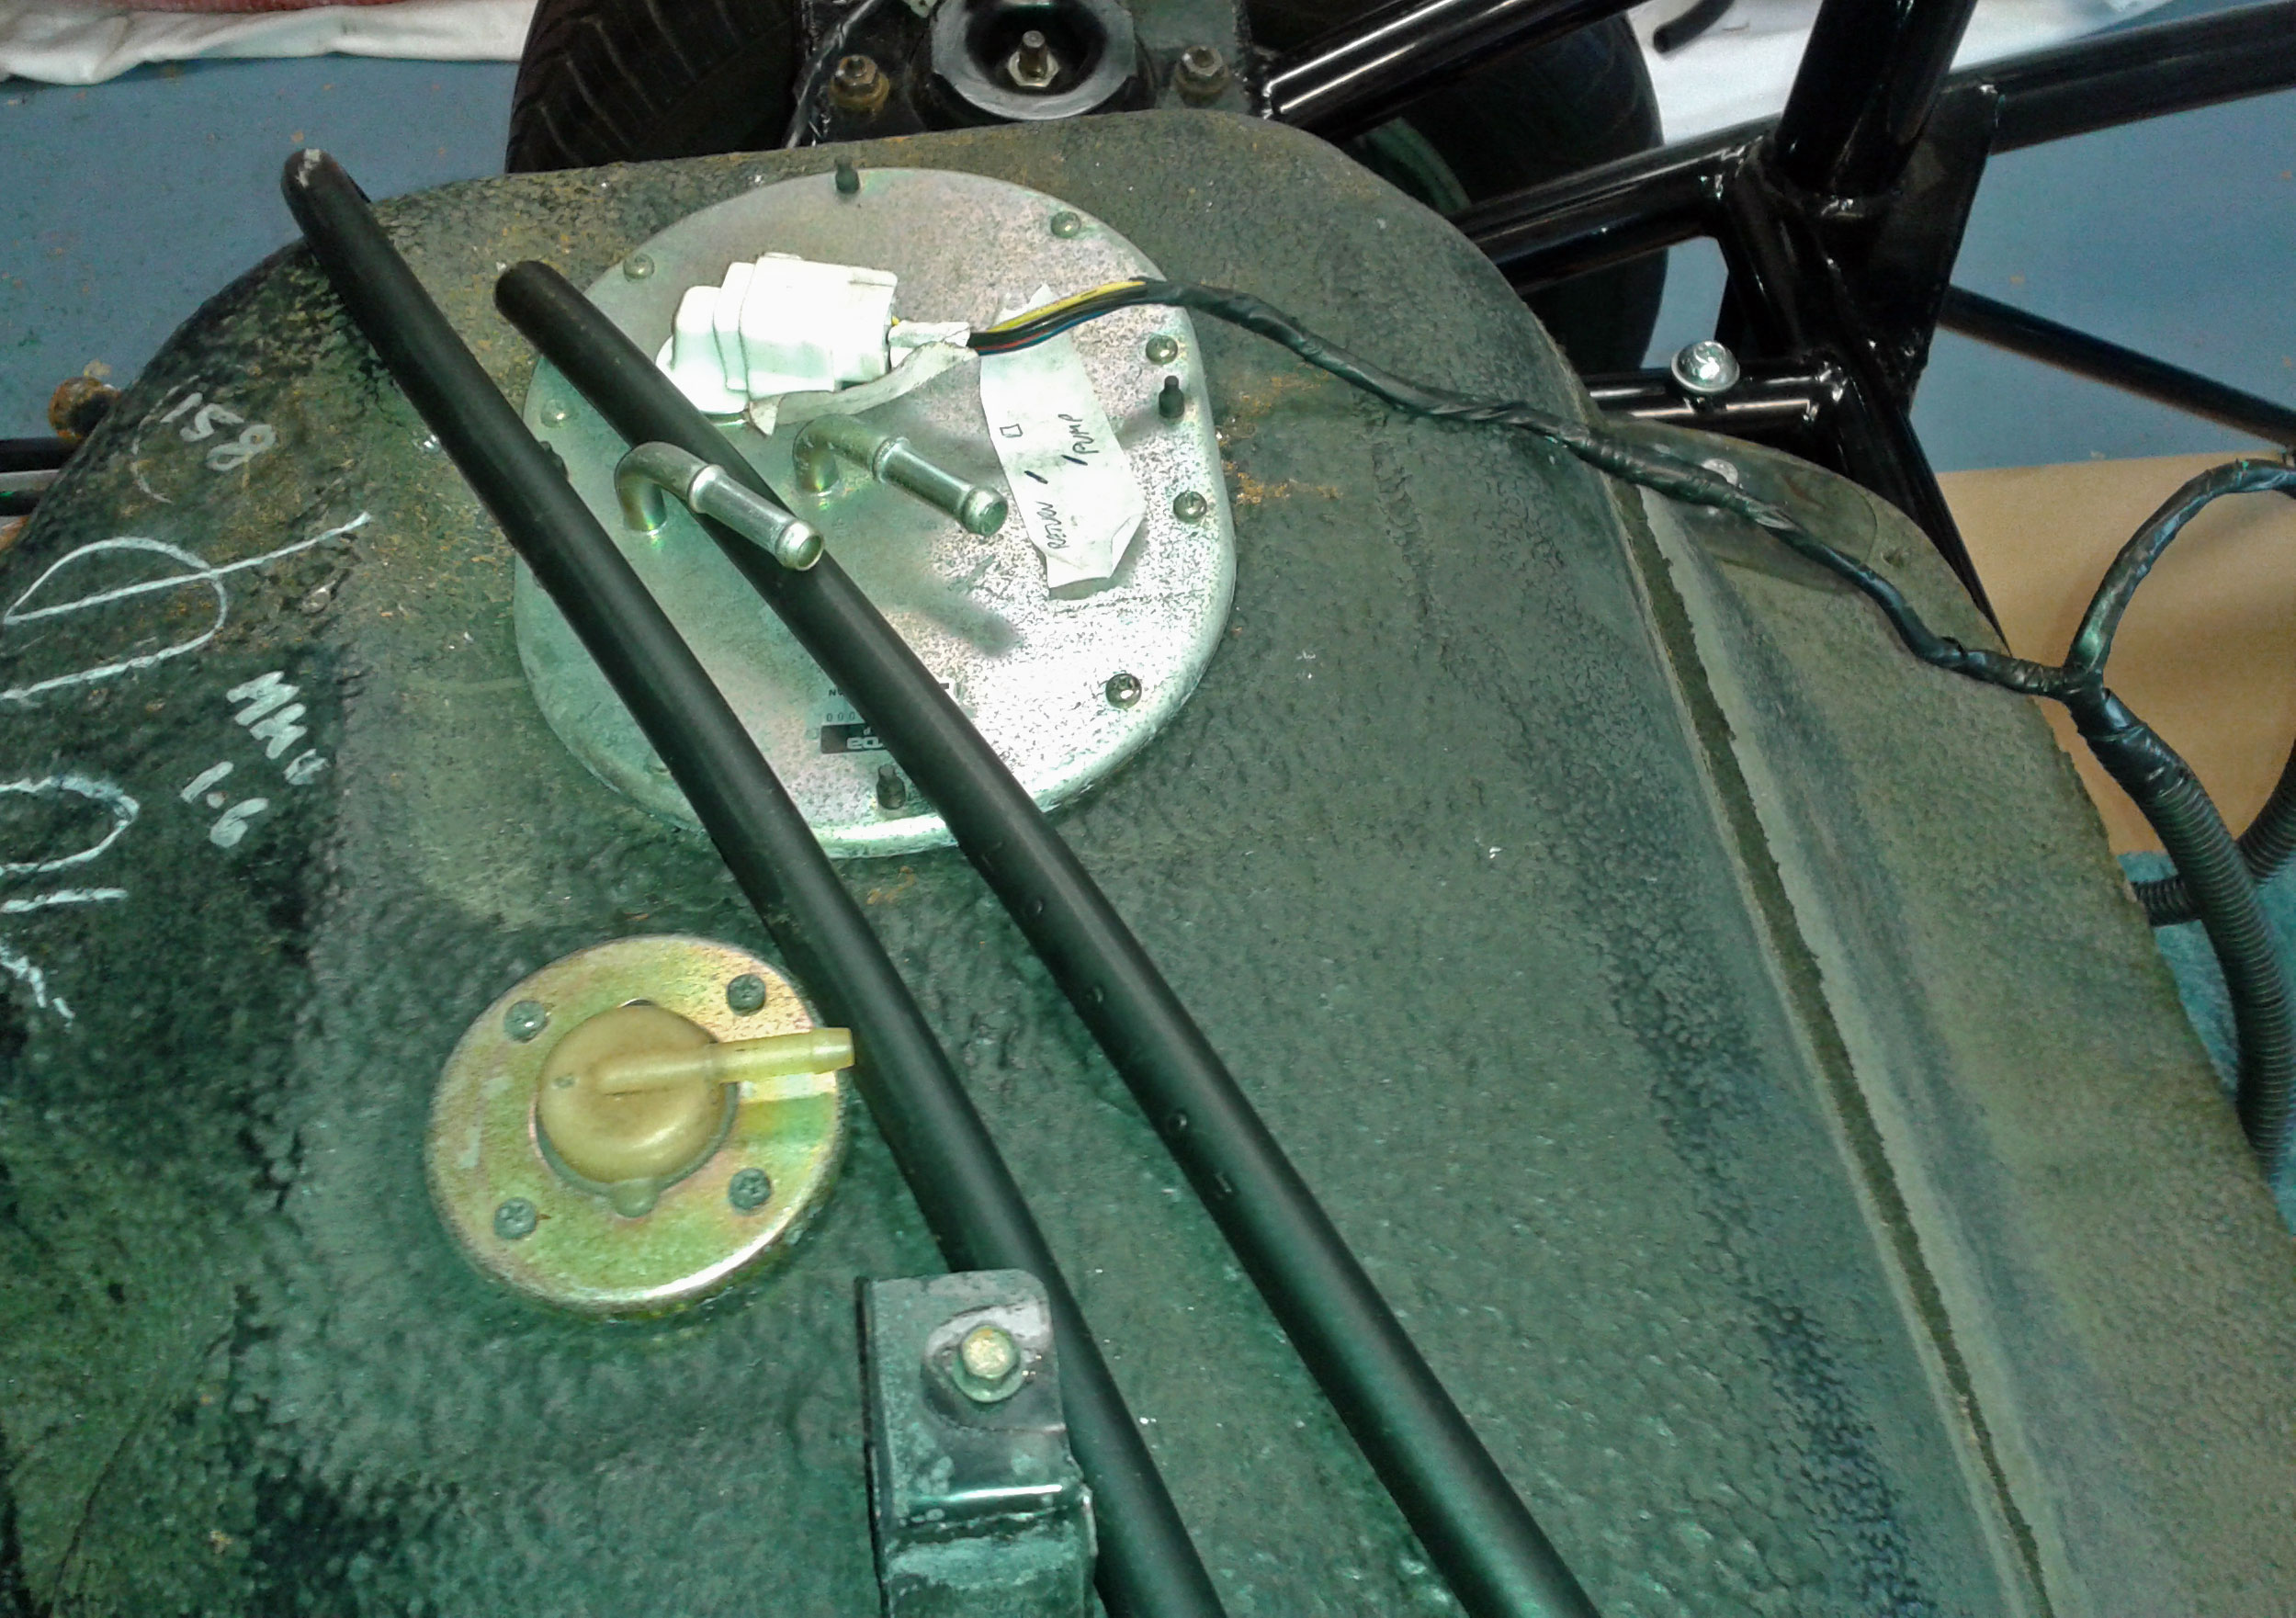 A quick look at the IVA manual seems to offer the get-out-of-jail-free card "All electrical cables/wires must be free from chaffing and secured at intervals of at least every 300mm unless contained in a secure hollow component.". Has anyone done anything more than protective sleeving on wires/hoses across the tank? |
|
|
|
Post by jgilbert on Jun 9, 2015 20:46:43 GMT
I used self adhesive cable tie mounting pads, with reusable cable ties for my electrical cables. On flat and clean surfaces once there stuck down they don't budge. 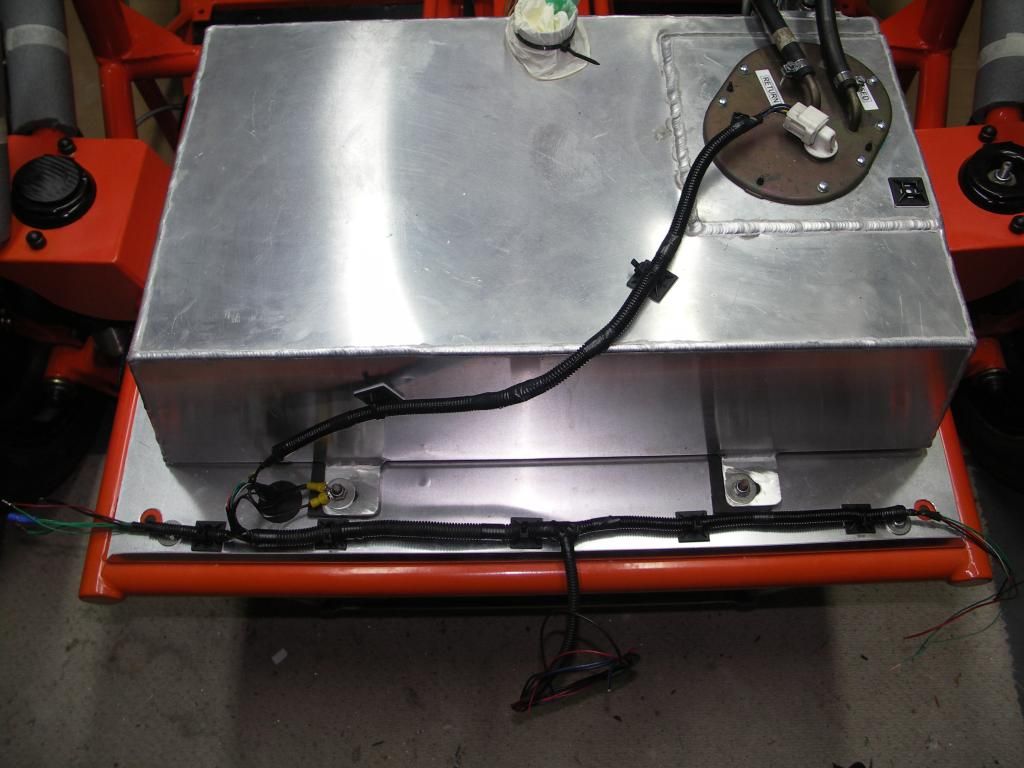 Might work with your pipes as well. Sourced from ebay I think. |
|
|
|
Post by miket on Jun 14, 2015 20:29:55 GMT
Thanks for the idea - I've got some of those now.
This weekend I've (nearly) finished the firewall panels. It took a lot of time, but making tabs on the panels to fold so that they're pressing up to the inside of the tunnel has made for a very solid structure & avoids there being panel gaps through to 'fresh' air ... very pleased with the outcome.
As a novice I found these panels pretty daunting at the outset - not wanting to trash too much expensive ally sheet. I'll aim to get some pics up when I've finished them in case it helps other rookies down the line.
I need to do some final tweaking at the firewall, but I've now noticed that the rear of the ally tunnel has a large gap to the chassis-permanent-tunnel on the lhs. It's tight up on the rhs so I may be able to lean/force the ally tunnel over to the rhs at the rear to even up the gap to something more readily fettled.
|
|
|
|
Post by miket on Jun 17, 2015 13:58:23 GMT
Here's some more on my firewall panels in case it helps future novice UK builders fabricating their panels... My approach:- 1. Fit tunnel (rivnuts). Remove. More info on this above. 2. Fit panels as required at top, outsides and bottom - but leave the side that are adjacent to tunnel. 3. Carefully trim front of tunnel to meet up to panels. 4. Mark outline of tunnel on panels, then make and bend tabs to fit inside tunnel. 5. Use tabs to pull tunnel and panels to a tight fit. I chose to fit the panels on to the sloping square-section verticals at the lower outside edges of the panels, rather than fit the panels in between the sloping rails. This meant the bottom lip of the panels didn't sit on the bottom horizontal chassis rails properly - so an additional bend needed to be made at the bottom of the panels (pics below). Tunnel RHS:- 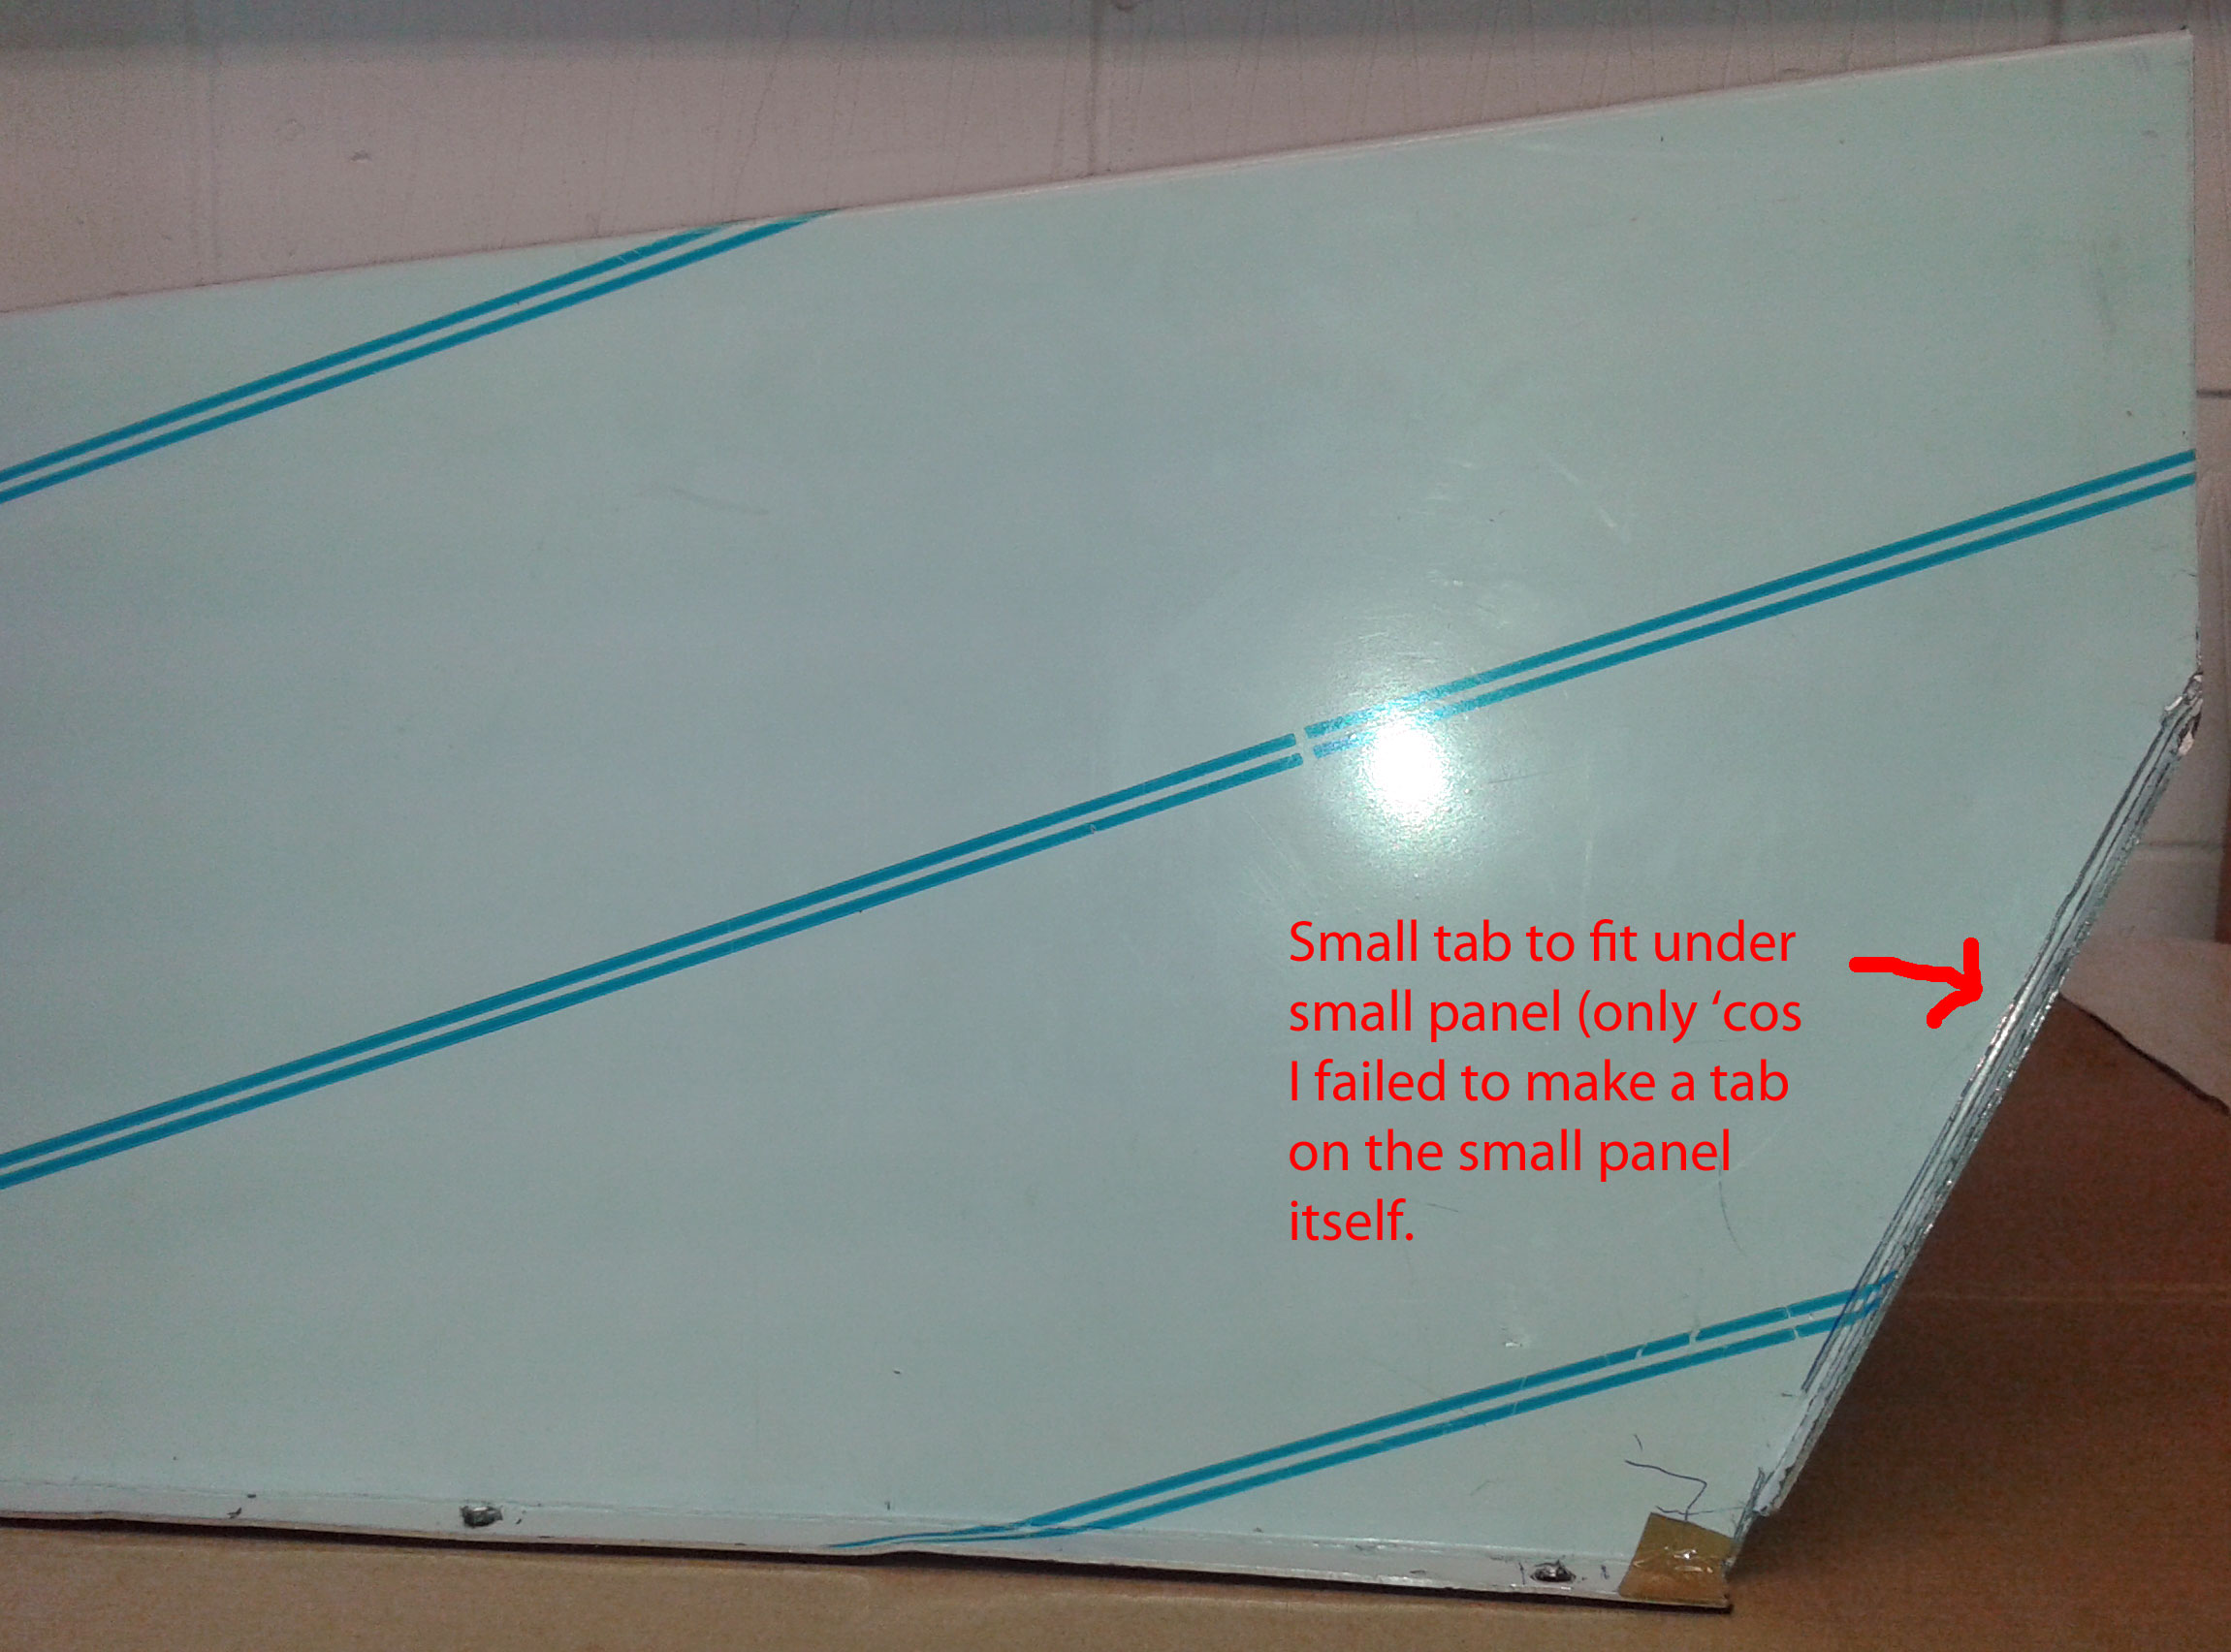 Tunnel LHS:  Larger (passenger side) panel:- 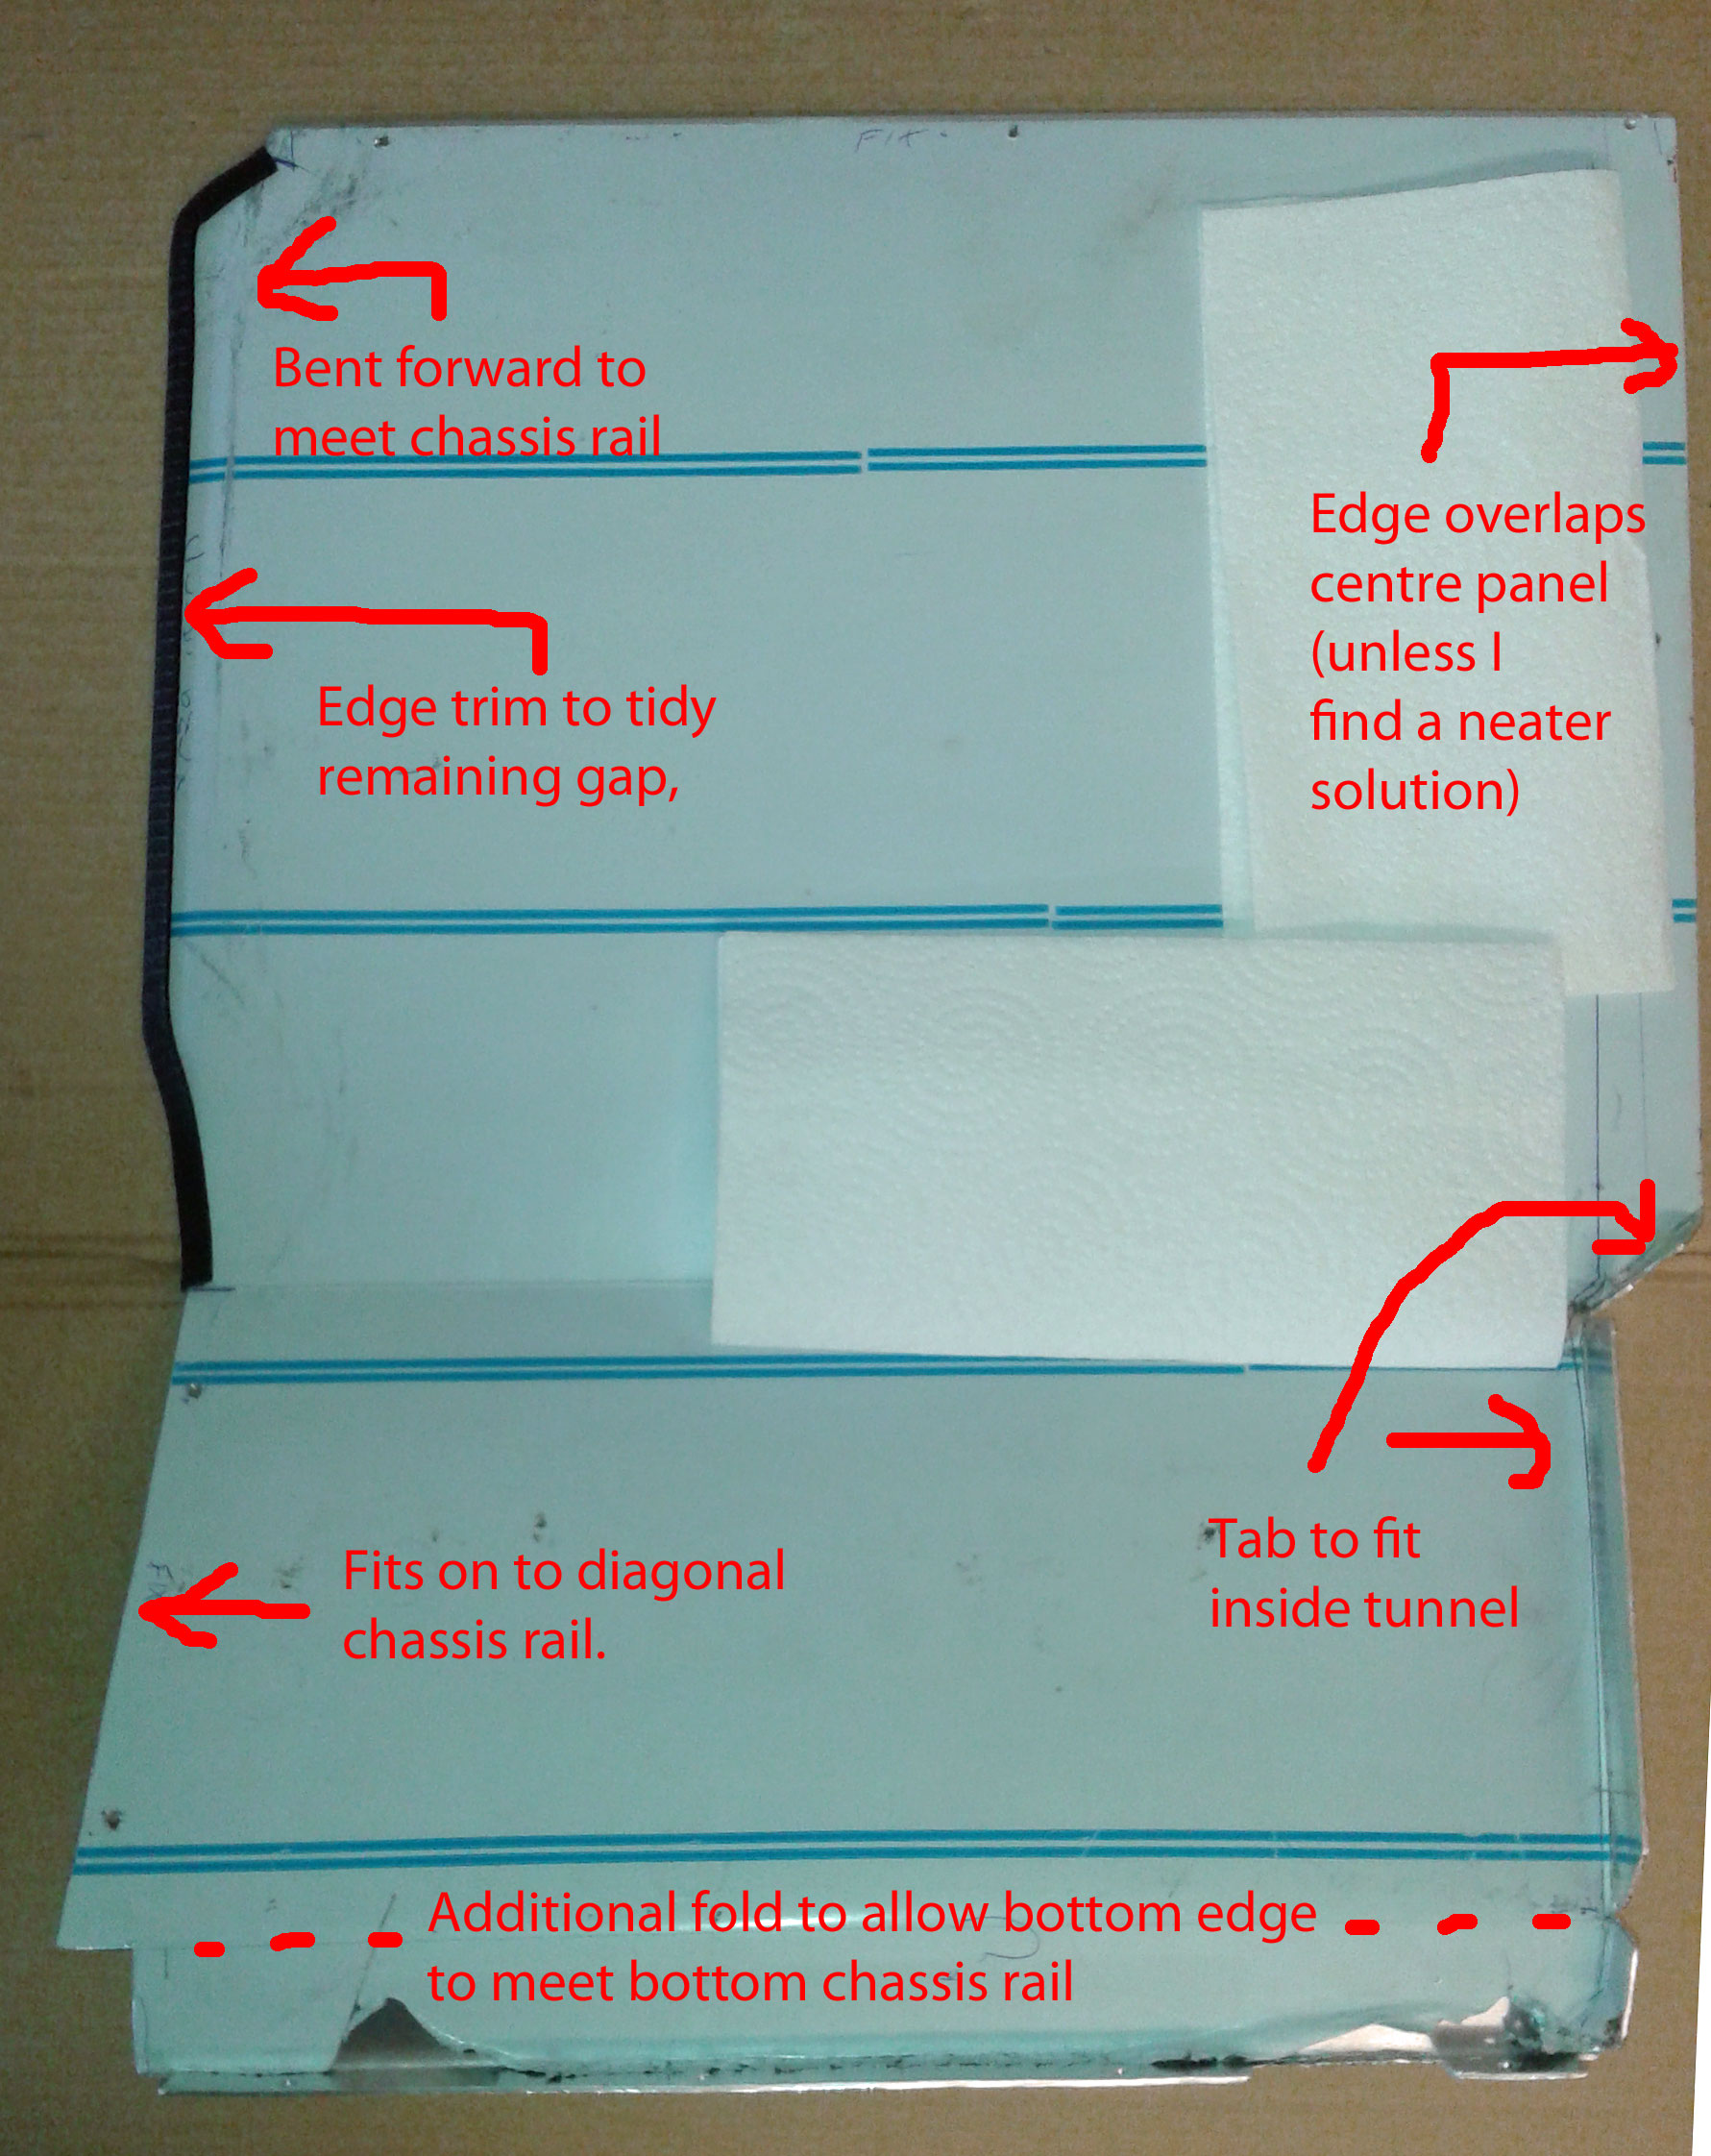 Smaller driver side panel:- 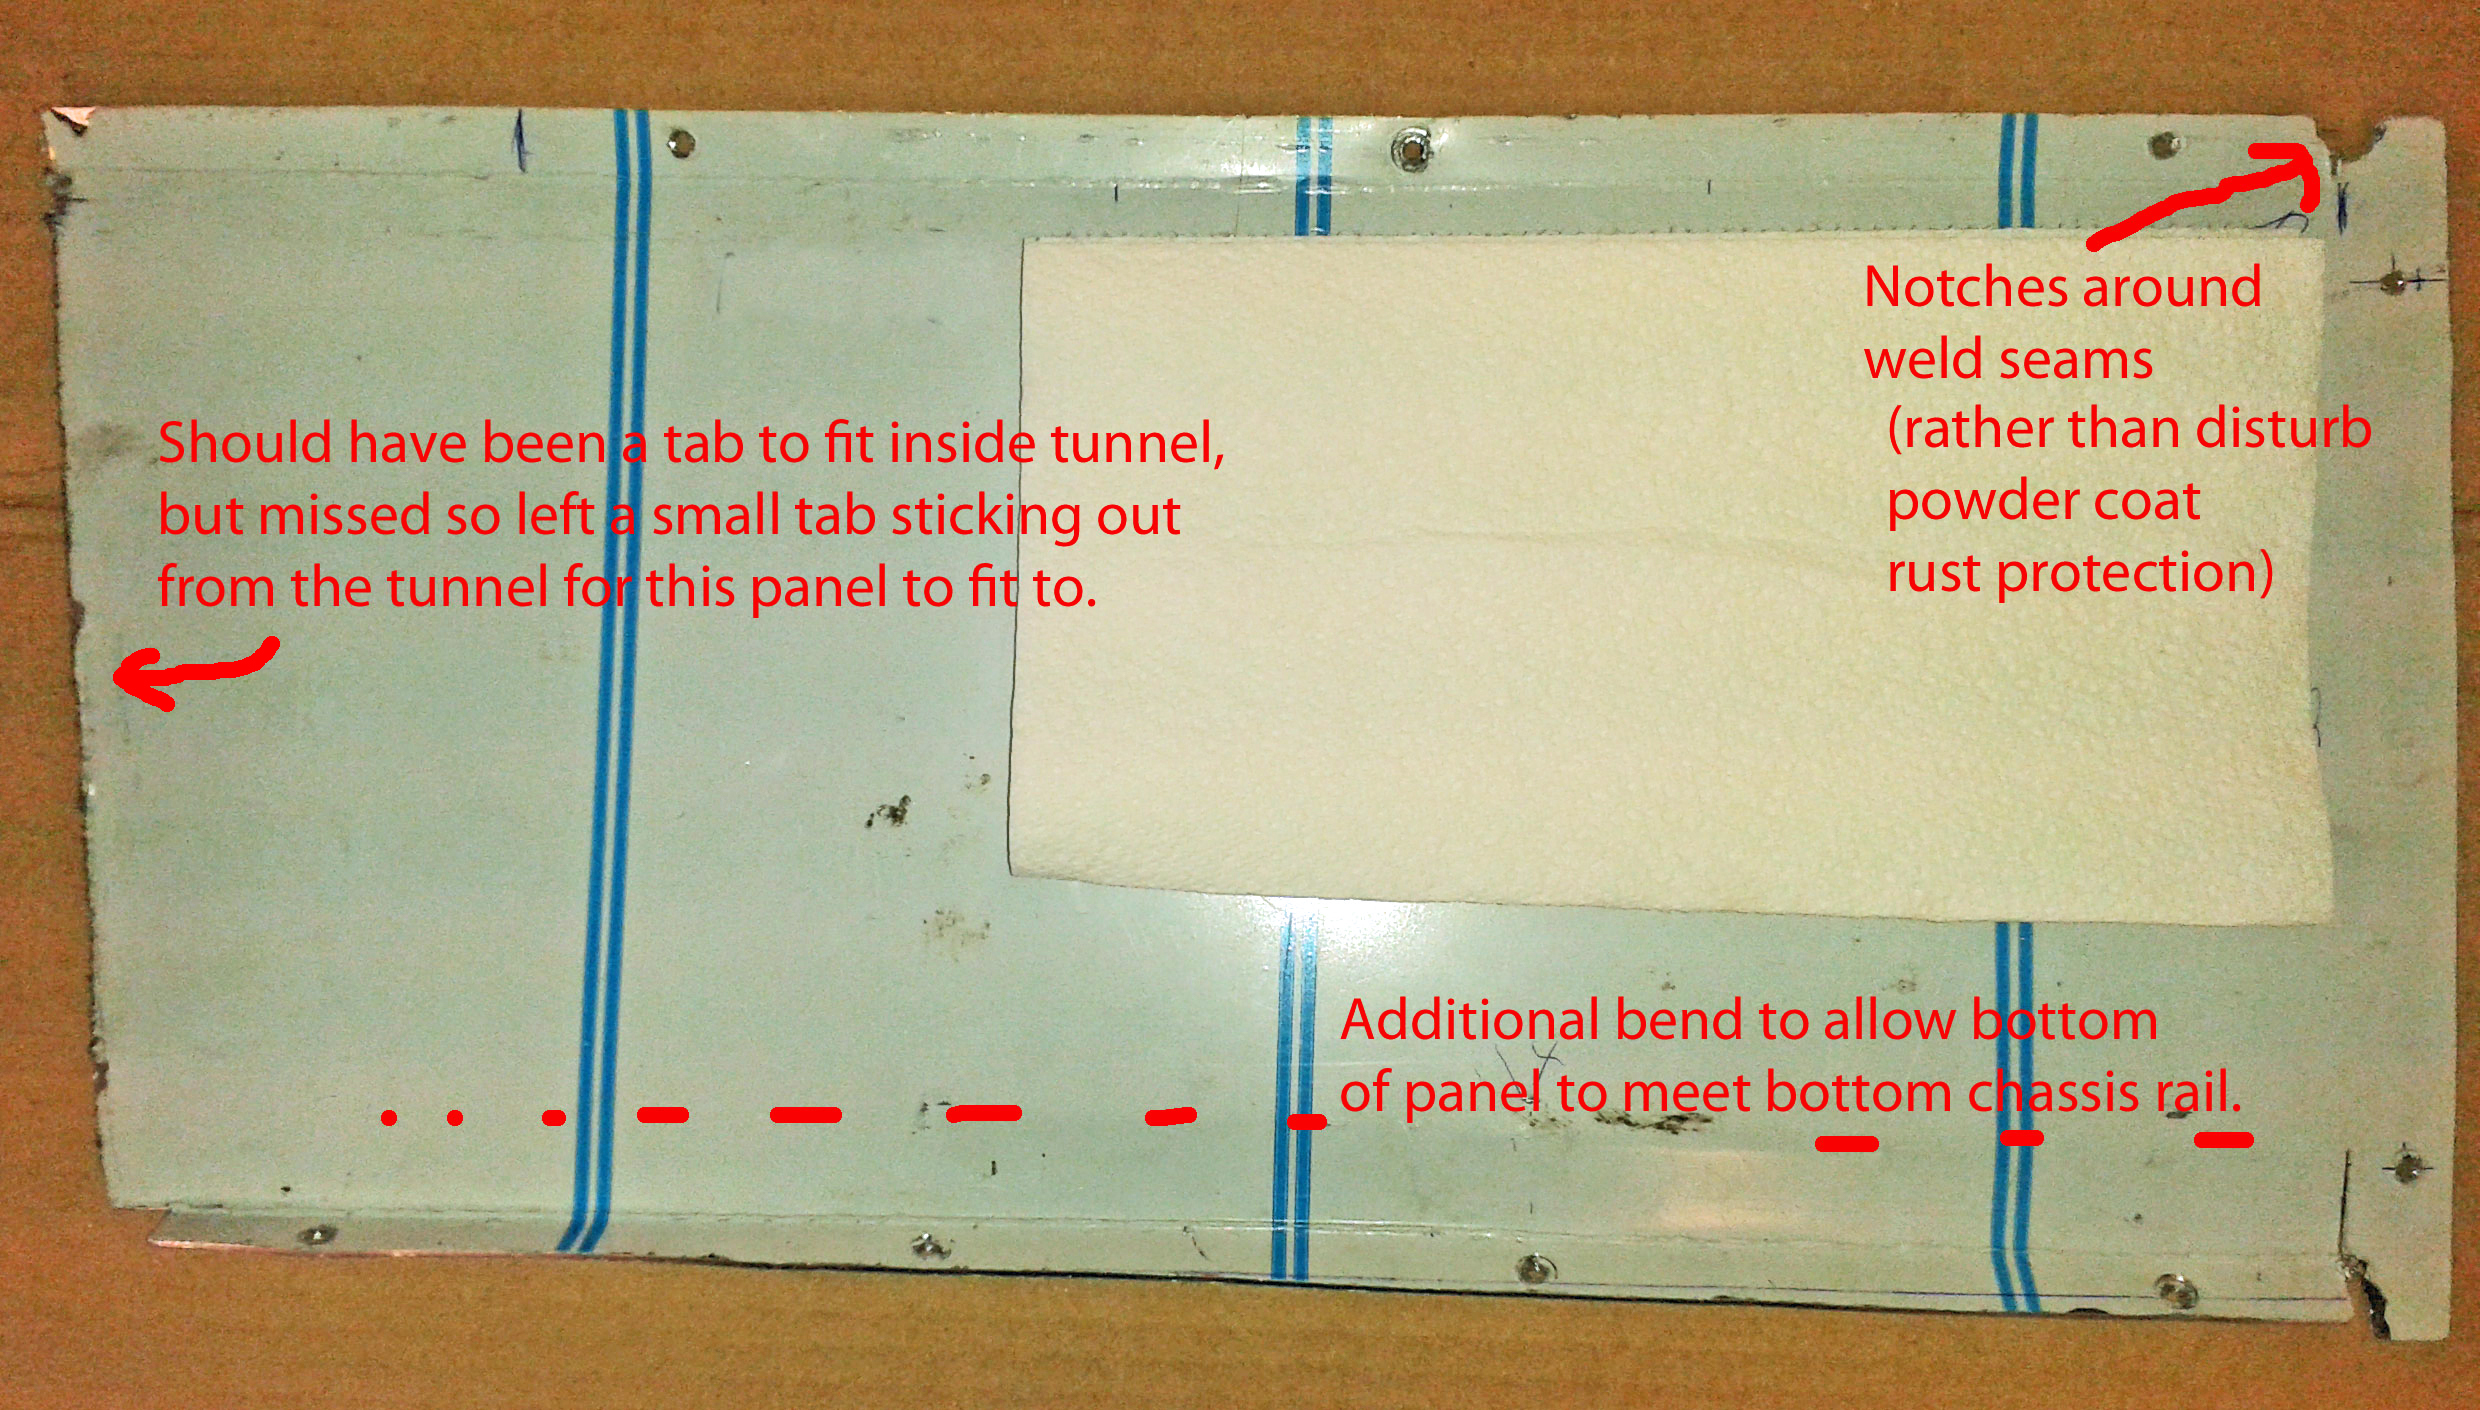 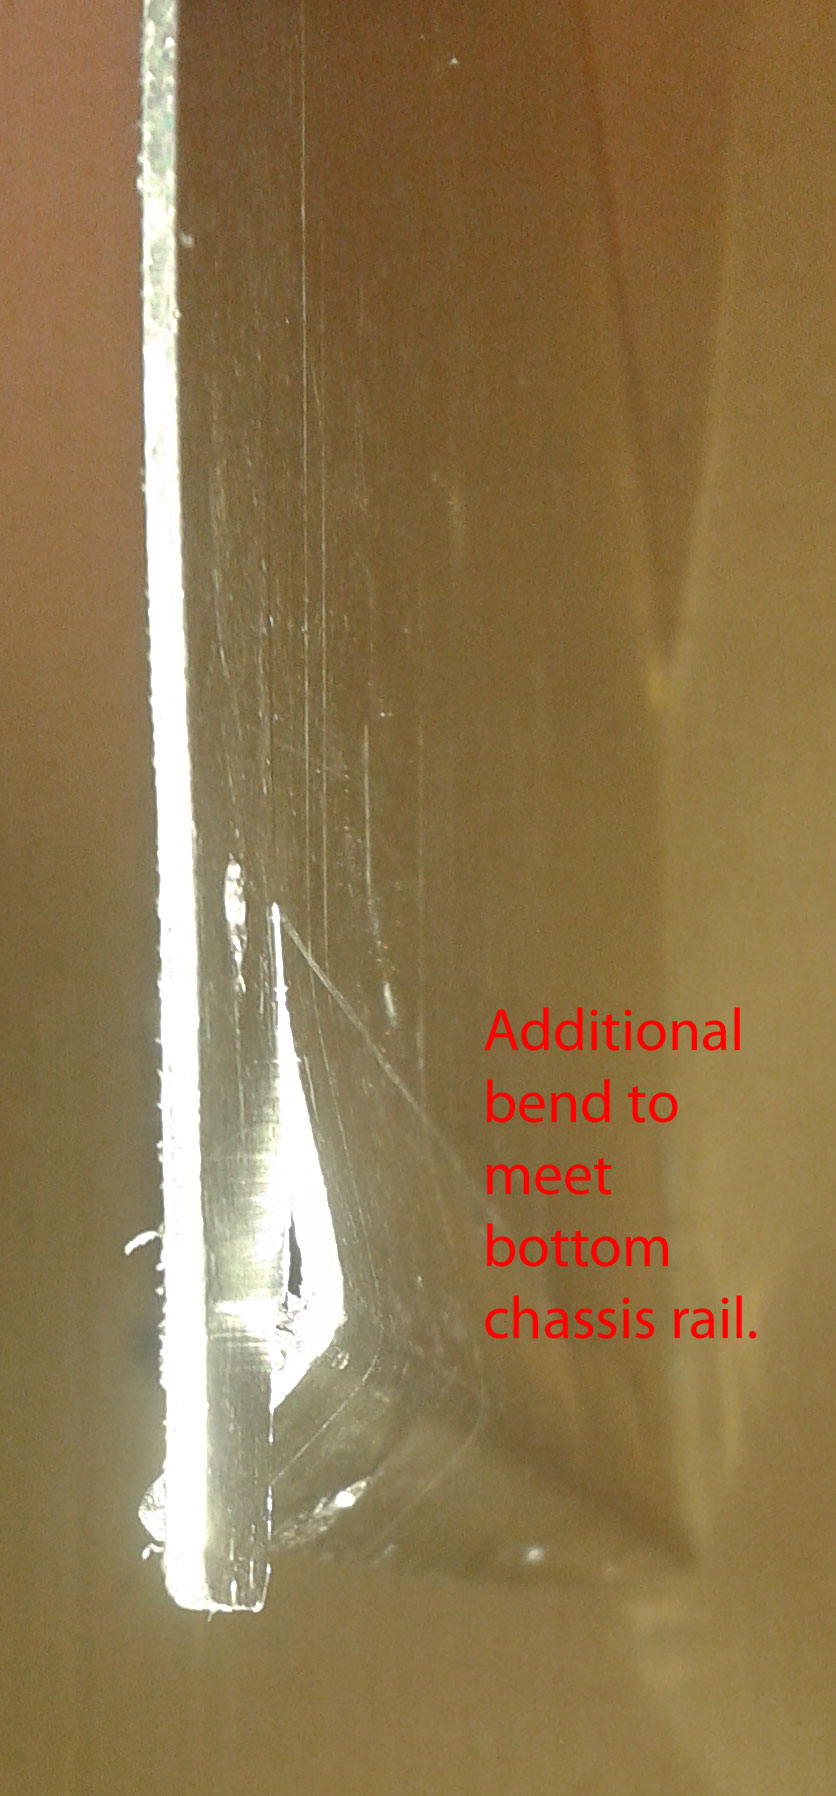 Centre panel (I didn't have a large enough piece of ally sheet left from the floor and had to acquire some more):- 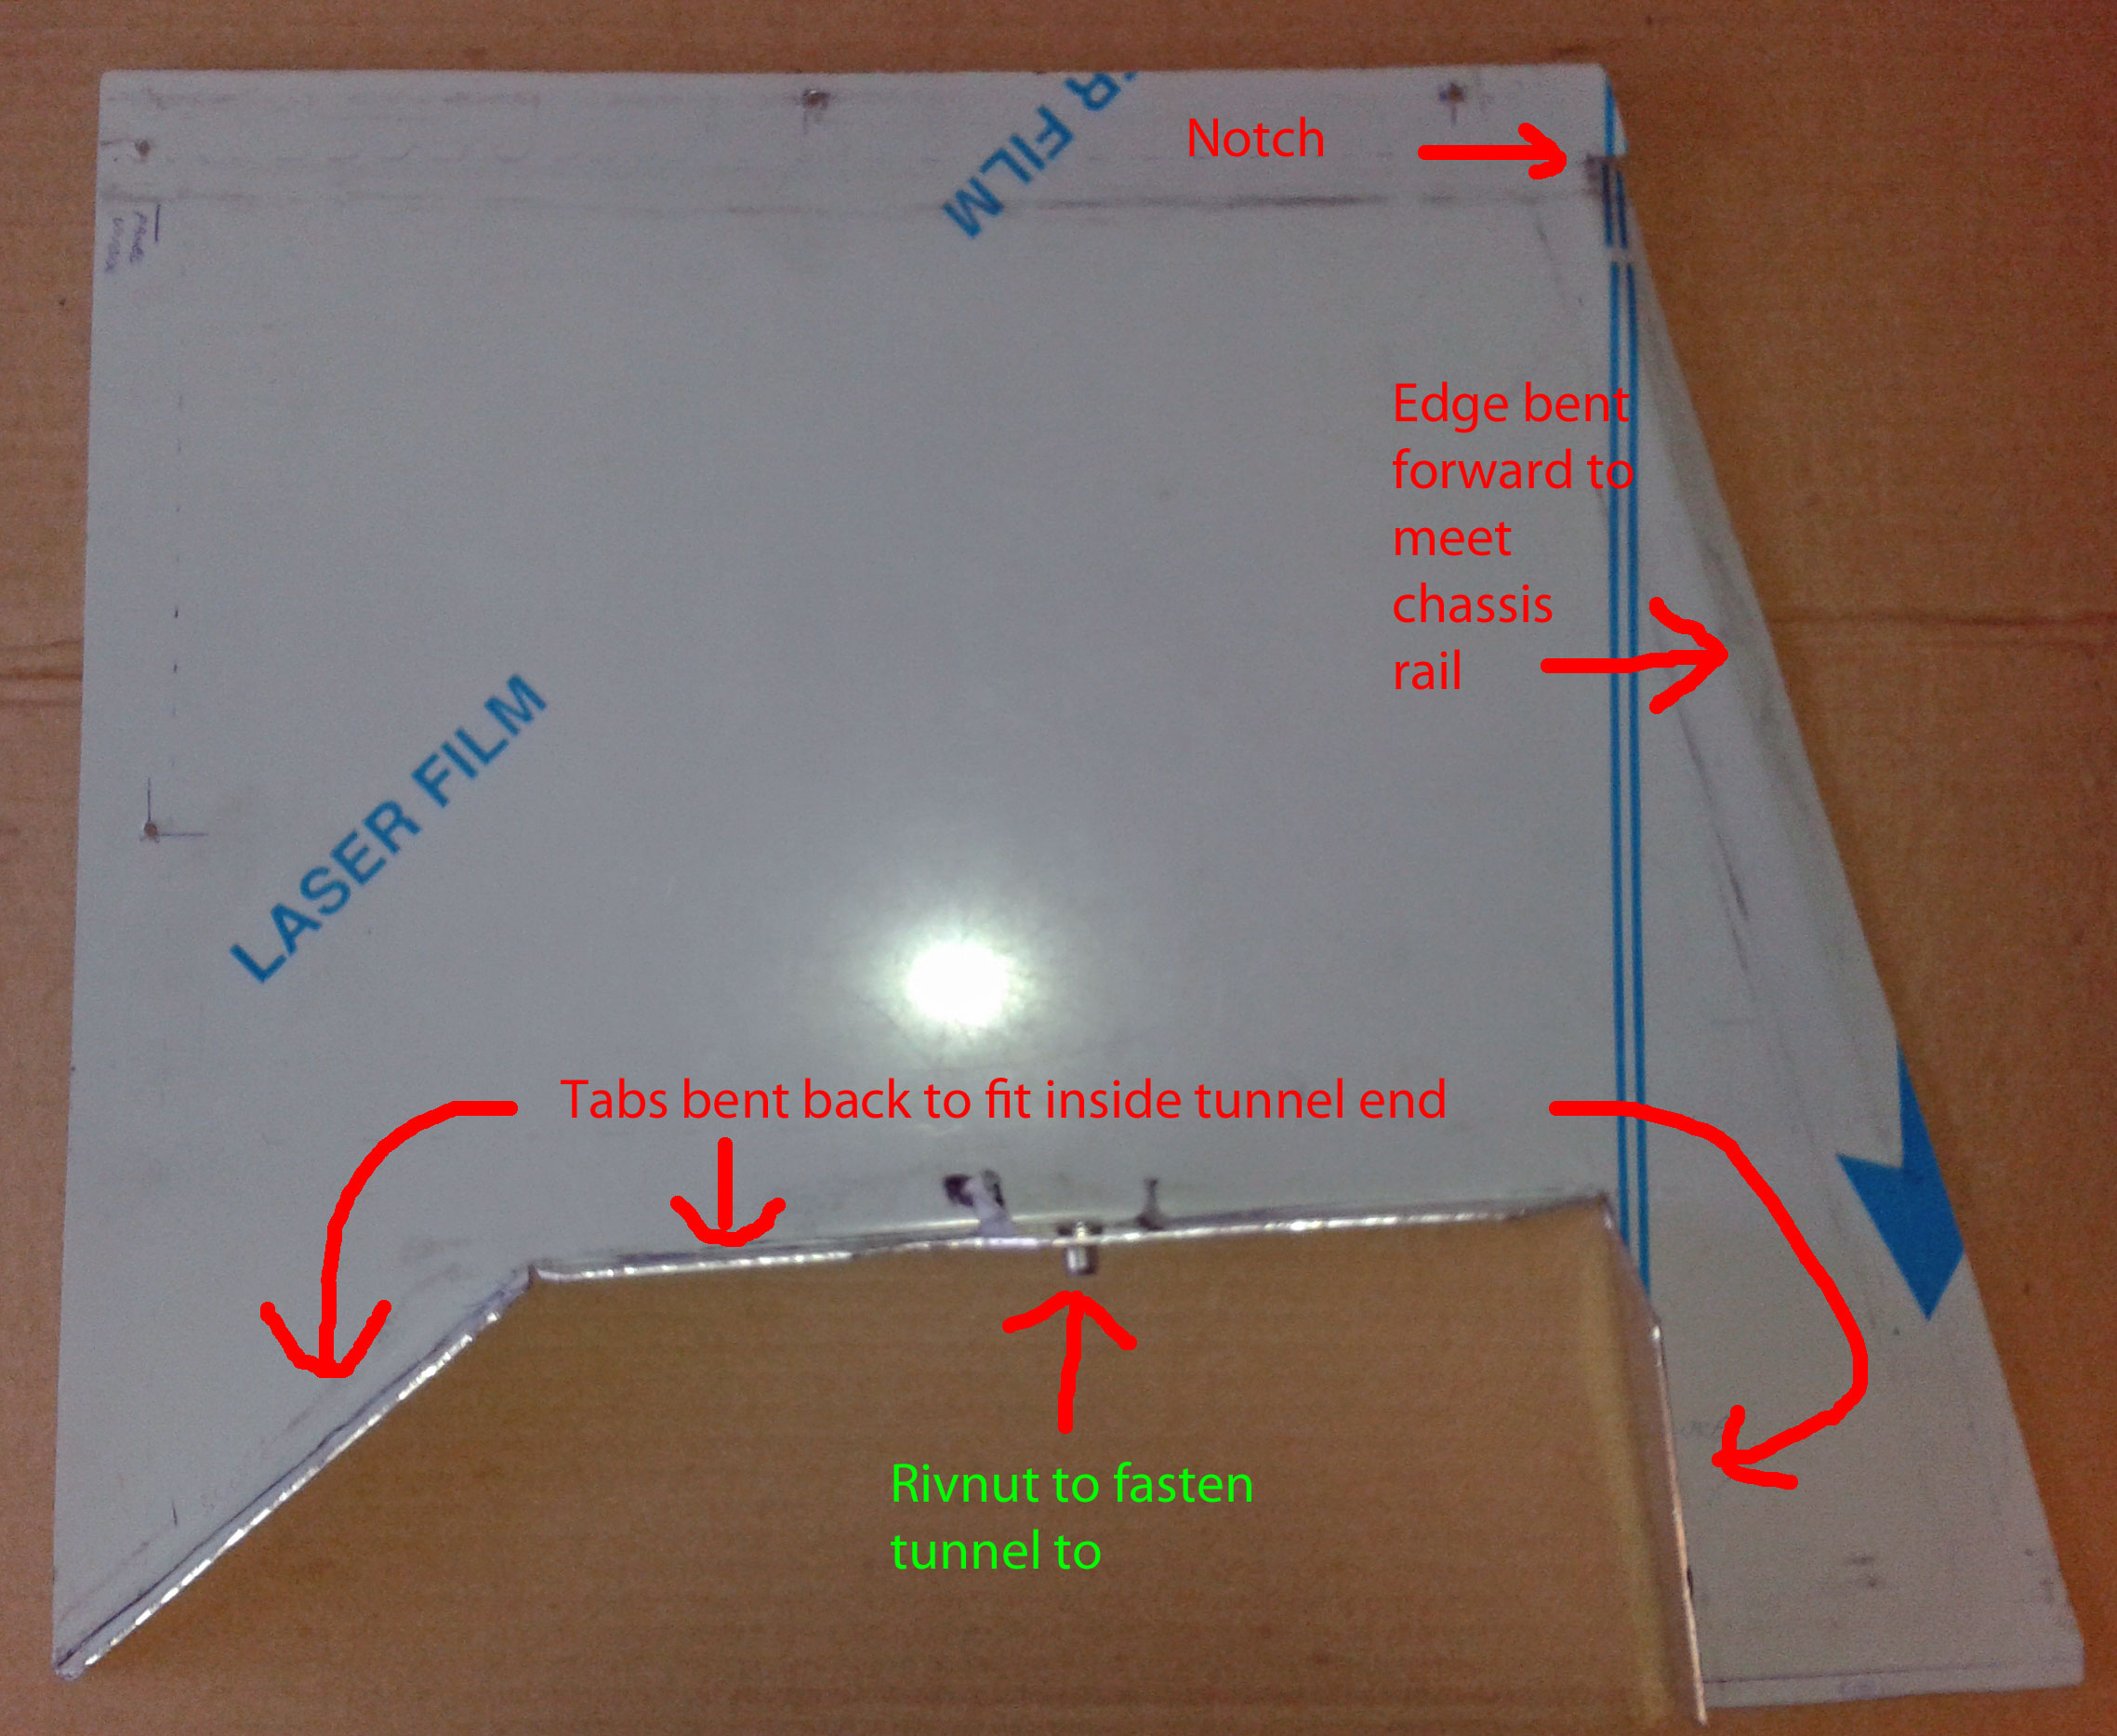 with tabs to fit inside the tunnel... 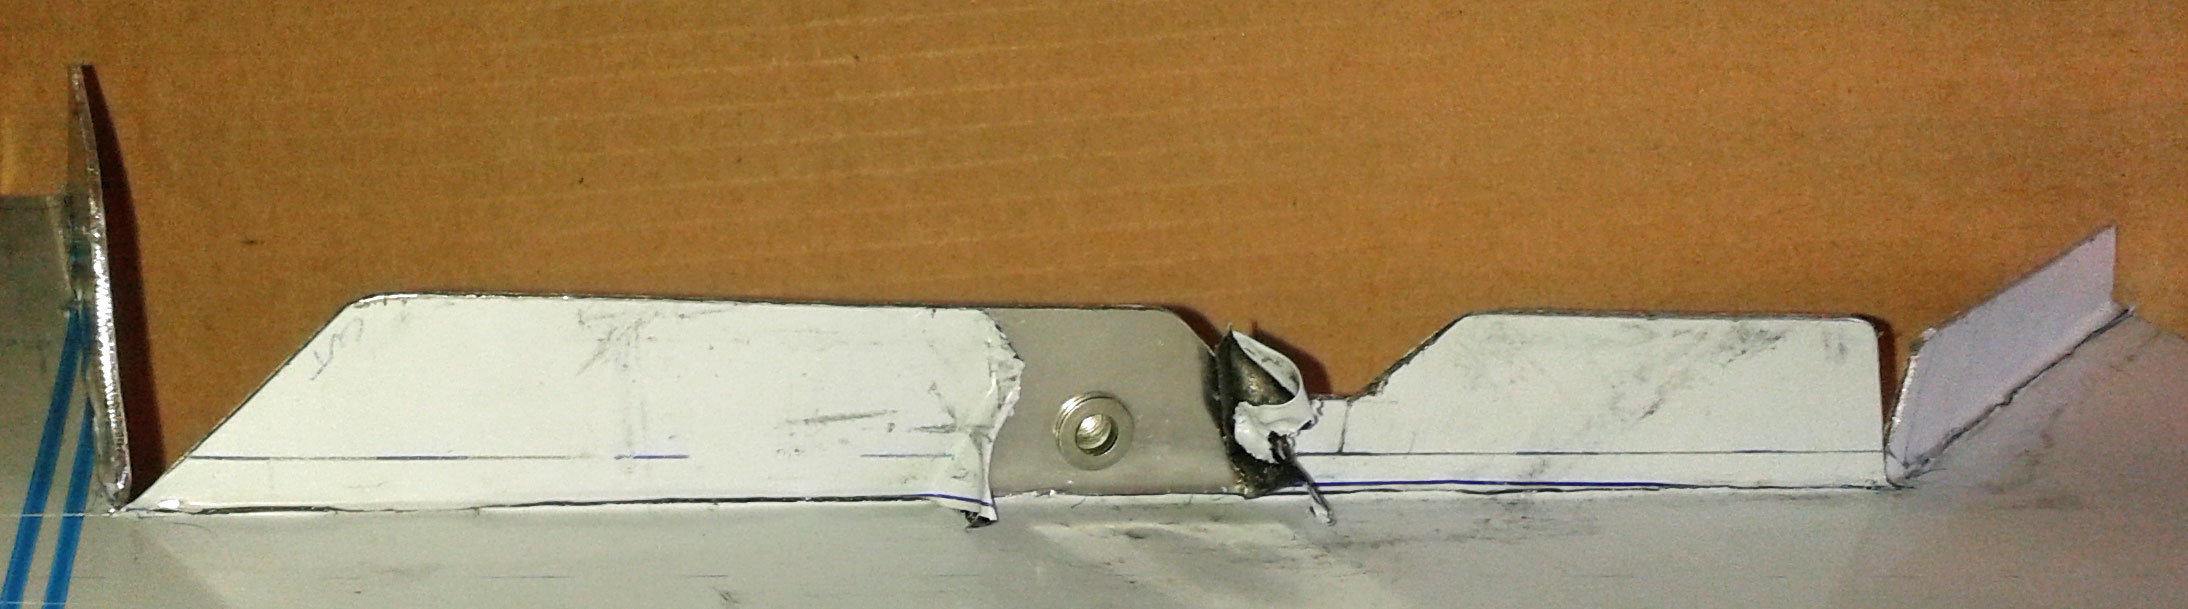 The tunnel is barely long enough to avoid gaps at rear and front... 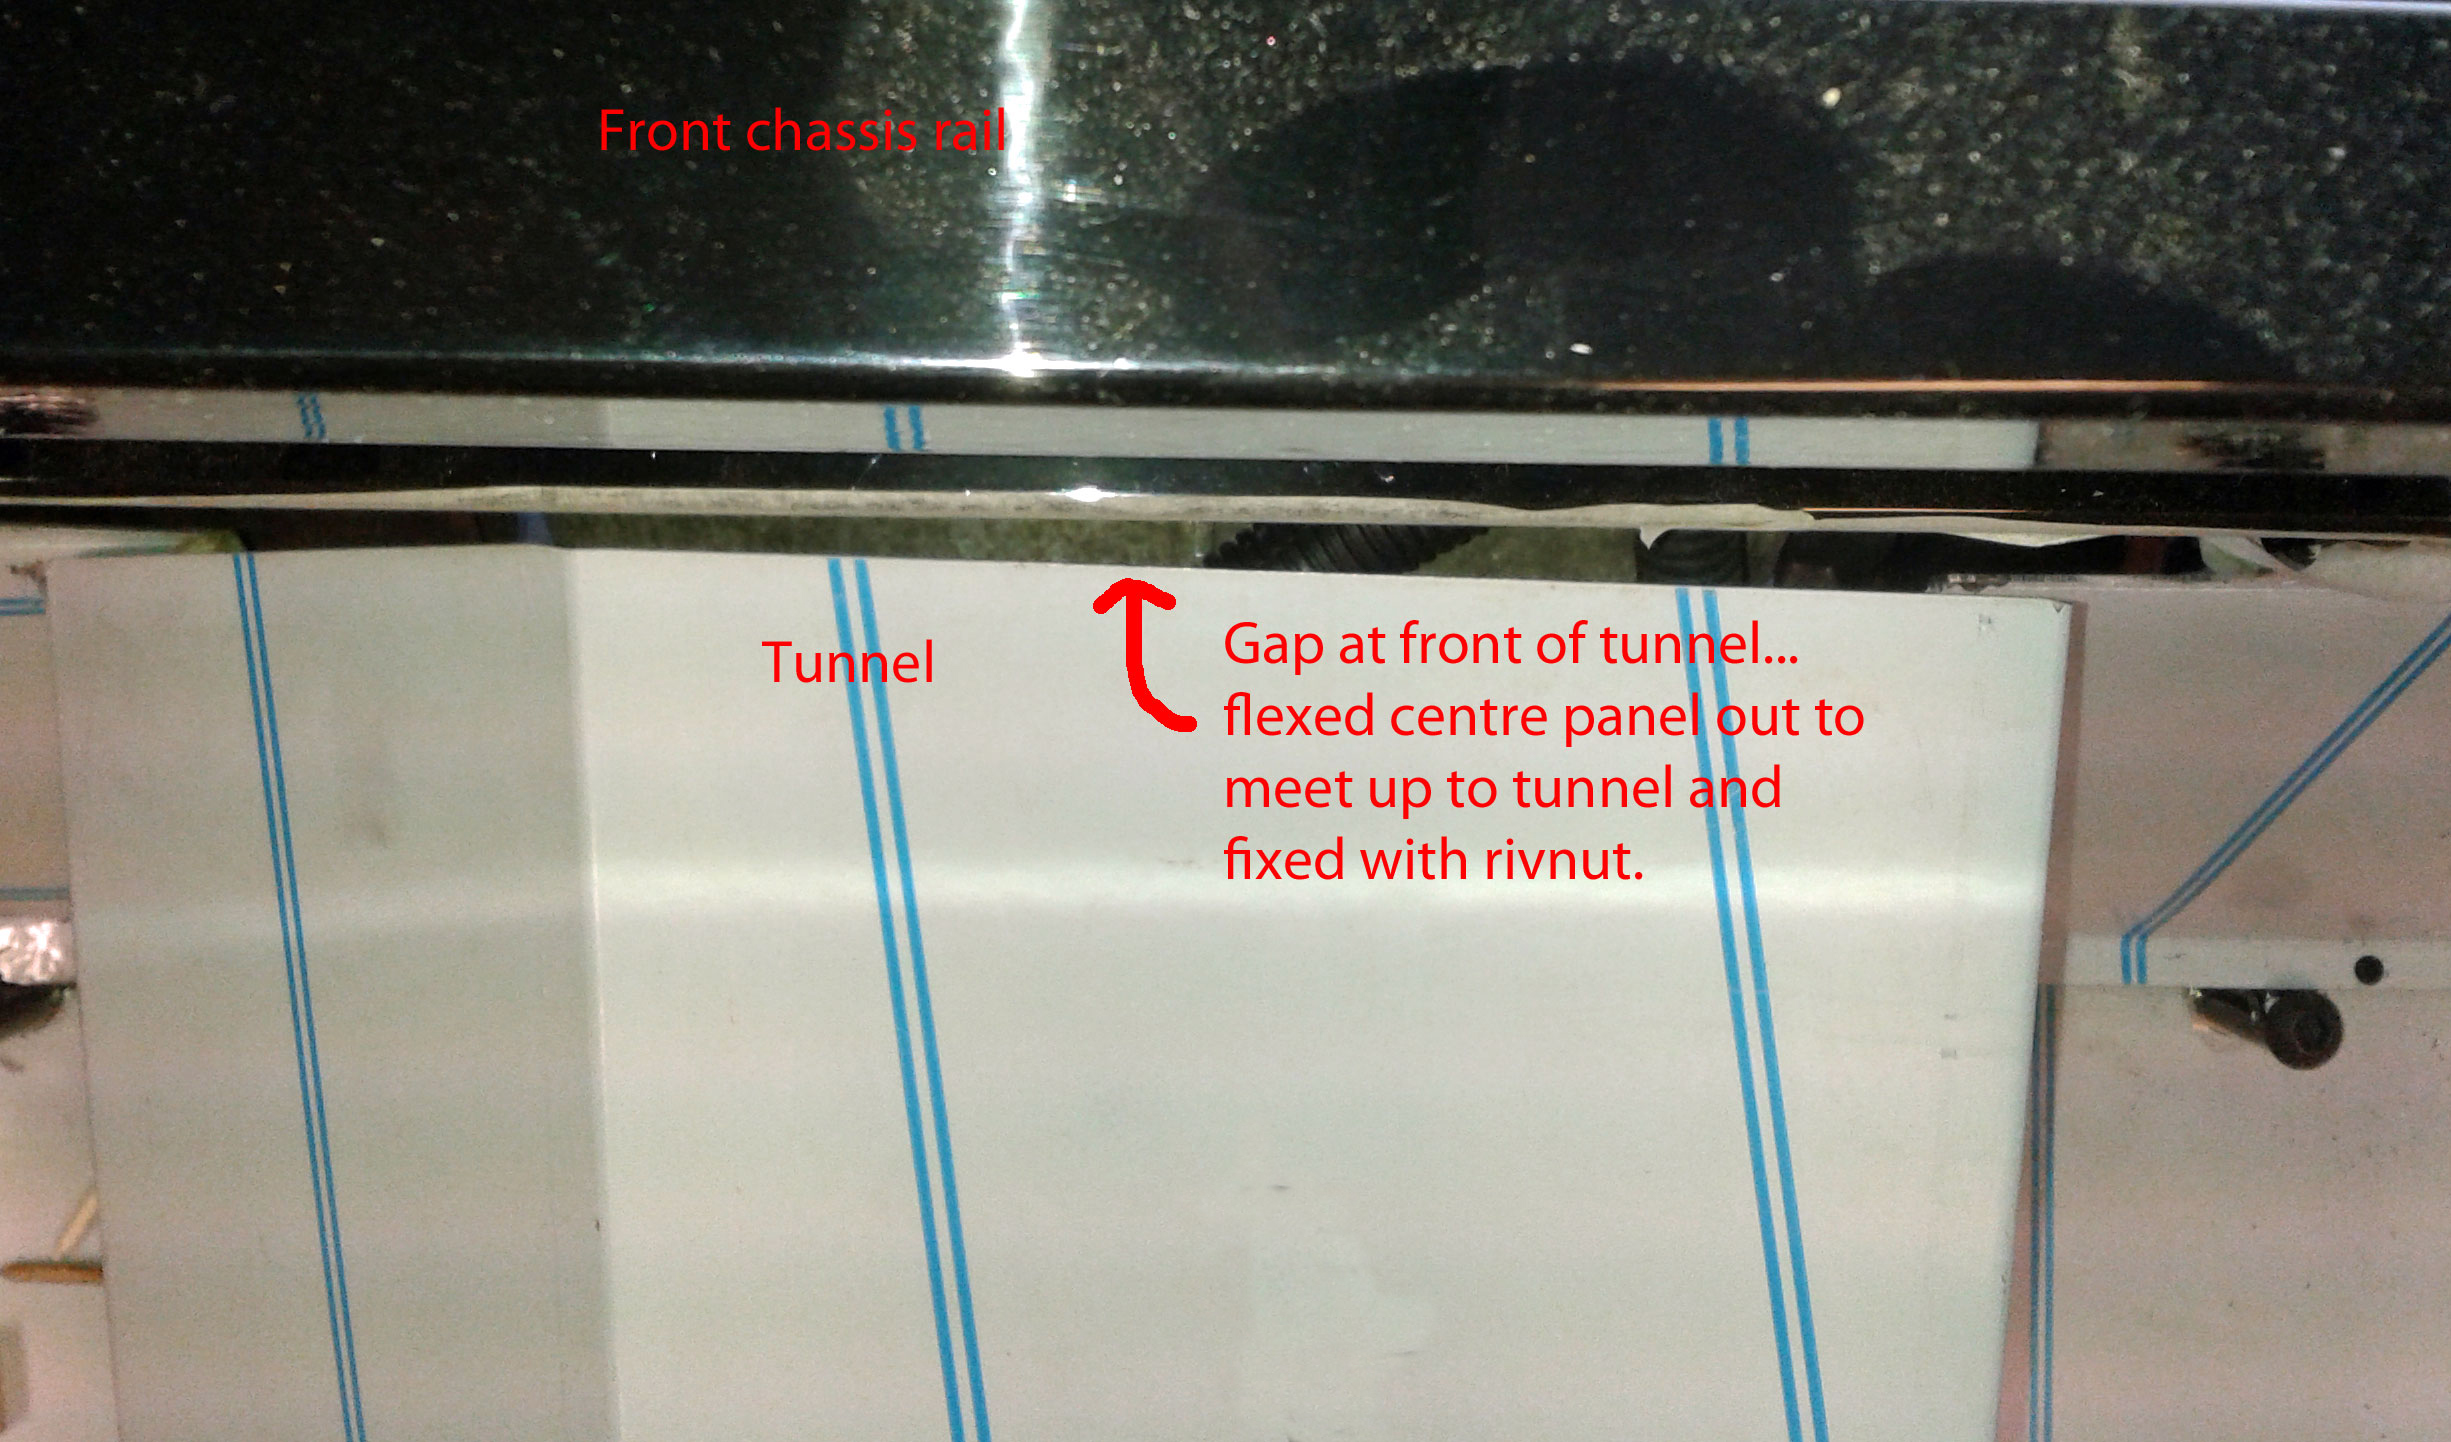 ... but the tabs can be used to flex the panels to tighten the gap. So now I just have the issue of closing this gap at the meeting of the permanent & ally tunnels:- 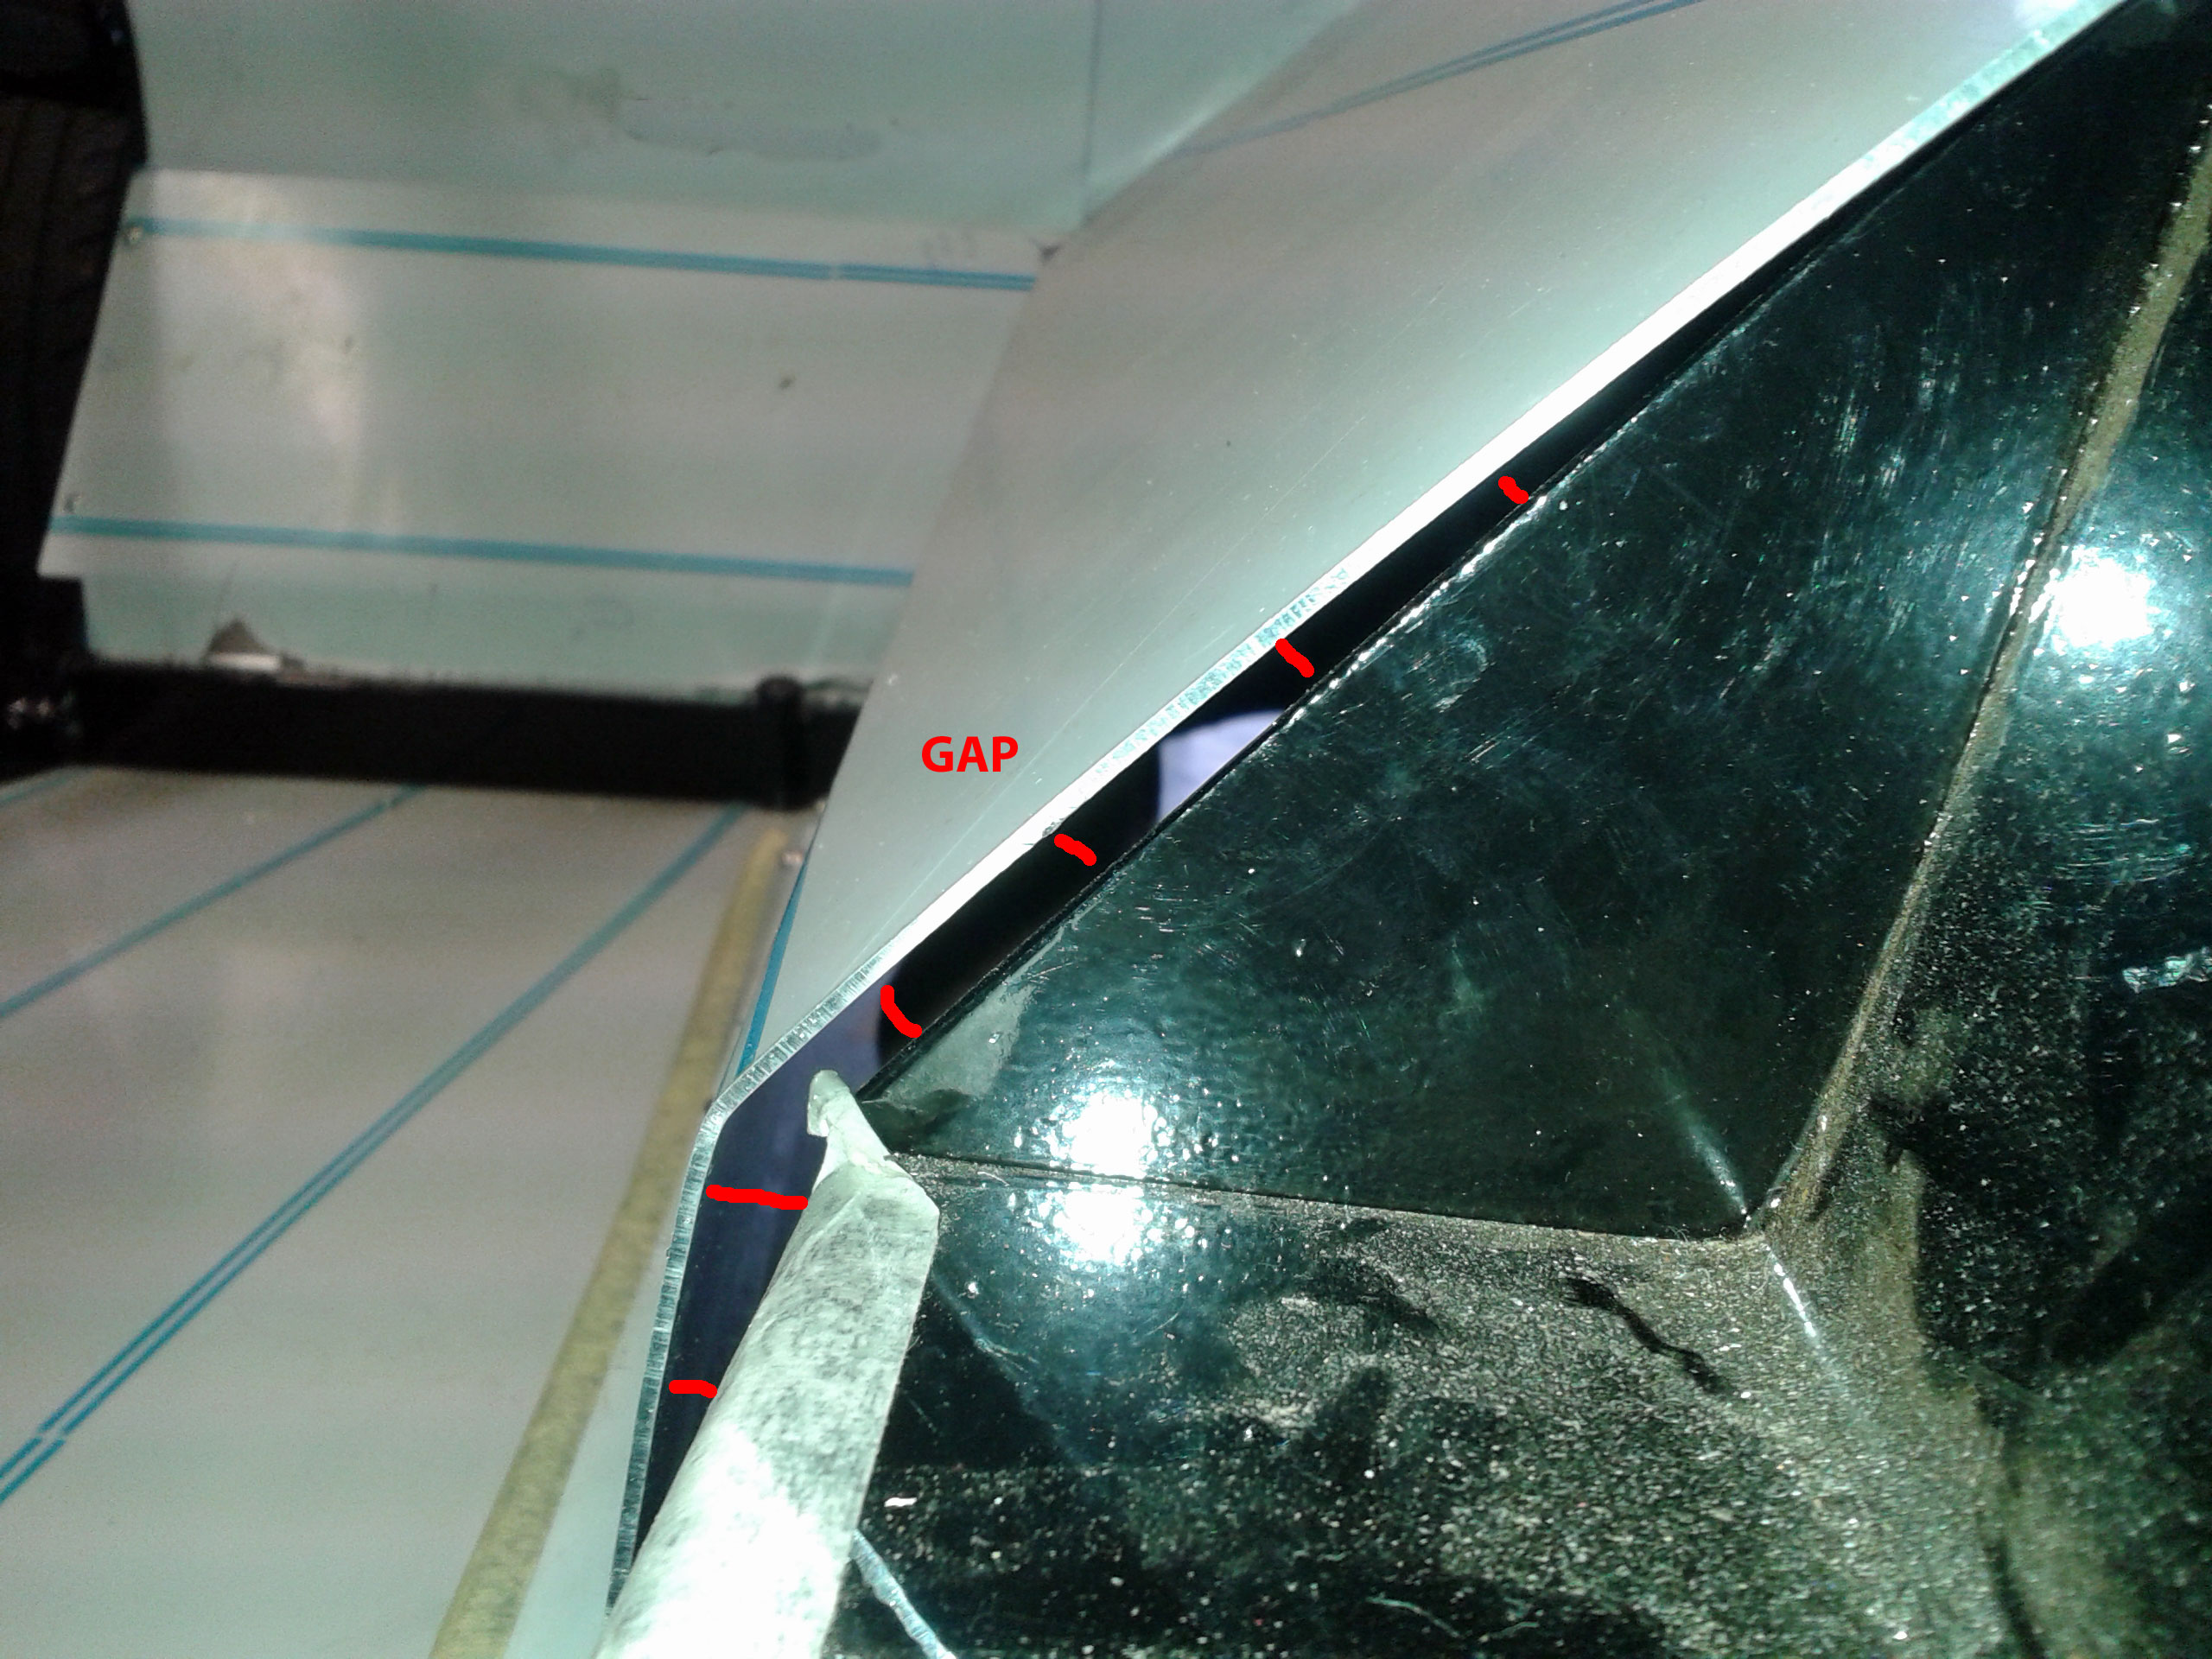 I'm thinking about using an MX5 rubber gear lever gaiter (just because I have one). It would need cutting down a lot but might just work. I'll have to see if there's a thread that's gone down this route...  |
|
|
|
Post by Toed64 on Jun 17, 2015 22:14:50 GMT
My MX5 gaiter fits nicely without cutting. The base is steel, so it's possible to contour the edge over the nearside.
|
|
|
|
Post by miket on Jun 19, 2015 21:49:23 GMT
Thanks - I was worried that it might look a bit odd like that, but I've done the bend, prepped some rivnuts and I'm happy with the result. Fits my basic/spartan theme.
Also started making an insert to block off the gap at the back of the ally tunnel. It's not like it ever rains in Yorkshire, but a gap might let too much heat in. Ahem.
|
|
|
|
Post by miket on Jun 22, 2015 17:30:01 GMT
Today just a bit of wrapping & laying out the wiring loom for the rear lights. The drip tray sides came in handy for fastening p-clips to.
It's hard to know how best to leave enough slack in the wires for uncoupling them when removing the cover versus having too much unsupported wiring. I guess it'll become clearer when I come to fit the various rear lights and am able to experiment.
|
|
|
|
Post by jgilbert on Jun 22, 2015 20:42:10 GMT
I would recommend some self adhesives cable tie bases and reusable cable ties. Both from ebay. The bases are really good and save drilling. The reusable cable ties mean that you can always remove the loom and add/remove cables.
You almost wont get it right the first time. Trial and error works well.
|
|
|
|
Post by miket on Jun 24, 2015 12:17:51 GMT
Thanks - cable tie bases duly applied to drip tray and with reusable ties. If they're going in to a place with limited access it's worth putting the tie in the base first! I've also used a few on the tank - replacing the adhesive pad with epoxy resin. Two earths fastened down. 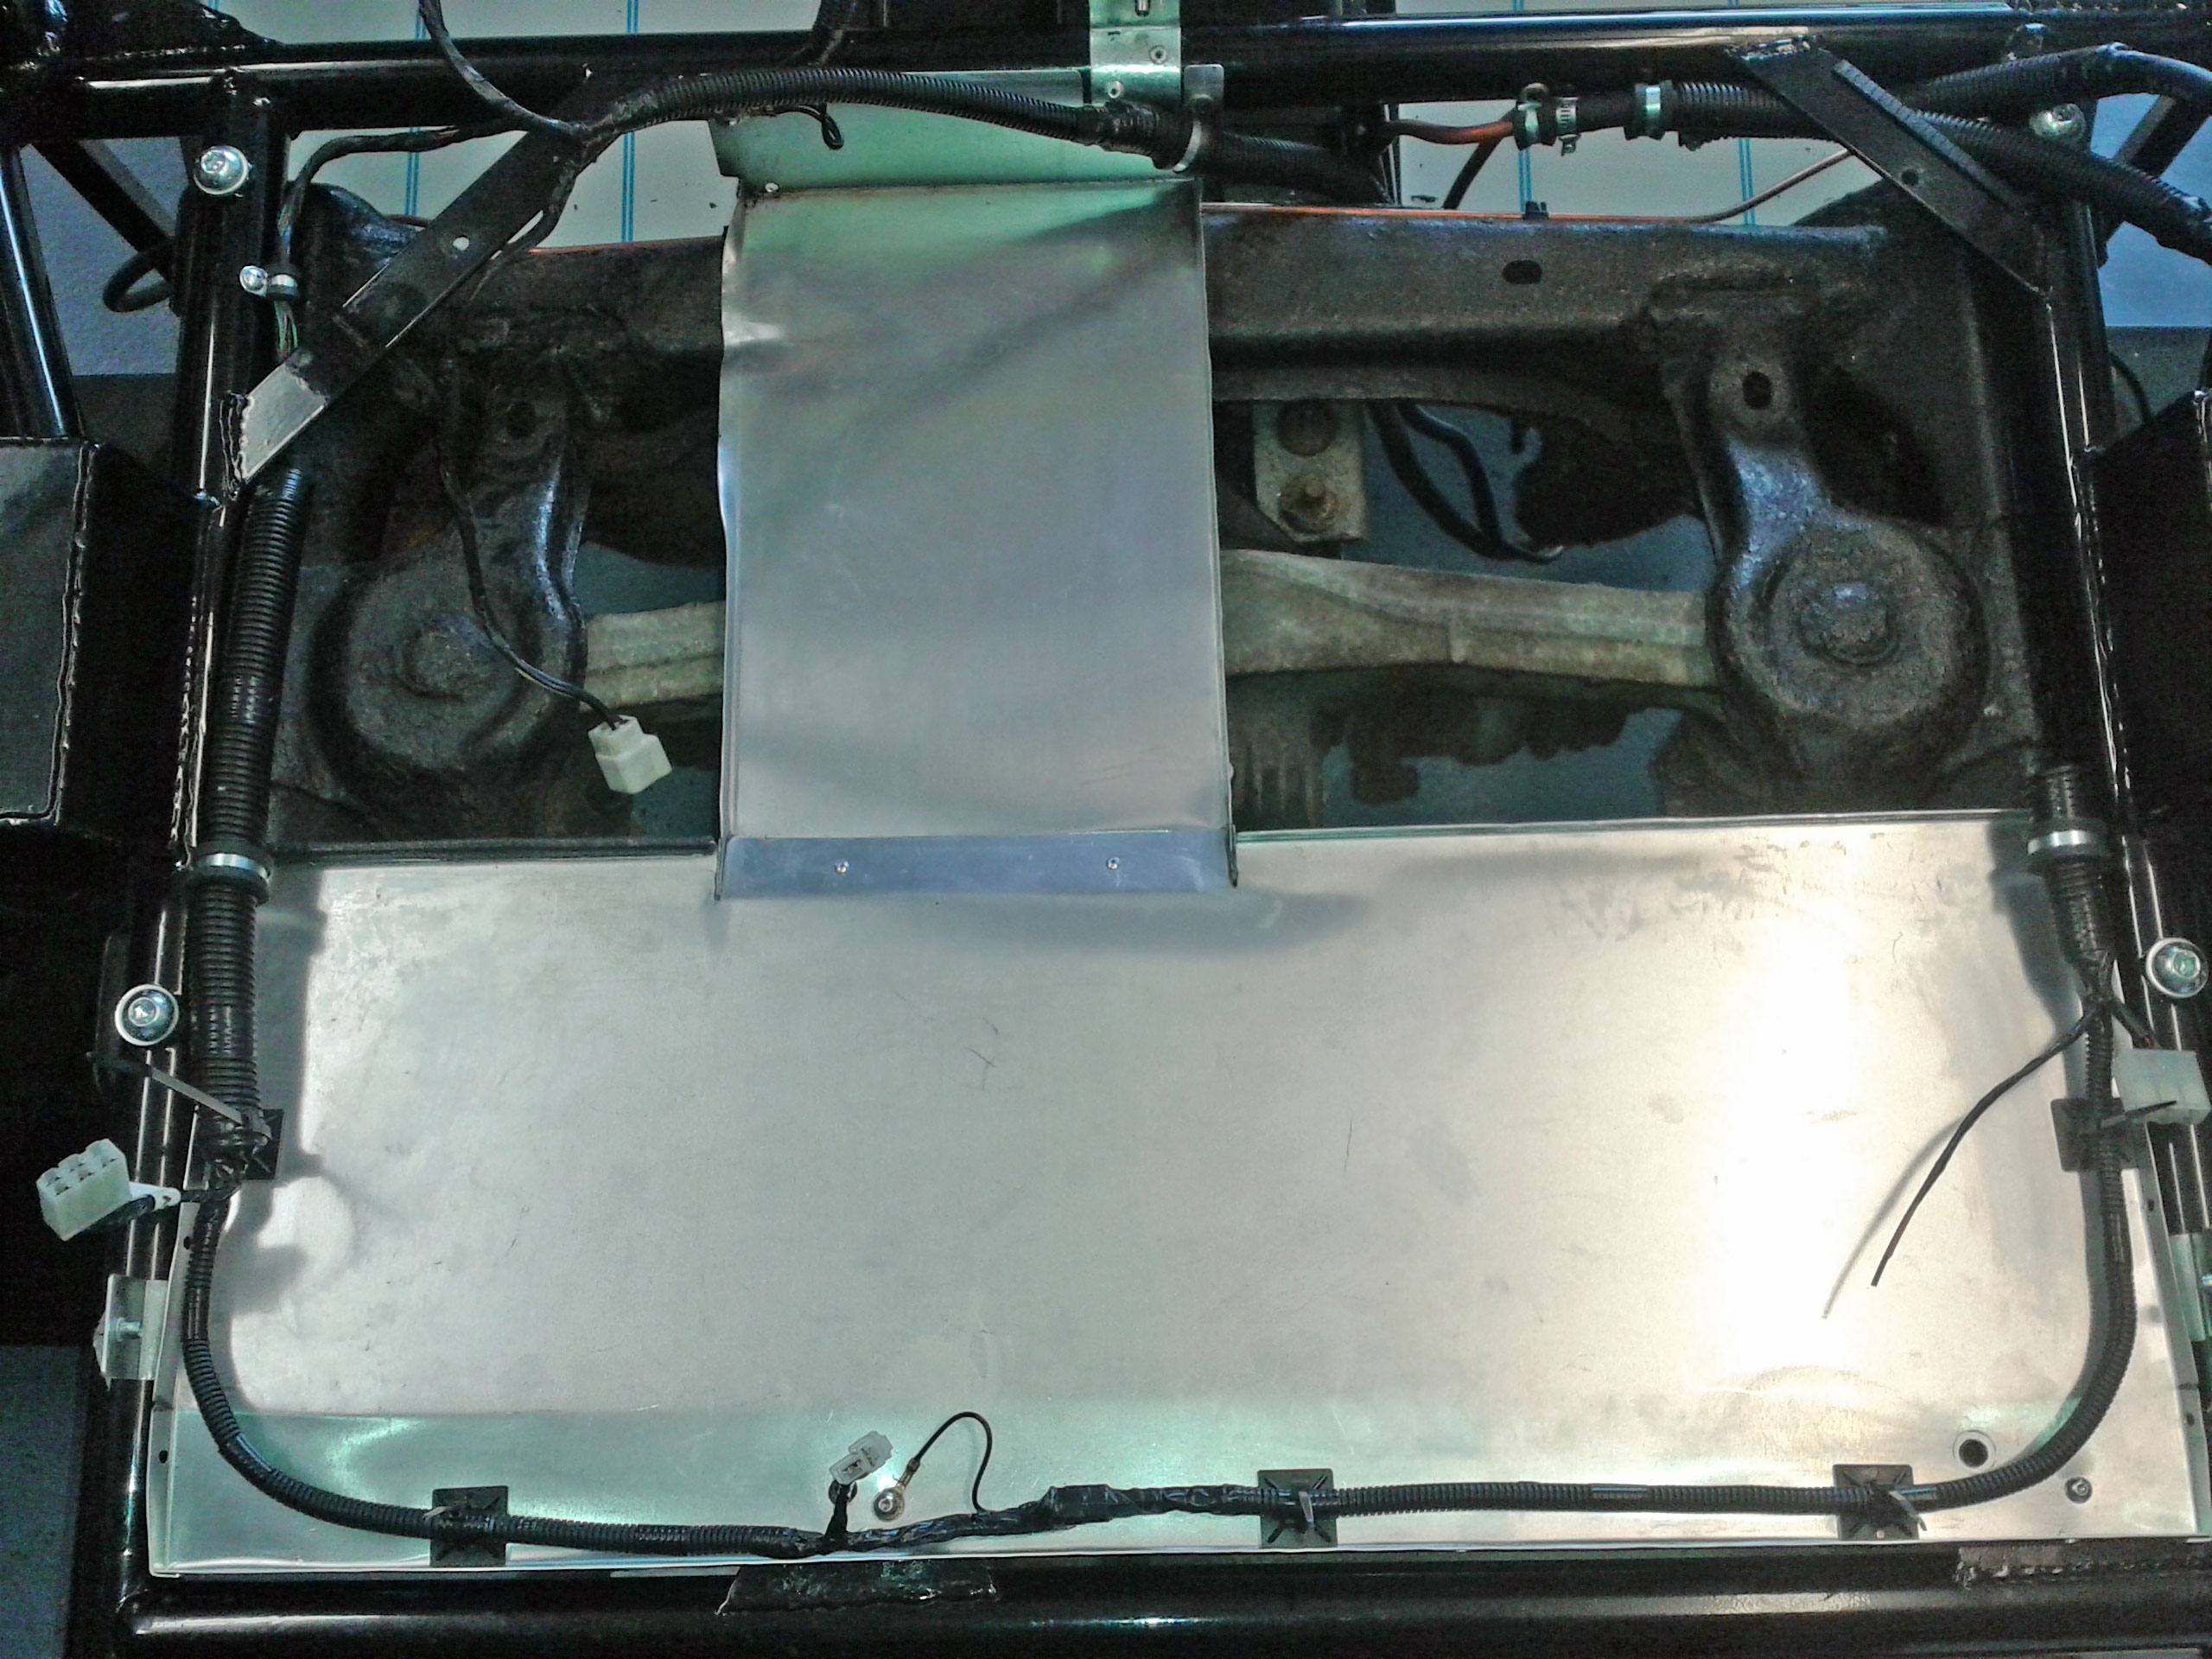 Next job is to finish off the tank with some edging and fasten on the hoses & wiring ... nearly feels like the back's finished ... apart from the lights onto the cover. Moving forward a little I need to decide what to do with the battery cables... 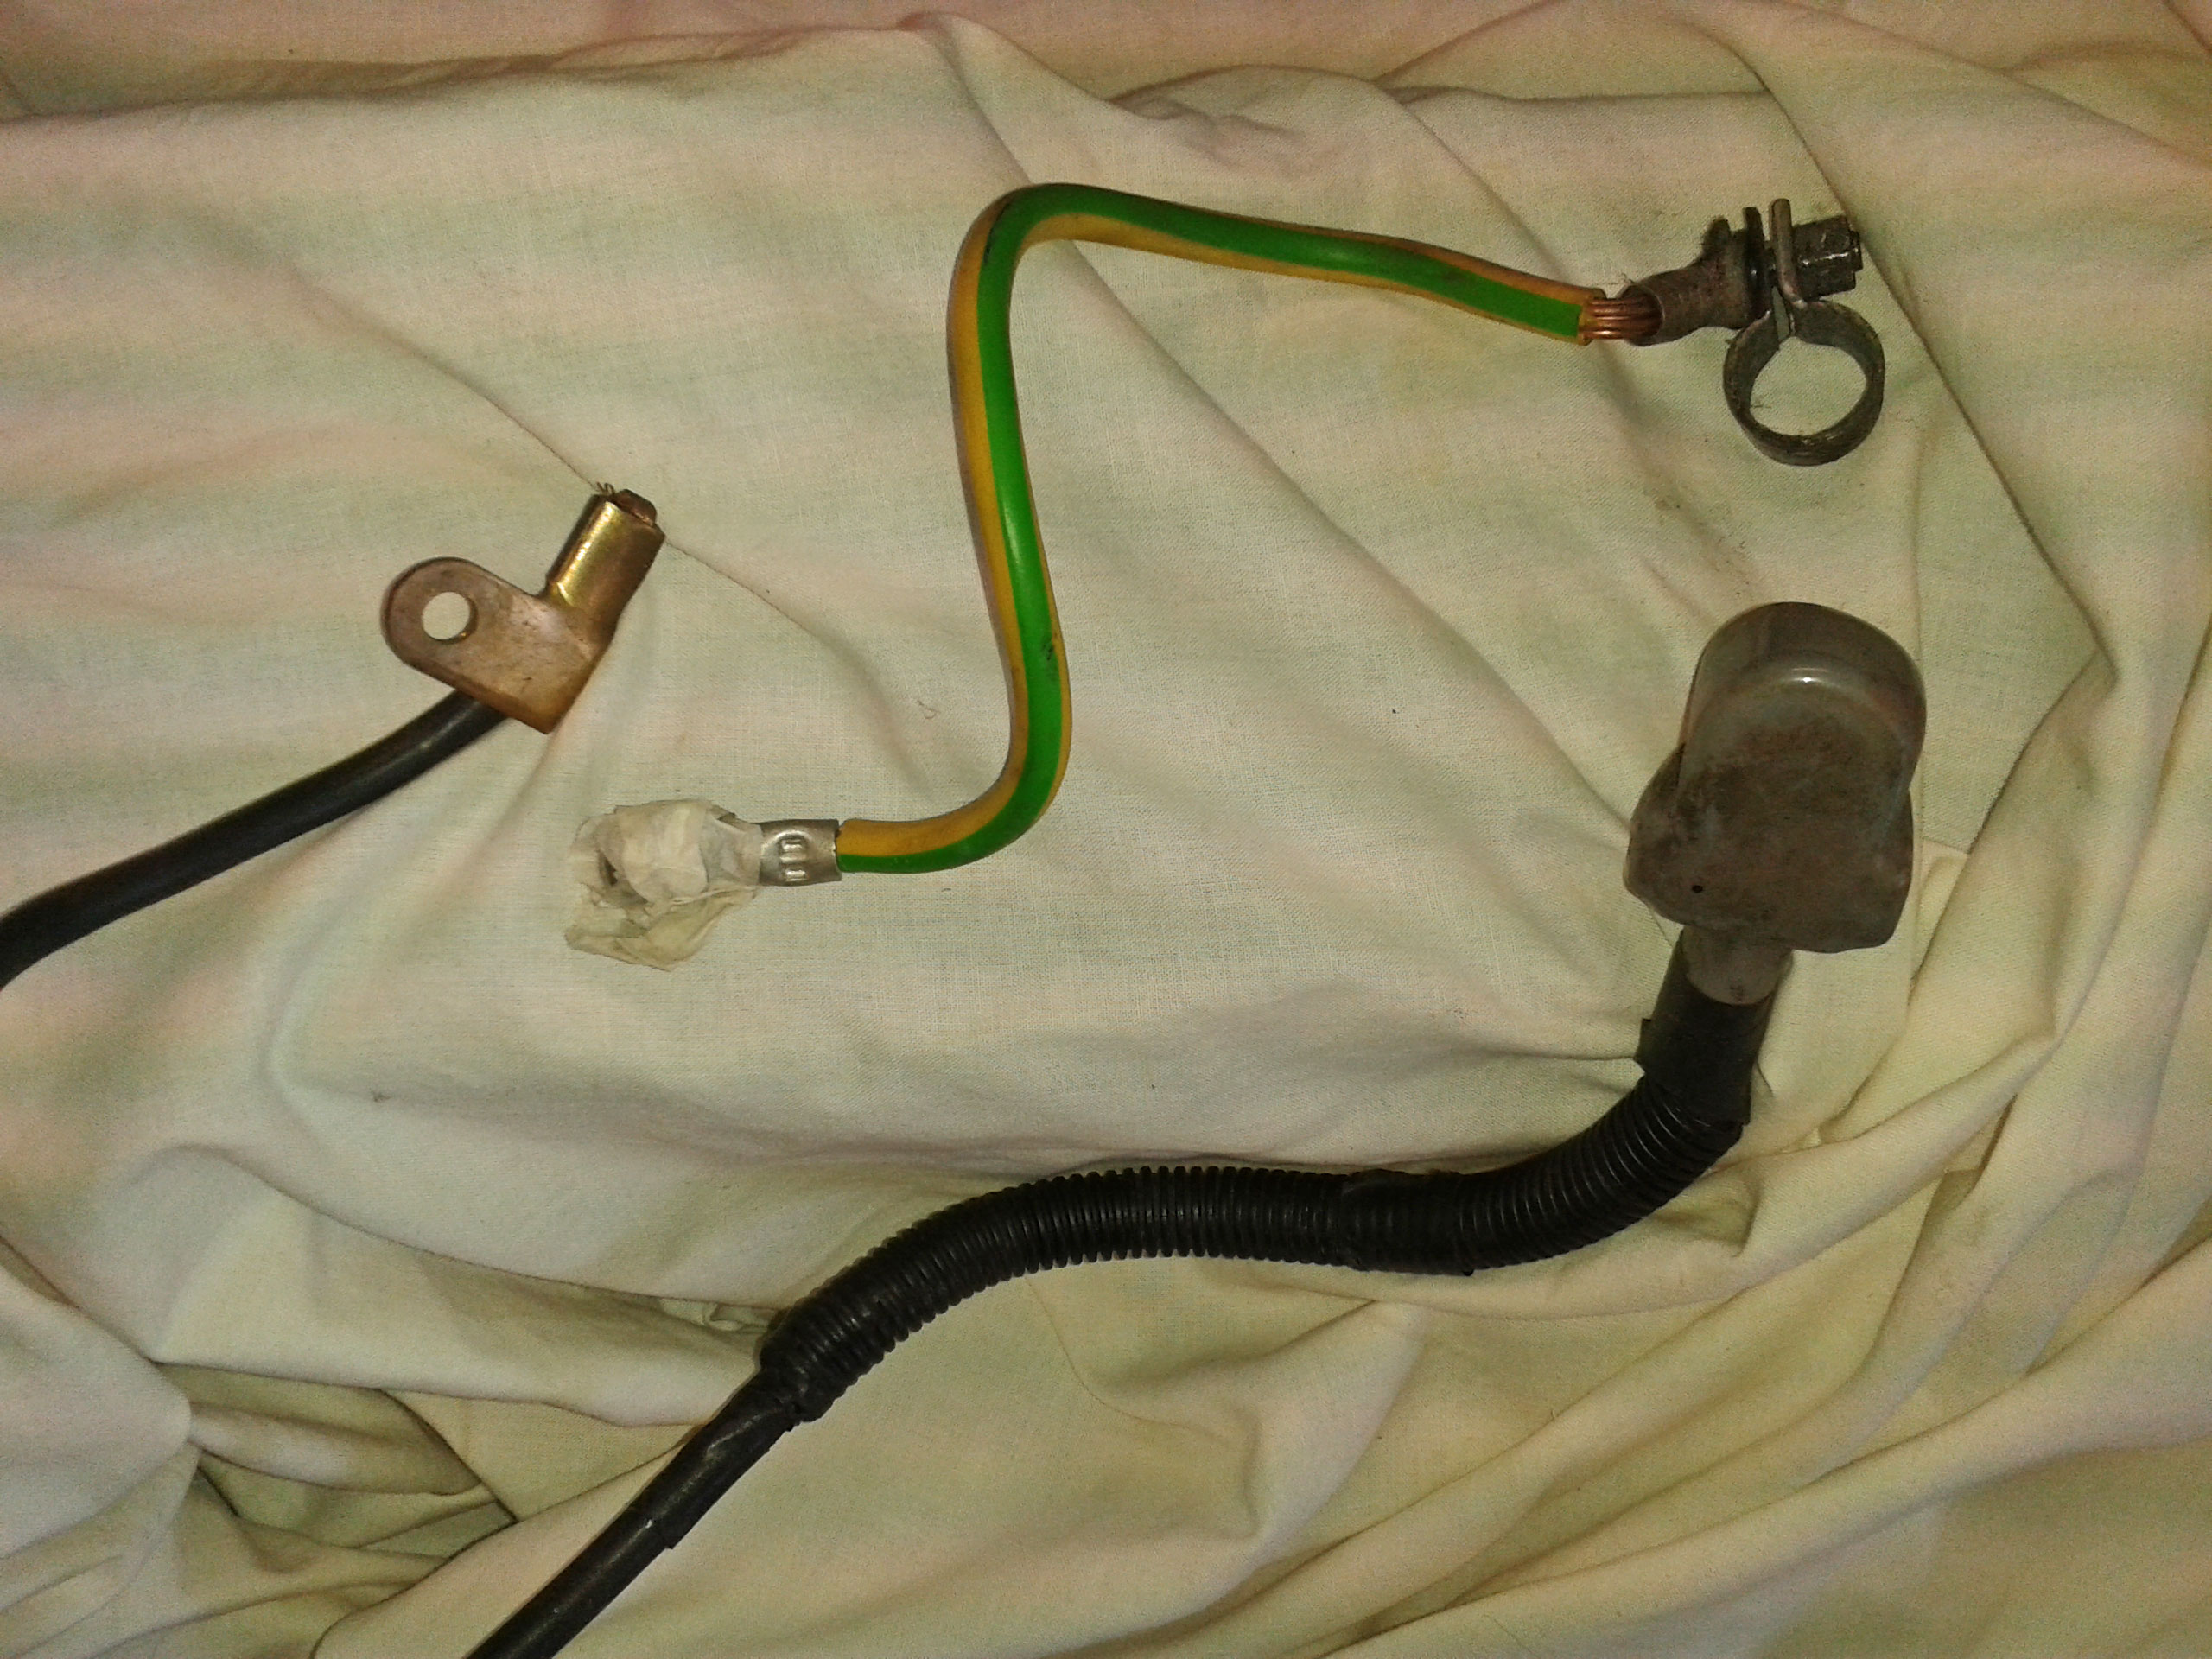 I.e. there's a lot of excess cable and I need to decide where best to pass it thru to a battery behind the driver's seat. Need to find out whether people normally go through the rear bulkhead and what they do with several inches of excess thick cable. |
|
|
|
Post by mawdo81 on Jun 24, 2015 17:51:31 GMT
Why not behind passenger, to even up the weight distribution?
|
|
|
|
Post by Toed64 on Jun 24, 2015 23:01:58 GMT
I bought some new bolt-on battery terminals and cut off the excess cable.
I thought about mounting the battery on the passenger side, but I'm glad I didn't, because the space behind the passenger seat is easily accessed from the driver's seat and is consequently useful storage space.
|
|
|
|
Post by miket on Jun 25, 2015 16:43:28 GMT
Thanks guys - it's good to have options  Today I've done the keyhole surgery that is attaching the new fuel hoses to the rail - and I have the gouges on my forearms to prove it. I have to say it was less hassle than I'd expected. I now need to find out if I need to support the new fuel hoses somewhere between the rail and the copper pipe which terminates low down by the firewall. Also had a first look at the MEV supplied lights to start thinking about how to connect them. A bit of initial research means that I've found about red and blue spade connectors being for different wire gauges and them then coming in various spade sizes ... another completely new topic for me. I've not gone further yet but I guess that, roughly speaking, this means there must be an ampage at which cable sizes increase and so need blue connectors. ... the learning continues. |
|
|
|
Post by miket on Jun 27, 2015 16:45:31 GMT
Working on finalising the fuel system. Decided to initially run with the donor's filter (re. separate thread on filter sizes) and then test out the in-line one I bought to see it's performing the same.
Decided that whilst I'd not seen anyone else ever reference supporting the fuel hoses in the engine bay it's got to be better than not doing - so I'll hang a bracket off one of the existing bolts.
Did some research in to what to do with the donor tank's vent outlet that originally went to the charcoal cannister. It seems some people have blocked it, others left it open and the rest not mentioned it. I had a read around t'internet and some MX5 forums refer to the donor filler cap venting inwards but not outwards, and hence pressure build up as fuel warms on hotter days - not a big problem in northern UK perhaps.
Leaving it open to vent means potentially fumes in the garage (where the gas boiler's pilot light lives!). I could link the vent back up to the charcoal cannister passively (i.e. not being purged), but I'm not sure if that only addresses the smell of the vapours rather than the actual vapours.
Anyway, doesn't need resolving for a while yet and I see what people at Mog'ers meet have done.
|
|
|
|
Post by miket on Jun 29, 2015 19:15:01 GMT
Steady progress:-
Fuel system ready to run ... now I "just" need cooling, electrics ....etc etc. Radiator next I think.
Also knocked up a basic tray for the excess loom, relays etc so I can start to wrestle the loom in to place.
I need to see if there's a thread that's covered whether there are any unexpected/bizarre wiring connections that need to be in place for the engine to run. I.e. Connections that a novice wouldn't have guessed at.
|
|
|
|
Post by rauf on Jul 1, 2015 3:25:08 GMT
Moving forward a little I need to decide what to do with the battery cables...  I.e. there's a lot of excess cable and I need to decide where best to pass it thru to a battery behind the driver's seat. Need to find out whether people normally go through the rear bulkhead and what they do with several inches of excess thick cable. I put the battery under the passenger  :  |
|


