trident
Senior
   Improvise, Adapt and Overcome
Posts: 629
|
Post by trident on Sept 1, 2014 16:09:57 GMT
|
|
trident
Senior
   Improvise, Adapt and Overcome
Posts: 629
|
Post by trident on Sept 4, 2014 17:13:52 GMT
So the re build has started and so far so good. Pedals and steering fitting back in like a dream. It does pay, in my view, to build the car in bare metal first and then reassemble everything after the chassis has been powder coated as the final finish is not damaged in anyway. 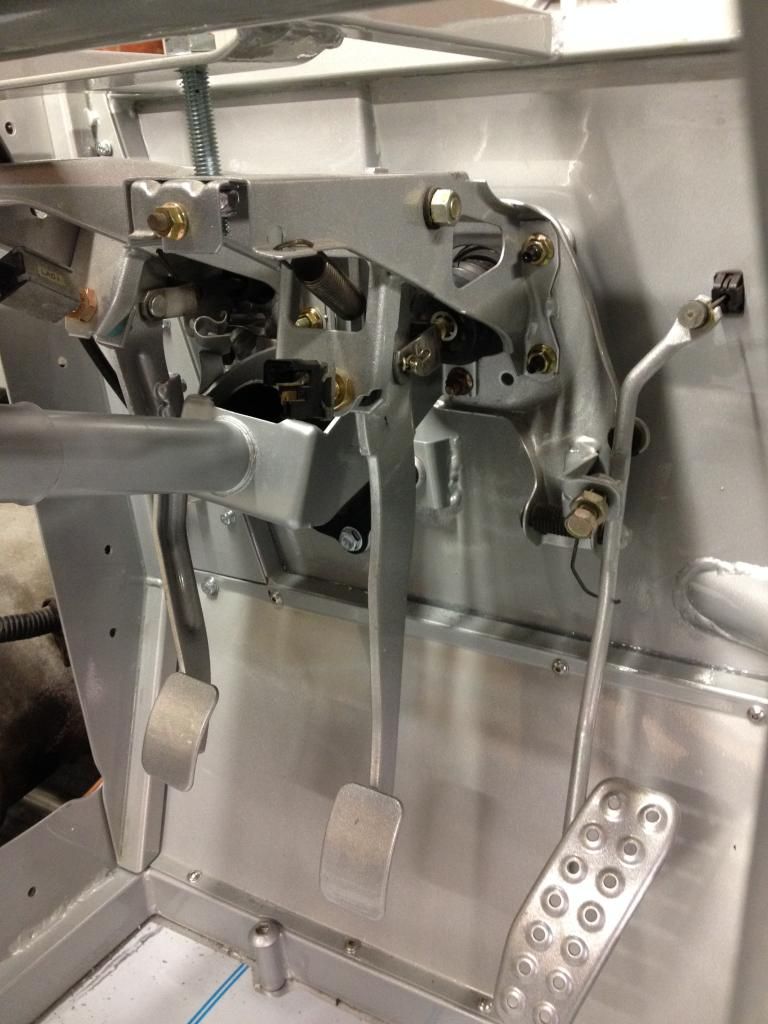 Unlike some I didn't adjust the brake / accelerator pedal units in any way. The bolt tubes on the rear were left as standard which meant the brake servo just bolted straight against the bulk head as per the standard MX5.  With the clutch unit I just added a couple of washers between the inside of the bulkhead and the unit to make it sit flush. I also added an extra bolt with a small spacer so that I could bolt the steering wheel bracket up. The final alteration I made was borrowed from jgilbert. I added a bolt to act as a stopper so the clutch pedal didn't hit the chassis when it was pressed down. Cheers for the idea John. Photo's are great as I have just noticed that I missed a bolt on the steering when rubber mount and the plastic cover.  The steering wheel and dash all lined up as it should following the re fit. A coupe more jobs ticked off … a million and 1 to go !! 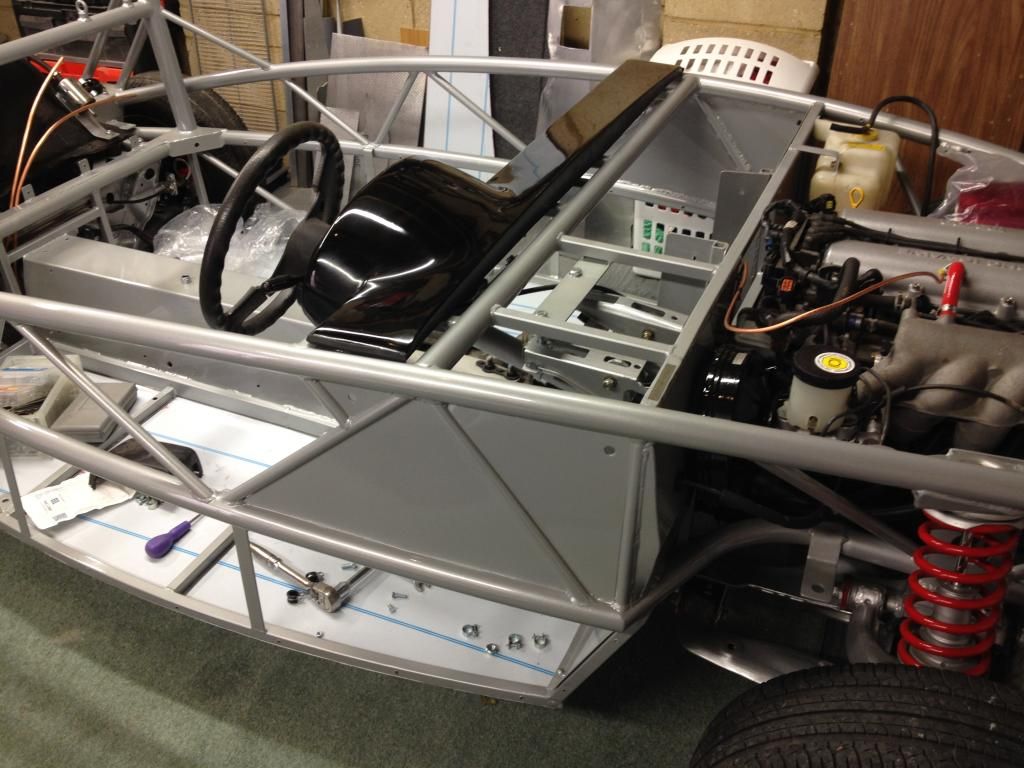 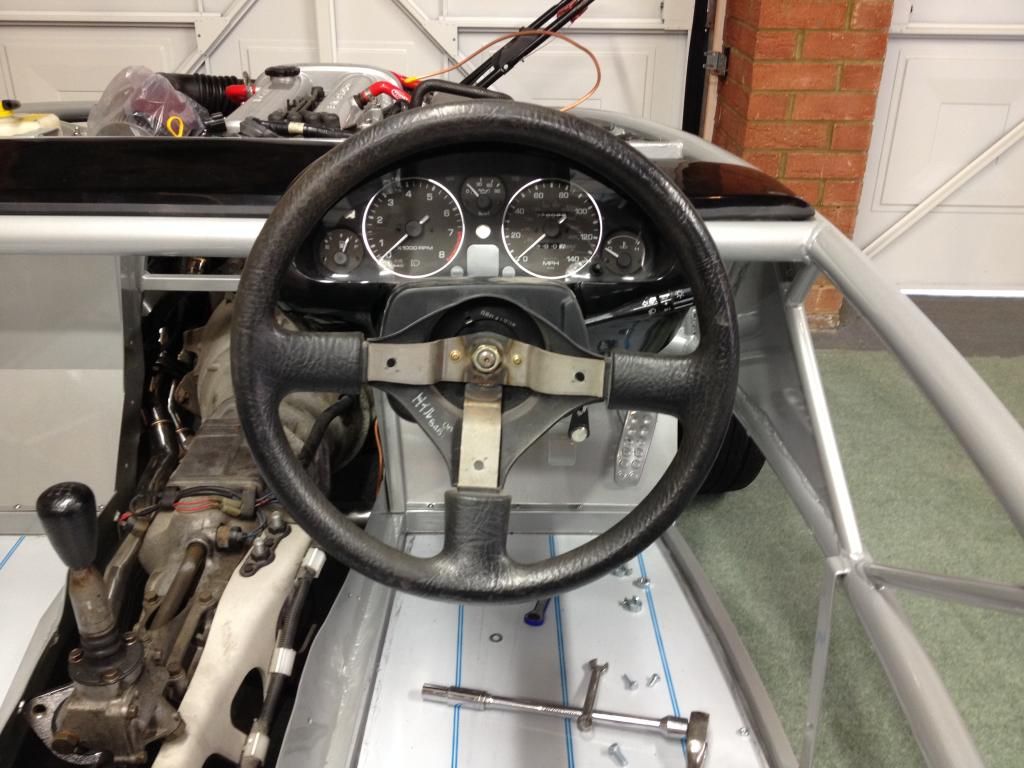 |
|
|
|
Post by gwnwar on Sept 4, 2014 17:30:00 GMT
The allen head bolt is that the one you added..looks like it hits the side of the clutch pedal.. might jam it when bushings wear in pedal pivot.. If you could weld a thick washer to a bolt so it would touch the front of pedal..
|
|
|
|
Post by jgilbert on Sept 4, 2014 19:14:17 GMT
The allen head bolt is that the one you added..looks like it hits the side of the clutch pedal.. might jam it when bushings wear in pedal pivot.. If you could weld a thick washer to a bolt so it would touch the front of pedal.. I can answer your question George. It's an optical illusion, the Allen bolt is attached to the pedal so actually travels with the pedal and contacts on the rubber bump stop on the clutch assembly mounting plate. Trident, Great progress, dash looks nice in the photo taken from behind the steering wheel. You're speeding ahead! In your first photo it shows the bolts you have used to secure the tops of your pedal to the Exocot dash plate. I found that I could distort the pedals if I tightened these bolts to much. Not enough and the pedals flexed down a bit. A simple option would be to fit two extra nuts. One securing the bolt to the dash plate then one above the pedal assembly. I did this in my pre build and then made some 'cotton reel' spacers for my final build. I've taken a couple of photos to help explain. Hope this is useful. J 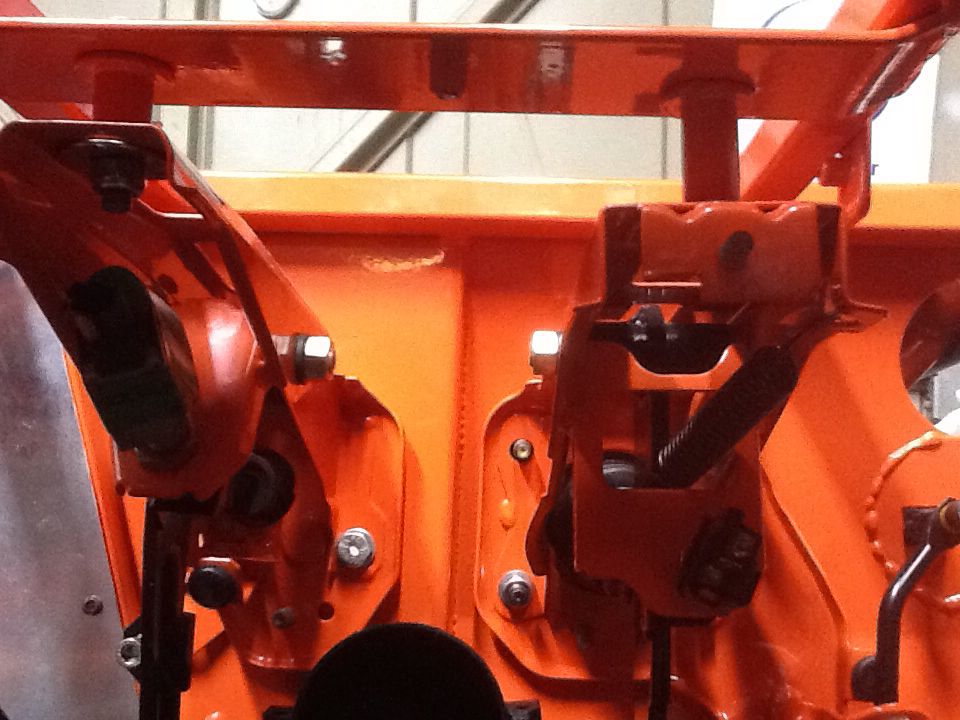 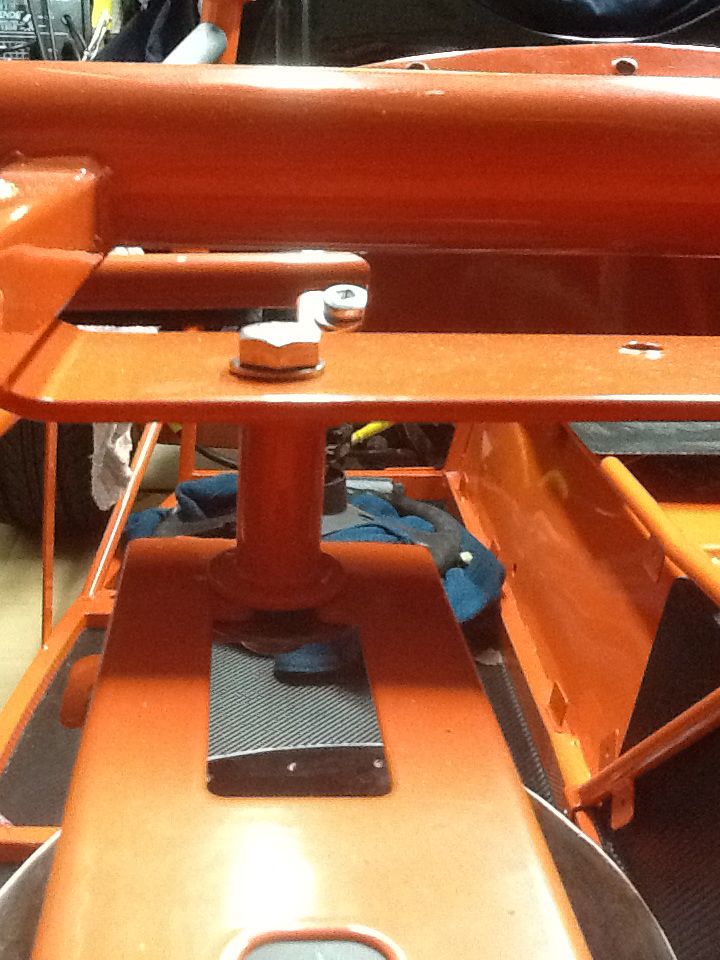 |
|
|
|
Post by gwnwar on Sept 5, 2014 1:58:43 GMT
jgilbert.. thanks for bolt info.. don't know what I was thinking I know better must be the 6 hours work (till 0300hrs.)trying to breath life back into a very sick basket case mx5 I picked up..
|
|
trident
Senior
   Improvise, Adapt and Overcome
Posts: 629
|
Post by trident on Sept 7, 2014 19:07:07 GMT
John Cheers for answering Georges question and thanks for the pedal bolt mount info. Quick question to those that have a Mk1 1.8 engine…. I have connected my fuel lines up but just want to make sure I have done it the correct way round. Is the set up below correct? I have run the line with the fuel filter to the front fuel connection on the throttle body and the return line to the rear fuel connection on the throttle body. Is this correct? Also do I need to do anything to the pipework to the left of the feed and return lines? Cheers in advance.  Also made the brackets that connect the rear sub fame to the chassis. Like others had discovered the bolt holes on the original fixed chassis mounts didn't line up at all and they made it very had to get the chassis on the subframe. 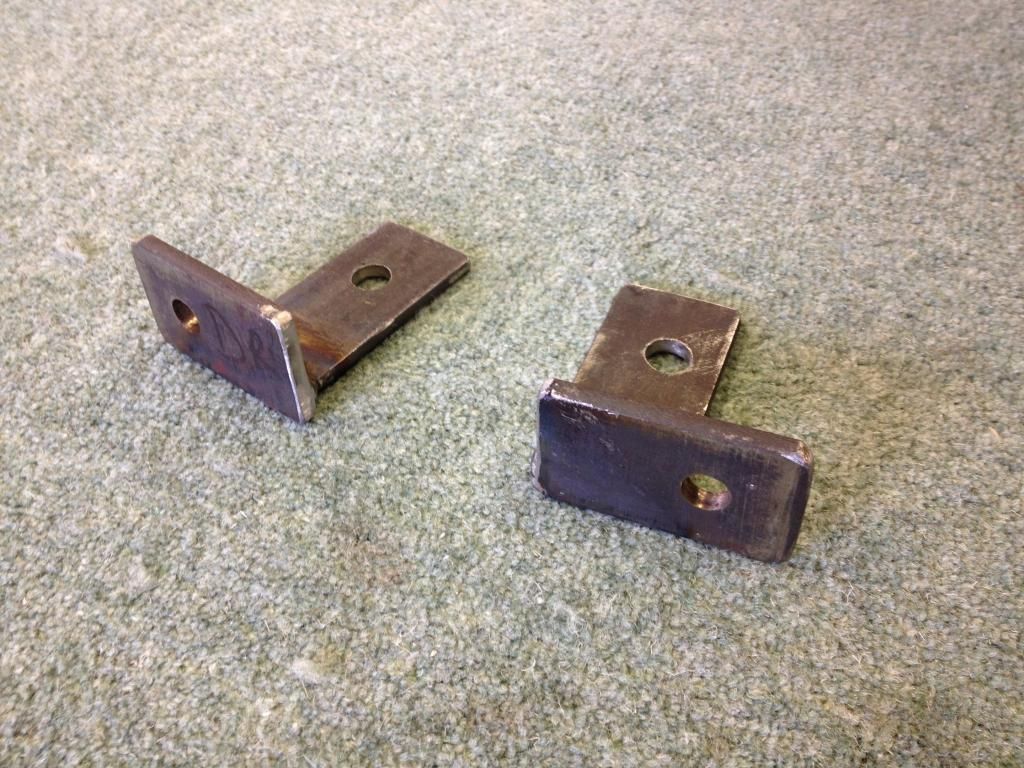 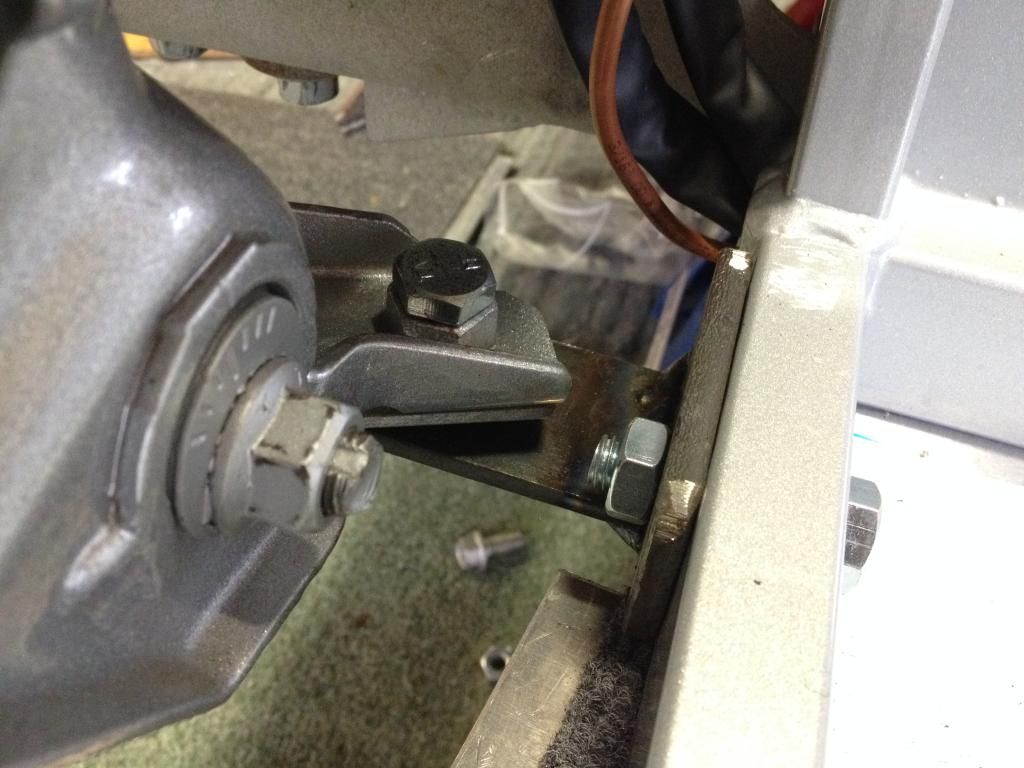 There is a small gap shown in the photo between the new bracket and the rear sub fame mounting point only because I didn't have the rear brace bars fitted at the time I took the photo. I believe it was only the 1.8 that had this mounting point on the rear subframe, but I could be wrong. I'll get the bracket powder coated later as I have a couple of other small brackets and the wing stays that still need to be coated. |
|
|
|
Post by gwnwar on Sept 8, 2014 7:37:03 GMT
No not right.. the center most tube on the pump housing plate is the supply put filter on that tube..
The supply hose with filter goes to the front of the FUEL RAIL not the throttle body. the other is the return line from rear of fuel rail.. No fuel hose to throttle body..
|
|
trident
Senior
   Improvise, Adapt and Overcome
Posts: 629
|
Post by trident on Sept 8, 2014 19:58:39 GMT
No not right.. the center most tube on the pump housing plate is the supply put filter on that tube.. The supply hose with filter goes to the front of the FUEL RAIL not the throttle body. the other is the return line from rear of fuel rail.. No fuel hose to throttle body.. Cheers George As you can tell I'm definitely not a mechanic, however I am learning as I go along. ---------------------------------------------------------------------------------------------- What about the pipework to the left of the feed and return pipes on the tank. Can this be left as it is or do I need to get shot of it and fit a one way breather valve   |
|
trident
Senior
   Improvise, Adapt and Overcome
Posts: 629
|
Post by trident on Sept 9, 2014 18:38:45 GMT
No not right.. the center most tube on the pump housing plate is the supply put filter on that tube.. The supply hose with filter goes to the front of the FUEL RAIL not the throttle body. the other is the return line from rear of fuel rail.. No fuel hose to throttle body.. Cheers George As you can tell I'm definitely not a mechanic, however I am learning as I go along. ---------------------------------------------------------------------------------------------- What about the pipework to the left of the feed and return pipes on the tank. Can this be left as it is or do I need to get shot of it and fit a one way breather valve   Ok, I'm now really confused.. This is a photo from jgilbert build when he took out the business end of his tank to put it in his new alloy tank… I know his car is a UK spec 1.8 built around the same time as my car. This would mean that my fuel pump set up should be the same as this one below as we have the same spec donor vehicle. In this photo it looks as though the return pipe is the one nearest the centre of the unit and the one nearest the outside is the feed with the fuel pump attached. This is the same set up that i had on mine.  My initial set up below.  However… qwnwar has stated that this is not correct and the centre tube is the supply which is the set up that Kevin for Exomotive in the US had when he built his first Exocet. This is his tank set up. 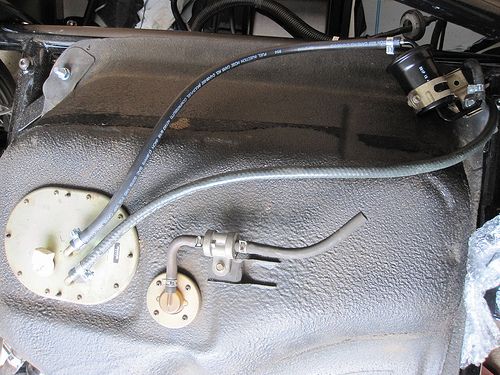 I've tried to look at other builds for more examples but this area of the build is not always clear. Wish I had taken more photos of my strip down now. I can only assume that there are a variety of different fuel pump feed and return set ups that Mazda has changed at some point during production of the MX5 or maybe the US cars are slightly different to UK model.. Personally I can't see why they should be different but like I said at the beginning I'm really confused.  |
|
|
|
Post by biggunz on Sept 9, 2014 18:49:54 GMT
Mine is the same as yours and jgilbert
Shaun
|
|
|
|
Post by Toed64 on Sept 9, 2014 19:18:04 GMT
You can blank that breather off. Mine is fine without it.
|
|
|
|
Post by gwnwar on Sept 10, 2014 3:25:54 GMT
trident.. I just went down to the shop and pulled a pump/gage unit and it is as I said on.. Closest to center
goes to pump. What year is your donor.. easy thing to do is just pull the unit on your build. Maybe there is a difference.. Please let me know..
|
|
|
|
Post by Toed64 on Sept 10, 2014 8:56:29 GMT
I checked mine by powering the pump for a moment (just turning the key) and watching to see which pipe squirted petrol - messy but it provided absolute clarity with minimal effort!
|
|
|
|
Post by scooby1929 on Sept 10, 2014 12:08:34 GMT
Thats pretty fancy looking fuel hose you have there Trident. Is it stamped high pressure on it?
I will check which way round my hoses are when i get home as I have the cover off at the minute
|
|
trident
Senior
   Improvise, Adapt and Overcome
Posts: 629
|
Post by trident on Sept 10, 2014 18:40:53 GMT
Thats pretty fancy looking fuel hose you have there Trident. Is it stamped high pressure on it? I will check which way round my hoses are when i get home as I have the cover off at the minute Scooby that would be great….. Am I correct in thinking that your donor was a Mk1 1.8 as well ? The hoses are marine high pressure fuel hose. I have checked with the inspectors at Southampton Test centre and they are happy with it. The ribbed effect is just a plastic sleeve, the same that is used in covering electrical wiring. I just added it to offer some protection to the rubber pipe against the edges of the tank and chassis etc. Probably a bit over kill but it will protect the pipe. |
|