|
|
Post by ancsportscars on Oct 3, 2018 7:37:16 GMT
Stoneleigh is always held over the Sunday and Monday of the first May bank holiday - which will be the 5th and 6th of May next year (however, you are allowed to camp from the Saturday, if you so wish.)
|
|
|
|
Post by ancsportscars on Sept 25, 2018 7:24:12 GMT
Tojeiro is going for a modern twist with his Replicar. If you look at pages 1 and 10 on his East Killbride Build thread you'll see the look he is going for. (Thanks for your email yesterday, btw.) I also recall an example where the builder has a body in a bright aqua marine blue (will need a bit of searching through older Replicar build threads to find it.) Just found it under page 1 of 'Berkshire build' - which is about 5 pages in on this Replicar forum.
|
|
|
|
Post by ancsportscars on Sept 11, 2018 7:53:19 GMT
Use a jig saw with a blade suitable for plastic. Only needs a slow speed to cut through it easily and hence doesn't generate enough heat to melt the edges. I presume your covers came pre-marked for cutting out? Obviously, cut outside the line and then use a belt sander or power file to gently profile the edge to the correct shape to fit.
If you do happen to mess it up, then don't worry, as I have now invested in a vacuum former and am now making my own covers should you need replacements.
The exact same method can be used to cut out or profile the fly screen btw.
|
|
|
|
Post by ancsportscars on Sept 4, 2018 7:05:49 GMT
Very smart, Scott. Like the warning lights too.
Did you use plain or foam-backed Milano? How have you fixed the front trim panel to the main dash (I'm guessing big head bolts bonded in and hidden under the red vinyl?)
|
|
|
|
Post by ancsportscars on Jul 17, 2018 10:41:13 GMT
This is definitely a good solution to the door release, if there was ever to be a build manual written then this should be in it. I have a comprehensive photo-rich build blog for the demonstrator on my website which I update regularly ( along with an overview on my Fb page). Hopefully it gives good detail of all methods and solutions used during all aspects of the build. (The above door locking/release mechanism/solution will be included at the end of the month when adding July's updates.) I don't really want to produce a definitive instruction manual which must be strictly adhered to - as I feel that may lead to each completed car looking too uniform. In my opinion, kit cars should be an expression of the individual builders' personality and flair. Thus by having just a general guide and blog to help them, I hope builders are encouraged to add their own design to a given solution or to come up with a new idea themselves during their builds. |
|
|
|
Post by ancsportscars on Jul 14, 2018 10:57:40 GMT
This has taken some working out, mostly because I don't know the correct names for the parts I want. Anyway I now have done a little re-design on the interior door handle, I like it. 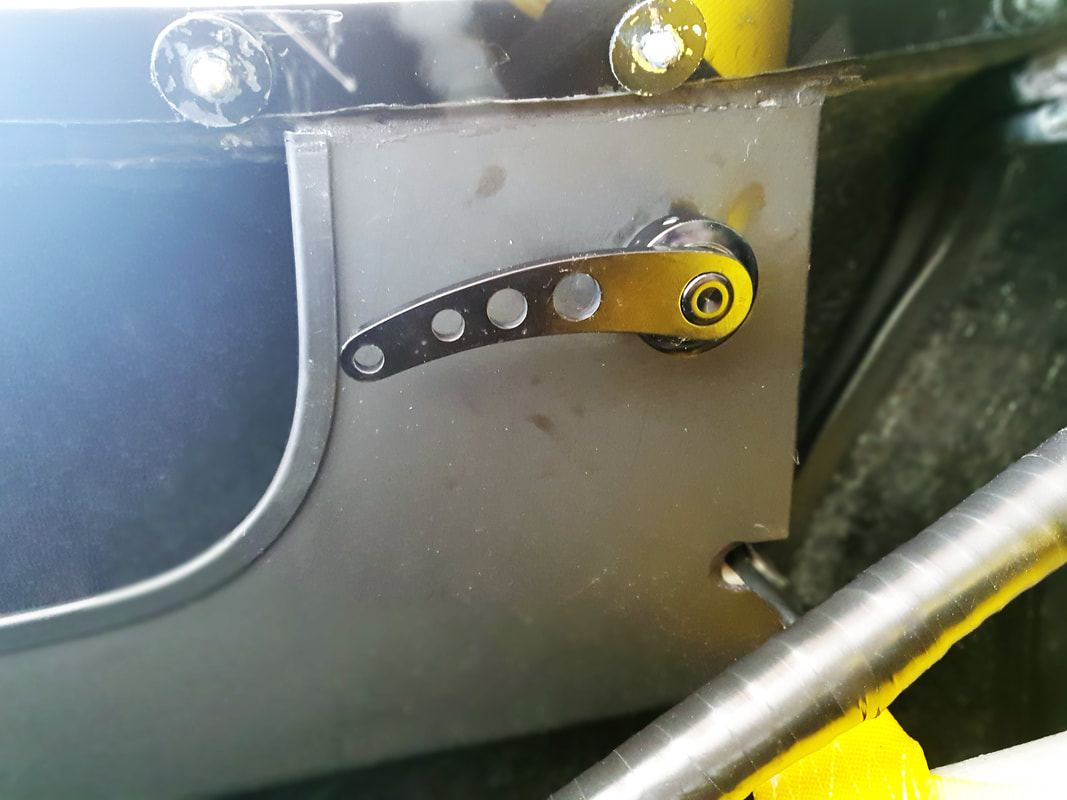 Hope you don't mind, Mark - but I've copied your idea for the door release levers (at around £8 a pair on ebay it was silly not to!) Using the bell crank levers, retaining clips and cut-down rods from the donor's door locking mechanisms, this is the solution I came up with. The bell cranks were spot welded to spindles made out of 10mm round bar. The donor connecting rods were cut to length, re-bent and fitted to the bell crank and bear claw latches using the donor retaining clips. 16mm wavy washers were used to take up any play when the levers were mounted to the door pockets. The edges of the levers etc. will need radiussing for IVA and I will need to add an additional return spring to the other side of the bell crank but otherwise they work really well.       |
|
|
|
Post by ancsportscars on Jul 13, 2018 10:50:24 GMT
Scott interesting jig saw and well worth the effort, really neat. how have you sealed the ali edges where they meet the glass body (not just here but across the build)? Next step for me is the various infill panels (somewhat different on the non door body)? Don't know what Scott used, but on the demonstrator, I've used this small dia. seal to take up any slight gap between the ally infill panel edges and body. www.ebay.co.uk/itm/Car-BOOT-SEAL-Rubber-EDGE-TRIM-Door-Bonnet/231766425592?ssPageName=STRK%3AMEBIDX%3AIT&_trksid=p2057872.m2749.l2649You don't want the edges of the ally panels to be in direct contact with the underside of the body as otherwise, over a period of time a ridgeline will become visible on the outside of the body where the two meet. |
|
|
|
Post by ancsportscars on Jul 13, 2018 7:37:12 GMT
Excellent work as always, Scott. Well Done. Just one thing I noticed is that the fuel check/breather valve should be vertically mounted and in the correct orientation (see white arrow on valve body) so that in the event of a roll (God forbid!) the ball bearing inside will shut off the fuel properly.  |
|
|
|
Post by ancsportscars on Jul 1, 2018 10:32:06 GMT
Thanks for the heads-up, Gary.
I had a customer pick up his Replicar kit (in black) yesterday -but he fully intends to have it painted as per original. I'll send him a link so that he can see what it will look like.
|
|
|
|
Post by ancsportscars on May 26, 2018 15:43:33 GMT
The attached guide shows what is required for the VIN plate (section 7.) The guide is a little misleading, though, as it seems to suggest that total weight and axle weights are required to be shown, However, the actual IVA manual section on statutory plates (section 18) note 2 shows that maximum laden masses are not mandatory but if are shown, then must be laid out as the guide shows. In other words, you only really need the Manufacturer (in your case MEV LTD) with the VIN stamped underneath it. So, yes you need top make one and fix it to the car prior to IVA. (presumably, you also already have the VIN stamped in a steel plate which has been fully seam welded to the chassis by MEV.) www.gov.uk/government/publications/individual-vehicle-approval-iva-for-cars-help-to-get-a-pass |
|
|
|
Post by ancsportscars on May 26, 2018 9:49:29 GMT
Note that further down the 'IVA Compliance' page, Stuart states that the Axle Weights shown on his IAC certificate should be the other way round - i.e. Axle 1 - 600KG and Axle 2 - 500KG
|
|
|
|
Post by ancsportscars on May 16, 2018 13:32:45 GMT
Sid, The attached diagram is very useful and pretty much self-explanatory when it comes to the mounting of the rear lights on all kit cars for IVA. Note that there has to be a minimum 100mm gap between the rear fog and tail light lenses. Thus, in order to achieve this on the Replicar, the brake/tail lights need to be mounted in the outboard recesses, with the fog mounted in the O/S inboard recess (the reverse is mounted in the N/S innermost recess) and the indicators mounted between the two. Unsure of a combination rear light and reflector that small. Again, be aware of positioning of reflectors in relation to outside edge of bodywork etc. westfield-world.com/svalights_rear.html |
|
|
|
Post by ancsportscars on May 12, 2018 12:17:54 GMT
Similar dilemma, been looking at a few options. Would like 3” straps but don’t fancy paying 3x the price for a weekend road car. I will have fixed seat position so strap lengths wouldn’t be an issue so probably go for the ones Andy recommended. I think westie66 has a set in his too. |
|
|
|
Post by ancsportscars on May 12, 2018 7:32:31 GMT
I have a set of these www.kitspares.co.uk/index.php?route=product/search&search=trs%20seat%20belt in black on the demonstrator. They are designed for 'Sevens' and so the shoulder straps are shorter which means they only have a couple of inches of adjustment per strap when fitted to Replicar. Does mean that there aren't excess lengths of loose strap blowing about when driving. Having met you at Stoneleigh, Gary I'd say they'd be fine for you. However, if the seat needs moving further forward for a shorter person or a large driver intends using it, then they may not give enough adjustment. They're IVA compliant and a good price, though. |
|
|
|
Post by ancsportscars on May 8, 2018 9:22:27 GMT
BTW,
On another note, it was good to meet so many Replicar builders over the weekend and put forum names to faces (Gary (R2S), Scott (Tojeiro), Mike (westie), Paul (Preston build), Sid potters etc. and Pete (who was my first customer) with plenty of photos to show me of his build. Not only is he making rapid progress, but judging by his pics, is also going to be of a high standard too.
I must get him to sign up on here to share with you all.
Being my first show as an exhibitor, I certainly learnt a lot w.r.t showing in the furure. First and foremost I won't be camping!! We'll book into a hotel next year for the two nights.
I really enjoyed my first show but it is very tiring. I'm a light sleeper so didn't get much shut-eye both nights. I was running on pure adrenalin yesterday.
|
|


