|
|
Post by James on Sept 18, 2013 8:22:09 GMT
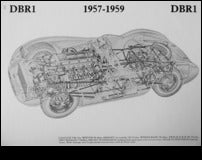 Build stalls somewhat due to lack of front shocks (bl**dy internet vendors!). Meanwhile I have been completely engrossed in the rare, two-volume history "Racing with the David Brown Aston Martins" by John Wyer with Chris Nixon. Just amazing, detailed recollections from the beginning with the 'Atom' (later to become DB1) through the DB2s, DB3Ss and finally the DBR1s and the winning of the Le Mans and the World Championships. Those guys were just so fabulous. Setting out from Feltham in a DB3S with a pair of goggles and a leather bag of clothes, driving to the Nurburgring, wiping the floor with everybody, a quick drink and drive back to the UK to race at Oulton Park or similar two days later. The schematic above is from the book. I like the battery position in the passenger sill. Thanks Graham Bracegirdle for the loan of your precious volumes and of your incredible photo album full of pics of the Astons and drivers you took back in the 50's. Thanks, too, to everyone who is reading this and giving us encouragement in our first build project. More soon. J. |
|
|
|
Post by James on Sept 11, 2013 7:54:52 GMT
|
|
|
|
Post by James on Sept 9, 2013 14:46:35 GMT
 A couple of hours or so with the grinder, files, emery and a big all-over with the wire buffer wheel takes all raised Mazda lettering off the cam cover. The alloy comes up fab with a wipe over with a clean oily rag - just right for the period. Anyone know where we can get an oil filler cap with raised 'AM' or 'DB' letters on it? !   Intakes also respond well to the wire buffer wheel treatment and the oily rag. It's not a straight six but at least it won't shout 'WRONG!' too loudly when the bonnet comes off. We're ready to work with the space-frame now. Looking at the work so far it's fair to say that we haven't achieved a 'New Car' look at all - we have achieved something much better altogether. It looks like an old car that has been constantly maintained, painted and greased up underneath. Perfect for a tribute to a classic racing car. Dead chuffed - and enjoying every minute so far. |
|
|
|
Post by James on Sept 6, 2013 7:28:13 GMT
Thanks for your support chaps and the comments. I'll keep posting stuff on this blog as we progress (relatively slowly compared to you guys I suspect). We'll definitely take you up on some advice as and when we come across probs. Especially as we come towards IVA - quite daunting for beginners!!!!  |
|
|
|
Post by James on Sept 4, 2013 17:45:00 GMT
It's interesting being something of 'pioneers' on this kit. We too are considering a spare wheel and have been thinking of using the 'boot space' (access from underneath) as a position. Would get filthy I suppose but at least it would be there. I recon the side exhaust is possible post IVA. A modified system could come out on the passenger side (wrong side) much more easily. We're going to try for this. Actually, I have seen a later DBR 3 with the exhaust on the near side. Good luck with the kit. I'll let you know about paint colours when we get anything definite. The colour's almost mythical but we have got feelers out. Our Mk1 had separate front side lights so we're currently sorting that out.  |
|
|
|
Post by James on Sept 3, 2013 8:28:48 GMT
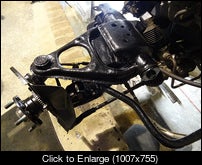
 We take delivery of four original Mazda 14" wires with good tyres we got off the net for £220. It remains to be seen whether they'll look good enough (obviously the Aston had 16" rims) but at that price, we had to give them a go. First problem will be fitting them as they were supplied with some 1600 cc models and the size of the brake assemblies on the 1.8 are too big. We would need some spacers to stop the spokes hitting the callipers.  The chassis comes back from being painted. A quick flick over with the blaster (it got wet on the way back from Stuart's and had a slight bloom of new rust on some sections), primed and powder coated in a mid grey similar the original DBR's interior. The best £170 we have spent so far. Lovely job and it will be a pleasure to work with. A bit more work on the front suspension to finish and we can offer up the chassis to the sub-frames. Once we're happy with the fit we'll take it off again to install the floor panels before starting the build proper. |
|
|
|
Post by James on Sept 2, 2013 18:25:19 GMT
 Had to replace the brake dust shields at the front - again, not expensive. Big day next week ....  Bodyshell arrives! We had a great day going down to Wakefield to meet Stuart with a borrowed trailer. The GRP is superb. Like glass with smooth curves. It seems bigger in the flesh - really impressive. We chose a colour to use as a base for a spray. We're aiming for the original Aston metallic green when everything has been fitted and tested.  Hunky! Thanks stuart. |
|
|
|
Post by James on Sept 2, 2013 18:13:48 GMT
|
|
|
|
Post by James on Sept 2, 2013 18:08:19 GMT
 Easier to put in than to get out!  Do Mazda use ANY grease when assembling these cars. Two of our wishbones had to be replaced due to seized bolts inside the bushes.  More refurb. Time running out. |
|
|
|
Post by James on Sept 2, 2013 18:01:41 GMT
 Rear sub-frame and wishbones all off, shot blasted, powder coated and back on. We want a 'new car' feel underneath - not chromed bolts etc. but clean and tidy.  Brakes refurbished and painted up. Only a week or so before we pick up the bodyshell and space frame. Need to get a wiggle on.  We decided to renew bushes wherever necessary. |
|
|
|
Post by James on Aug 30, 2013 6:07:18 GMT
 The forklift struggled to separate the shell from the sub-frames until we found the two bolts we hadn't seen underneath! If any one else is a first-timer we strongly recommend buying the longest breaker bar for your socket set as possible. Some of those bolts are stubborn! Then it was plain sailing, a real landmark for us as we can only get to the workshop for one short session a week.  Now we're getting somewhere. Before the body shell was disposed of we took a few photos of the chassis number and then used the grinder to cut it out for safe keeping.  Now was a great opportunity to get the power washer in action - followed by penetrating oil on everything we could see (probably more psycological than anything else - the threads are always bone dry when you finally get them off). |
|
|
|
Post by James on Aug 29, 2013 15:46:04 GMT
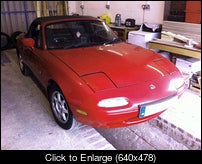 We opted for a Mk 1 1.8 as the donor and found this one in January 2013. As this was the 100th anniversary of Aston Martin it seemed an appropriate time to start our first ever kit car. We weren't that bothered about age but we were looking for relatively low mileage. We were happy to find this quite locally with 67k verifiable miles on the clock and plenty of history. Drove brilliantly back to Lancaster from Leeds. We rang Stuart at MEV and put the order in. We were amongst the very first after seeing a preview in Kit Car mag. It wasn't officially released yet but we simply had to do it. It seemed affordable, do-able and it was the right car - a British icon to die for. 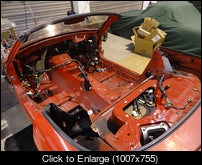 Doors off, roof off, interior stripped and plenty of cardboard boxes. Masking tape and pens always to hand. We reasoned that over-labeling is better than wondering later on. Somebody on the blogs already described the MX5 as '99% wiring looms'. We were forewarned! 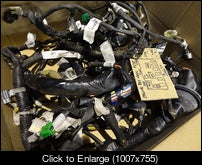 Once you get the hang of the fact that there are several looms all growing out of each other it's not so daunting. Be prepared to spend some time easing them through the front bulkhead. We would have struggled if Larry hadn't been on one side pulling and pushing while I eased each individual block connector through one at a time. |
|


