|
|
Post by gwnwar on Jun 9, 2016 17:23:14 GMT
That is how it shows in the manual..
|
|
|
|
Post by R2S on Jun 9, 2016 18:29:00 GMT
I must have been looking in the wrong place as the only picture I found shows the clip exploded from the calliper. I couldn't find anything in the manual showing the exact fitting with the clip in place.
Surprised at how difficult it was to find anything on the web, and even more worrying that some have the clip inverted and others have it fitted below the other spring clip which makes it totally ineffective!
Oh and when I found the picture, pre dismantle, of my donor these clips were completely hidden under the calliper!
|
|
Deleted
Deleted Member
Posts: 0
|
Post by Deleted on Jun 9, 2016 19:29:07 GMT
I agree the pic is correct. It isn't a big deal if you don't use the clips. They are pushing the pads back from the disc but as the pads can be really tight in the caliper they often don't do a great deal. I put a dab of copper grease on the sliding surface of the pad but a few miles of muck build up and they get sticky.
|
|
|
|
Post by R2S on Jun 9, 2016 20:00:55 GMT
Ive copper slipped all the faces, and got the correct grease for the sliding pins (all the way from the states; thanks to snowbird1), was going to leave the clips out until I spoke to MX5 parts and they were insistent that they should be used so all is good now.
Was toying with the idea of replacing the original shocks and springs for the IVA if i cant resolve height issues with adjustables fitted.
|
|
|
|
Post by gwnwar on Jun 9, 2016 22:17:13 GMT
Per the '99 manual.. The REAR use W springs facing up top one and down bottom one..PP 04-11-19
The FRONTS use a large U shape spring that both face toward the center of the caliper. PP 04-11-15
|
|
Deleted
Deleted Member
Posts: 0
|
Post by Deleted on Jun 9, 2016 22:19:41 GMT
Thats a good idea if you still have them. I will probably find out how much I can lift over the weekend. I would imagine we would get similar results so will let everyone know.
|
|
|
|
Post by R2S on Jun 12, 2016 16:03:30 GMT
Ok here is this weeks update:
Successes:
Latest parts arrived from MX5parts (the ones ordered in March), hand brake cables, two nuts and four washers for lower end shocks (now fitted and torqued up).
All front suspension torqued up and ready for caliper fitting (see below), all steering fitted and torqued up with exception of track rod ends (front alignment needs setting).
The not so good (requires more attention).
Went to fit handbrake cables whilst petrol tank is not installed only to find that the brackets (mid length) used to fit them in MX5 don't appear to fall anywhere near sub frame or chassis (what have others done? cut them off?).
Now I have seen this one crop up before:- fitted new front lower ball joints and when I torqued them up the castellations on the nut fall just below, rather than in line, with the hole for the split pin. At moment I have simply bent pin ends down and around nut to stop rotation but I suspect this would fail IVA (or an MOT). I know I have original nuts (which are taller) somewhere and will search these out.
Finally the blxxdy annoying.
Went to fit the new front calipers sourced from that well known European Parts supplier. Now it took me months (I kid you not) to paint the calipers with the yellow brake enamel so I was being really careful not to cause any damage. Everything was in place the carriers, pads, springs etc, fitted slide bolts through to hold caliper in place and started by torqueing up top bolt first in stages. Hadn't got half way to the torque shown in the manual when I felt the resistance in the wrench disappear (heart sink time), even at this low torque setting the thread in the caliper has stripped (cheap casting me thinks). So its a trip to the supplier tomorrow, months (probably years - just found invoice Nov14!) since I purchased said item to ask them to replace!
|
|
|
|
Post by gwnwar on Jun 12, 2016 20:38:49 GMT
With the ball joint castle nut just add a washer under it no problem..The later NB joints have longer stud..
What torque were you using 33>39 ft.lbs. on the slide bolt.
|
|
Deleted
Deleted Member
Posts: 0
|
Post by Deleted on Jun 12, 2016 22:01:58 GMT
I'll sort out a pic of my handbrake cables tomorrow, I have used the mid-point bracket on one side but it didn't work for the other, you also need to be careful of the exhaust, my first attempt looked great until I fitted the exhaust then I had to move it as it was touching. On the Westy build they are just zip tied out of the way and that is fine for IVA so don't get too worried about them. Anyway, will sort some pics when in the garage tomorrow of my solution.
|
|
|
|
Post by R2S on Jun 12, 2016 22:07:09 GMT
Like your simple solution of a washer, I've never placed washer under these bolts but the more I think about it I can see no reason why not.
Was going to take the bolt up to the stated 53Nm only got to 30Nm! Had to smile when I got home and found the receipt I bought them in Nov 2014, only seems like yesterday. They were quite expensive at £90 each, if they won't replace because Ive had them for over a year, rather than scrap I might try a helicoil (any reason why I shouldn't?)
|
|
|
|
Post by gwnwar on Jun 13, 2016 0:25:31 GMT
No put the washer under the NUT..
|
|
|
|
Post by R2S on Jun 13, 2016 6:04:58 GMT
Yep I meant nut (it was late and Id had a few beers watching the football and Canadian GP)
|
|
|
|
Post by R2S on Jun 13, 2016 8:39:05 GMT
I'll sort out a pic of my handbrake cables tomorrow, I have used the mid-point bracket on one side but it didn't work for the other, you also need to be careful of the exhaust, my first attempt looked great until I fitted the exhaust then I had to move it as it was touching. On the Westy build they are just zip tied out of the way and that is fine for IVA so don't get too worried about them. Anyway, will sort some pics when in the garage tomorrow of my solution. Whilst I am planning on a side exhaust I dont want to do anything that might prevent 'standard' route if required so will look at avoiding area around exhaust hanging bracket on rear subframe. Have decided not to try to return calliper but will use Helicoil insert main reason being I would have to repaint and it took about 4 or five coats (thats will take 4 weeks at least bearing in mind I only visit workshop one day a week) before I got the depth of yellow I wanted. |
|
Deleted
Deleted Member
Posts: 0
|
Post by Deleted on Jun 13, 2016 17:08:38 GMT
I am really looking forward to seeing how side pipes look on the car, pipes were one of my ideas as well. Are you using JP Exhausts in Macc? Managed to get a couple of pics of the handbrake cable, hard to get a camera in there now it is mostly complete, if you need I can try for a better shot next time the wheels are off. Left side. You can see my first mounting position which as I said hit the exhaust. 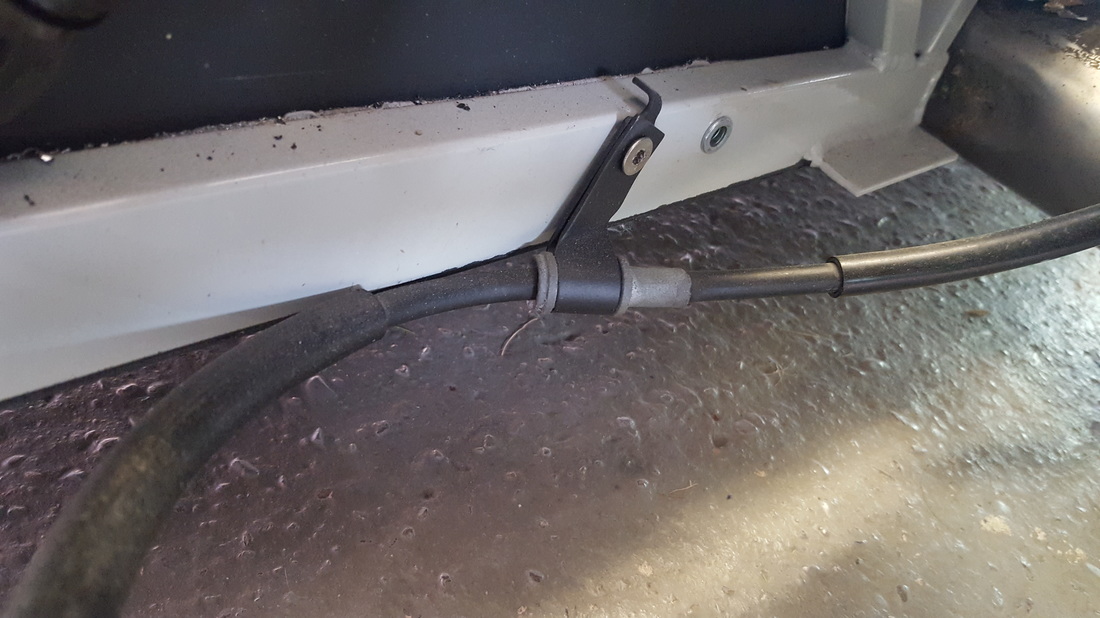 And the right side. It will need some zip ties to keep it still but it just feeds over the PPF and down to the caliper 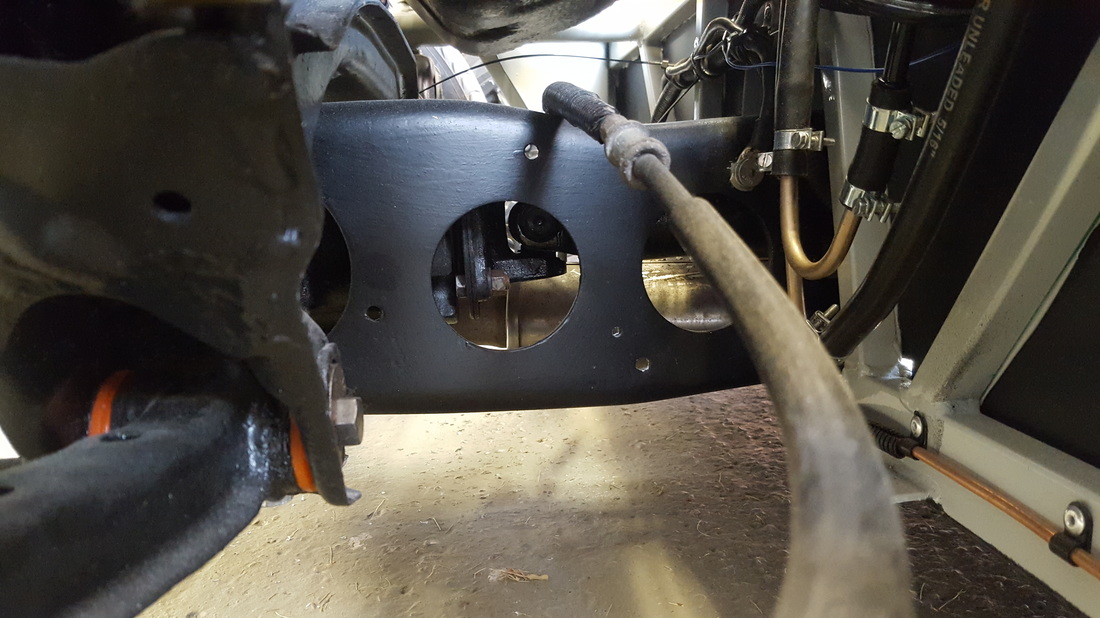 Hope that helps |
|
|
|
Post by R2S on Jun 13, 2016 23:13:41 GMT
Westie66 Thanks really useful photos.
I contacted JP when I first started the build and they said they would take a look when I had something more complete. Initial plan is to run the exhaust in the box cill with outlet just in front or rear wheel, and I expect I may have to run part within passenger footwell.
If JP tell me this is a non starter I see two further options:-
1. cut the lower quadrant out of the box cill leaving something like Ferrari did (dont fancy this option).
2. full side pipe running outside body (this may make access to the cabin difficult bearing in mind there are no doors).
Sent you a PM about Sunday 19th.
|
|


