|
|
Post by perthwa on Feb 9, 2023 14:07:29 GMT
well... today proves that if something can go wrong it will!
Get a permit. drive to work. go to the engineer in the early afternoon. drive home! simple..
However the reality:
Driving at 90kph and I hear repetitive clunking metal on metal sound. stop on shoulder. look around, push and pull car but can not find noise. drive ahead and it is still there, so I pull over, leave engine running and noise is not heard so good news it is not the engine.
Roll car forward and front right wheel area is the noise source. every thing is still attached but sounds almost like a wheel balancing weight is hitting a calliper, but there is 2 cm clearance. Only 2 km to work and quiet surface roads are available so I get off the freeway and tip toe to work on the back streets, all the time listening to the clunk... clunk with each wheel rotation.
Arrive, borrow a jack, remove wheel and spot that one of the brake disk attaching bolts has worked its way free and is now colliding with another bolt on the upright housing.
Borrowed a file and clean up the bolt, replace it and tighten the other 3 as well. I will probably add some loctite in the near future.
So... as I purchased this as basically an unfinished roller, I have pretty much checked every suspension bolt and nut. Unfortunately, these bolts can only be tighten when the wheel and hub are removed. My Bad for not assuming that the original constructor would have done them up a bit tighter.
40 minutes later all fixed...
1pm... get in car for 40 minute trip to meet engineer for a 2pm... Ignition key just spins in its housing. I had noticed that after the Tune up, it had been quite a bit less exact in its working. You actually had to rotate it about 45 more degrees to get the starter motor to engage.
Look in my kit of tools and decide to see if I can manipulate the lock mechanism. NO, it was shite... So decide to hot wire the car. only three wires... ignition goes live. no problems but starter will not engage. There had been just a bit of extra noise that I heard when I pulled up in the morning between the clunking noise. Not much just a whirring sought of noise coming from the engine bay. maybe that was a bigger issue than I gave it credit for.
I ring the engineer, apologise and bail on the meeting.
It is, by the way, a less than pleasant, 35 degrees C in the carpark... I decide that with electrics working I should be able to push start it... no way! i.e. I do push it and jump in but it will not fire up...
I then remove the remains of the key switch and decide to interpret the guts of the device... Bad idea! it just falls apart...
Then decide that I can test the solenoid and the starter motor... Borrow a set of wrenches and pull the starter. connect the earth and test with my hot wire from the key unit. I can here the solenoid under the dash energising but not a lot happening at the starter.
Spit the dummy...(pacifier) and get a lift home...
Drive back to work in the Pajero 2 hours later and 10 degrees cooler... Re-pull the starter motor and attempt to use the Pajero battery to energise the removed starter motor. Nothing at all... pull the starter motor apart and it is SHITE. broken magnets cracked brass contact shaft... a mess.... well it is 19 years old!
Spit the dummy again. drive home around 7pm...
Wife says: should we go and get it... aka tow it home... I look up rules for towing and it simply says tow rope must be 4 m long and driver needs a licence. and we decided that we could do that..... Now I can relax.. albeit annoyed a lot... I did have to remove my GRILL wire that is held in place by 4 screws so that I could fold the tow rope around the front bar behind my DOTT approve nose cone.
two steps forward and 3 back... that was today...
Now I need a starter motor, I think the solenoid come as a package...
I also need to find a key that fits my spare Ignition unit that came with my car OR buy a new one with its own key....
Then I can get another permit and meet the engineer....
I will add some snaps in the morning when I calm down a bit..
good evening!
|
|
|
|
Post by wishful4444 on Feb 10, 2023 16:18:38 GMT
Apart from the 'inconveniences' was the rest of the day ok? Commiserations.
It never rain but it pours or in your case It's never hot but it gets hotter.
Good luck with the repairs.
|
|
|
|
Post by perthwa on Mar 10, 2023 10:58:45 GMT
Here are the snaps of the less than fun day. The tow hitch - perfect once the grill was removed.  Here is the offending bolt that was a bit loose and was knocking on the brake calliper. I made it shiny so the allen key would fit again.  Here is the broken internal magnets from the starter motor. They were loose and not attached. One was cracked in to two pieces. And here is the cracked commutator .   So new starter motor arrived. And wasn't that an adventure. I found a supplier that has a store 3km away. They did not have it in store. The nearest in store supplier was 60km away and for 12$ they would deliver it. I needed to drop off a couple of recycled cabinets to a friend and he was about 45 km in the same direction... Logic says that I will spend about the same money in fuel BUT I will get two jobs done and I have Friday afternoon off... no brainer!!! Order motor. get confirmation text for in-store pickup... Drive 60km... store staff can not locate item... They BS me and say that it was put on a TOLL delivery truck by mistake... Too bad as long as it gets delivered... back to mate's place, drop off cupboards, half the job done and not out of pocket by anymore cash! That was Friday noon... On Tuesday noon, I ring store... get a cartage number for the TOLL delivery, look it up and low and behold, it was picked up at 9am Tuesday morning... 24 hours later I get a delivery... Starter installed. Key mechanism... in my original parts basket from the original builder there was a spare Narva key mechanism but no keys... I pull the casing apart, remove the lock unit, insert my key from the broken mechanism, get out a file and make it fit the new lock. Rebuild the lock unit and save $70... Unit now installed, turn on the key and nothing happens. Better charge the battery, it has been 3 weeks... Voila... it starts. While I was stuffing around checking fuses on the original day I realised that having the Haltech fuse block upside down under the dash was stupid... so I changed its location. Now I just remove the bonnet and I can check the fuses... Smarter move.  Now because your under the bonnet and you know the car runs a bit hot and you are not running a fan shroud, perhaps some form of routing the cool air into the radiator should help. DONE: Here is the under body piece  and the top view.  and another view of underneath looking backwards. 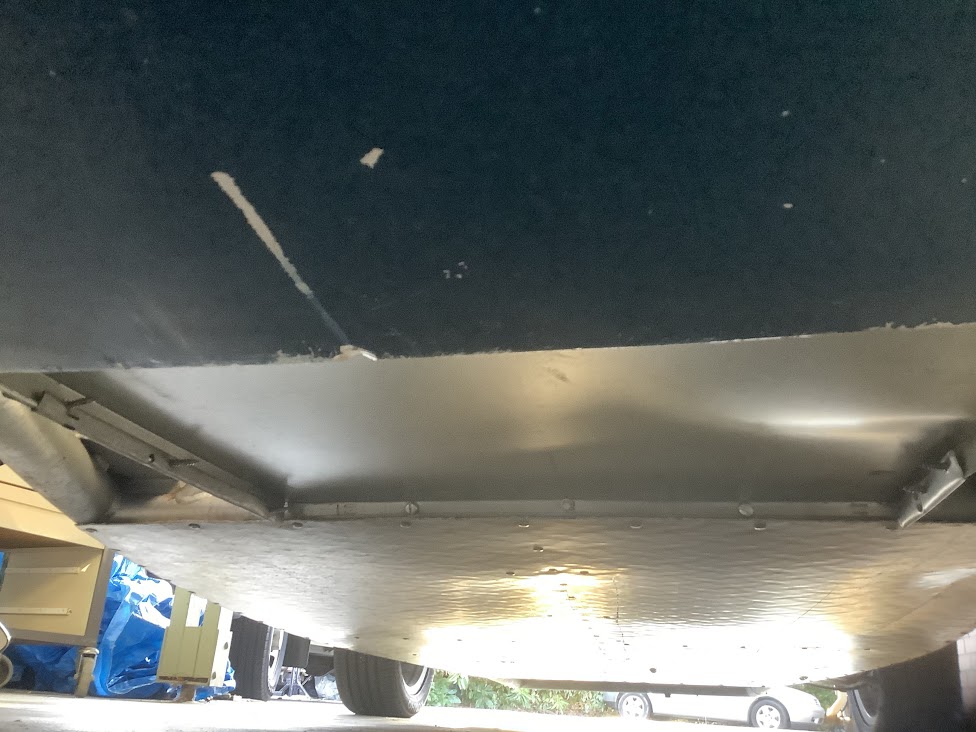 and a view of the side inserts  Now guess what? Time for another PERMIT . Yes!  |
|
|
|
Post by wishful4444 on Mar 10, 2023 16:16:06 GMT
Good day perthwa
You do have fun don't you!
Did you put some Loctite on the loose bolt?
|
|
|
|
Post by perthwa on Apr 10, 2023 7:49:43 GMT
Chapter next! Well, whilst driving quietly around my neighbourhood, I determined that there was a few more metal on metal sounds. Only on reasonably fast corners. Had some time; so I decided to investigate. The right hand brake disk was fouling with the calliper on cornering. There was light scoring on the inside of the disk.       Pulled off the wheel, disk, calliper and assorted hardware and sure enough there was some scoring. Interestingly enough, there was already some attempt to file off the trailing edge of the calliper to get some clearance. This was obviously not enough so I took 1.5mm off of the spacers that had been installed to offset the affect of the wheel spacers that were installed. Rinse and repeat for the passenger side and all should be quiet. Went to a sports car meeting and someone with knowledge said "there should be NO movement about the bearing" Well the bloody well is... Not sure If I can get video to work.. www.facebook.com/profile.php?id=100057360103424video is visible in one of my posts under the comments. So, removed the entire wheel assembly. Now looking at getting both sets of bearing pressed off. Buy some new ones and try to work out why they were damaged. I do know that they are NOT Ford originals as they are marked Japan MBS 88128 . The Mark 1 bearings are supposed to be pressed in from the inboard side and have a retainer. I think that these have been pressed in from the inside but I am unable to tell...    The clearance shown here is very limited. I have even ground off a smidge before this photo. I believe that one of the bolts is a little bent, so clearance was an issue from day one.   |
|
|
|
Post by daydreamer on Apr 10, 2023 10:53:57 GMT
Hi Perthwa, My thoughts as follows; There should be no movement in the bearing, when the driveshaft is installed and shaft nut is up to torque. When looking at your bearing carrier I can see no retaining circlip or circlip valley. This may be because there is no circlip valley or the bearing is not sufficiently pressed in to reveal the circlip valley. Failure to preload the bearing by applying the correct torque to the shaft nut will result in its failure in a few miles. In the design , as I understand it; - The bearing is pressed in from the inside face of the upright, The bearing carrier in the upright needs to be mounted appropriately and the bearing retailed with a circlip.
- The bearing is held in the bearing carrier on the outbound side by a substantial flange and on the inbound side by a large circlip.
- The clean and oiled hub is pressed carefully, without much pressure, into the bearing from the outside while supporting the "bearing inside inner race" until the hub contacts with the outer face of the inner race of the bearing, no load or stress should be on the bearing at this time. Failure to support the "bearing inside inner race" while pressing the hub in may cause the bearing to separate and then a new bearing is needed.
- The clean and oiled CV knuckle splined shaft on the driveshaft should be pushed into the hub from the inside. The 32mm shaft nut that goes on the end of the splined shaft that is now protruding from the outside of the hub should be tightened up to torque. This will pull the CV until it contacts with the inner face of the inner race of the bearing. This is a very high torque setting as it is is designed to compress the inner races of the bearing to preload the bearing up to normal operating tolerances. At this point stress or "preload" is transferred to the bearing outer race via the bearing "balls bearings". The circlip and bearing carrier inner flange are not stressed parts, they are there to hold the bearing in place until it is torqued up at which point the outer bearing race is pressed hard up against the bearing carrier "tube" wall.
Failure to preload the bearing will result in its failure in just a few miles , in my case under 250 miles..... The use of wheel spacers , unavoidable on a sonic also means that rear bearings are under significant load and will tend to fail quickly anyway. I've been through three sets , but I do give them a lot of abuse with autotests. This type of bearings is cheap and generally a fit once item , if you press them out or remove the hub they tend to fall apart. A new bearing set is the way to go , and torque it up from day 1. Pics of my setup 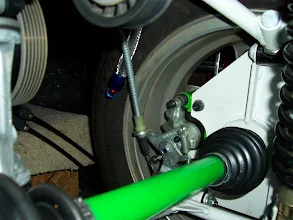 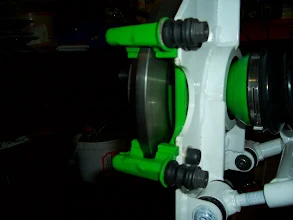 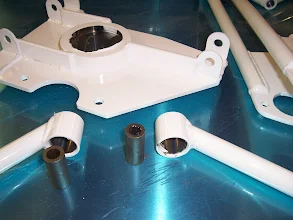 |
|
|
|
Post by perthwa on Apr 10, 2023 13:15:28 GMT
much appreciated feedback, Thanks.
|
|
|
|
Post by wishful4444 on Apr 10, 2023 15:31:36 GMT
Good day perthwa
Please excuse me using your thread to ask daydreamer a question about his post
daydreamer
You post "In the design , as I understand it;". Where did you find the information? Also what is the preload torque setting?
Thank you.
|
|
|
|
Post by buildityourself on Apr 10, 2023 20:20:07 GMT
From your facebook video you can see that the drive shaft tapered flange is not seated against the bearing surface. This is your issue. The build manual advises adding several washers to the drive shaft as the chassis was designed too wide for the focus drive shaft length.
|
|
|
|
Post by daydreamer on Apr 10, 2023 23:25:59 GMT
Hi Wishful4444, RE:Where did you find the information? Torque info on driveshaft nut from Haynes manual for MK1 Focus. Also previous discussion on this forum - mevowners.proboards.com/thread/8288/hub-nut-torqueHaving changed my bearings several times I have had the "opportunity" to see the various ways they fail and come apart. RE: Also what is the preload torque setting? from previous articles on the forum 316NM or 220 ft-lbs ( not exactly the same , I know but my Haynes manual is in the garage and I'm all locked up now as it's late ) NOTE: these torque settings are for the front (driven wheels) on MK1 and MK2 focus. ( as used on the rear of Sonics and Rockets. Other variants may be different, I have not checked. Certainly on my MK4 Mondeo the torque was little more than finger tight plus a qtr turn. On that car they even supplied a single use stretch bolt to ensure it was not overdone. A very different bearing design on that more modern car. CAUTION - Musings of an unqualified non-engineer on torque for bolts and bearings. Smarter people than me ( not a high bar I know ) have worked out the correct settings and I've come to realise following the guide settings given by "qualified" sources ( that's not me, I'm not qualified in much that is relevant here) such as a manufacturer or trusted source such as Haynes saves grief. I have tried to understand why preload matters. I've read a little and perhaps understood or maybe misunderstood the following. Most bolts and bearings endure "cyclic" loading, that is to say the load they carry varies back and forth over time. Each time the load "cycles" through low to high some amount of fatigue is introduced to the bolt or bearing components and the surfaces they mate with. Eventually the fatigue accumulates to an extent that the distortion is noticeable and the bolt or bearing is said to have failed or be failing. When a preload is applied, the variation in load is affected in two ways. A- The proportion of the variation is smaller , esp as the preload gets greater. B- If the load and it's variation is less than the preload then the stress in the bolt or bearing is mostly unchanged and therefore not cycling, what is happening is the cycling load is "mostly" being transferred to the mated surface they are attached to. The effect of A and B is that the service life is extended as the rate at which distortions are accumulated is reduced. In the case of the bearing, preload is applying a load that is greater than the load from the weight of the vehicle and and any shocks from normal road use. Hitting potholes or other uneven surfaces at speed will probably "in my estimation" introduce a load cycle that is well beyond the preload "although suspension and tyre sidewalls may help". Repeatedly driving on rough roads or overloaded means many "extreme" cycles in the loading and quicker accumulations of distortions. www.google.com/search?q=bolt+torque+cyclic+loading+failure |
|
|
|
Post by daydreamer on Apr 10, 2023 23:45:09 GMT
RE: tapered flange is not seated against the bearing surface - comment from Buildityourself
If the cv joint is not pulled up tight against the bearing surface then that is an issue. It suggests to me that the hub nut is not pulling the splined shaft in, or the bearings are wrong, or .....
Looking again at your pictures the hub pokes right through the bearing. To my mind that is wrong and suggests the bearing is too narrow or the bearing carrier has been machined wrong. If the bearing carrier has the bearing too "deep" then a large "washer" can be made to adjust that depth.
RE: Spacers on the end of the CV joint between cv and bearing - comment from Buildityourself
This is to effectively extend the driveshaft and prevent the tripod joint at the half-shaft or gearbox end coming out at full droop or compression.
|
|
|
|
Post by perthwa on Apr 11, 2023 9:23:44 GMT
WHAT THE....... I think I have deciphered some of the issues with the current install. The stats on the MBS bearing are 38.892mm bore, 80.00mm OD, 21 mm Outer race width and 27.5 mm inner race width. The standard measurements for a mark 1 Focus bearing is outer bearing race width 37mm. and 72.0mm OD. This means that the bearing is a full 16 mm narrower. That makes it 57 % of the factory ford bearing dimensions... The part number from the MBS comes up as this... a REAR wheel bearing...  SO I recon that they made up the bearing housing to suit the wrong bearing. Most of you know I purchased this 1.5 Yrs ago as an almost roller.... Don't shoot the messenger... This is someone else's handiwork.. well cluster.... So the next question is did they use a Mark 1 Drive shaft and spline? or did they do something else? I shall go and count some splines and measure the Shaft diameter. it is 38.892 mm according to specs but not sure about splines... Back to the shed. 25 splines . counted them on the photo above. What is the spline count of a standard Mark 1 2002-4 focus? I will look that up... or one of you will tell me... I guess I am now making up two sets of bearing housings... one for the rocket and one set for the Sonic 7... See my last post in WA Sonic... At least it looks like it was torqued up... Here is my untorque spanner... a bit sore ...  |
|
|
|
Post by wishful4444 on Apr 11, 2023 14:18:17 GMT
Good day daydreamer
Many thanks for your quick detailed reply.
It was very interesting particularly as I suspect I will be renewing the rear bearings on my Sonic at some point in the future.
|
|
|
|
Post by daydreamer on Apr 11, 2023 17:20:12 GMT
Hi Perthwa, Well, now we know what is going on. I concur with you on the correct bearing dimensions. www.autopartspro.co.uk/skf-1362645RE teeth and hub, Looking at replacement CV joints for MK1 Ford Focus suggests that 25 splines is right. My observation is that the CV joints are common on all Ford Focus models of the period so hubs and spline count are also common as they mate with the CV joint. www.autopartspro.co.uk/gsp-142414www.autopartspro.co.uk/mapco-2033937RE: Bearing From here you might consider making a sleeve to reduce the bearing carrier down to size for the right bearing , that might be much easier and cheaper than having a whole new bearing carrier made x 2. or CAUTION - Crazy idea follows that may get shot down for many good reasons. fit two of the wrong bearings side by side in the same carrier. That would be 18mm wider than the correct bearing ( 27.5 x 2 ) -38 = 18. This means the splined shaft would have to have 18mm clear thread showing when attached to a standard bearing setup. I'm not sure it has that much , perhaps about 10mm from memory. Also bearings are of unknown rating re weight capacity and might need a 4mm separator plate between them to allow successful non deforming mating of the surfaces. hmm, crazy idea forget it . |
|
|
|
Post by daydreamer on Apr 11, 2023 19:03:48 GMT
..... At least it looks like it was torqued up... Here is my untorque spanner... a bit sore ... That's not an untorque tool, THIS is an untorque tool 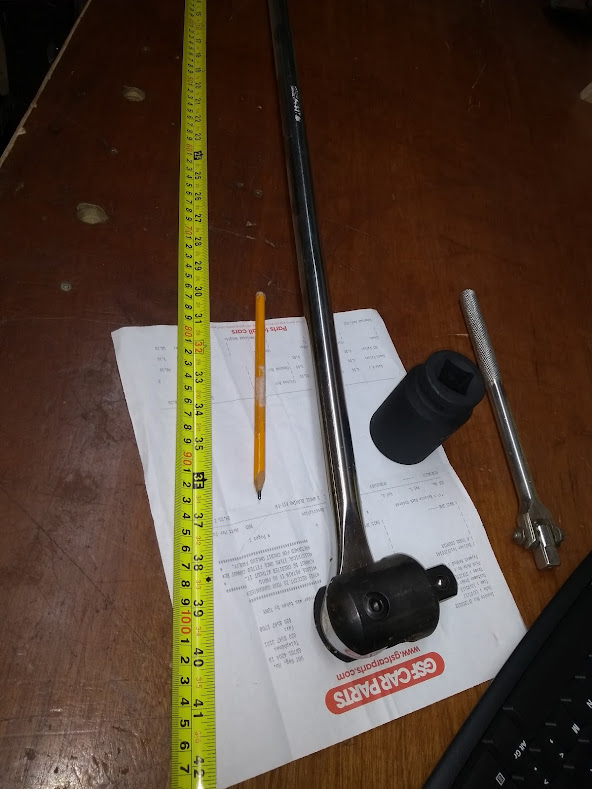 |
|


