|
|
Post by erik on Feb 22, 2013 12:24:27 GMT
|
|
|
|
Post by roadtrackrace on Feb 22, 2013 15:31:09 GMT
|
|
|
|
Post by slugshot on Feb 22, 2013 16:36:55 GMT
Hi Eric
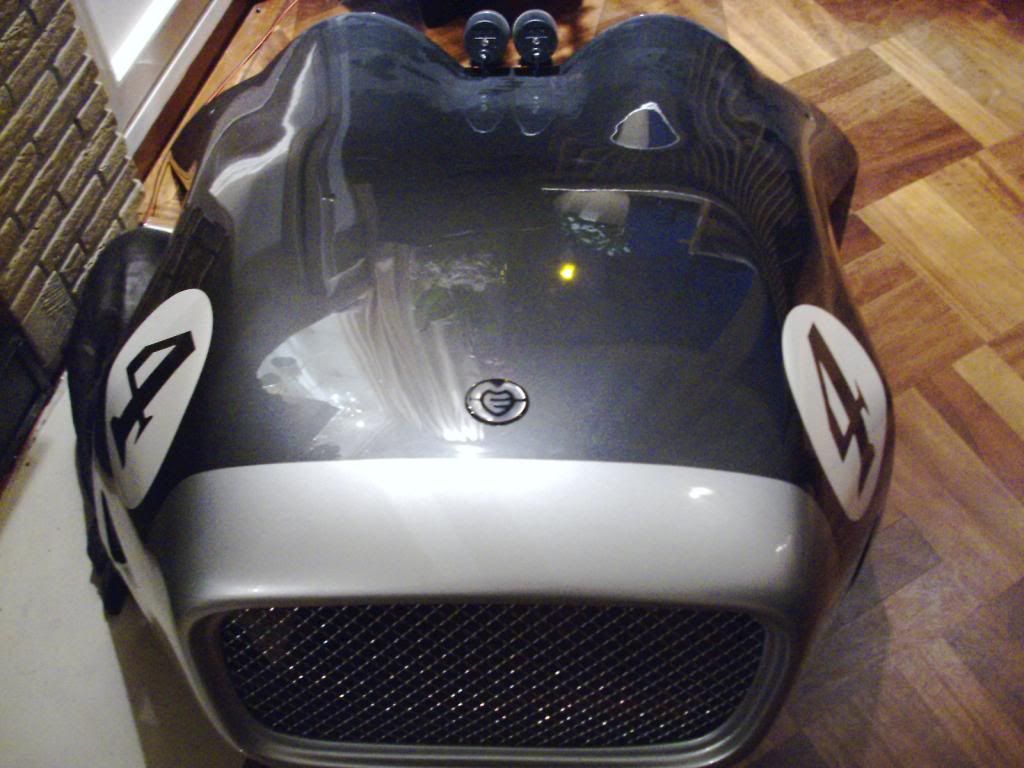
She looks much better outside, the red comes to life and would look even better if the sun was out.
I think you've go the position of the number 4 just right, are you only having it on the left side.
Cheers
Kevin
|
|
|
|
Post by erik on Feb 22, 2013 16:51:56 GMT
Thx! The number will be on both sides. Will have a search for vinil to match the chasis tough. Yeeah the colors are pretty close to the real thing and the wine red will be much deeper and slightly to brown when the sun is on  the gunmetal (metallic) and wine red (non metallic) are a good match. I think reflective vinil (math silver) will be a good match with wine red#4 and highly visible at night lOL!! omg, took me several days to figure out the vintage racing plate color sheme... The only thing that doesn't show is the cool tR1ke emblem I made!! |
|
|
|
Post by erik on Feb 23, 2013 23:40:24 GMT
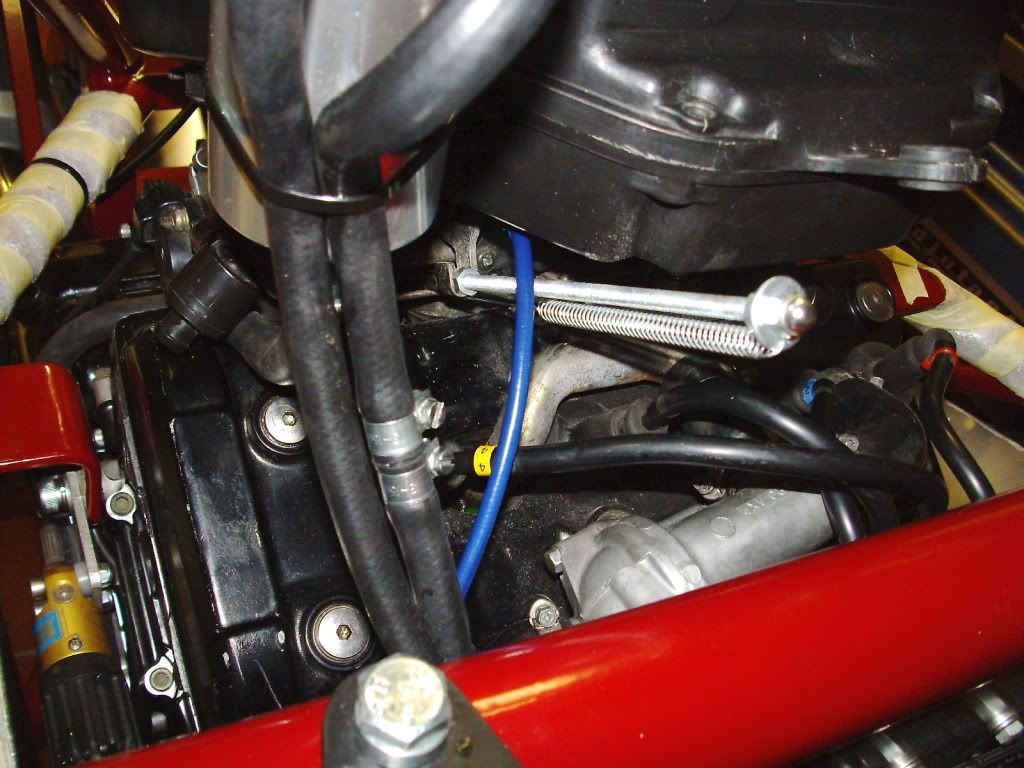
Ok here it is: Fixed the brakes. I had them mounted with the nipples downwards so we swapped them to face to the top and added the last fluids. Took her outside and raised the rear wheel. Managed to start the engine 4 times but because the engine tumbled over when installing in the chasis it is likely oil leaked on top of the pistons so starting was a pain and black smoke out of the carbs and gear box vent hole. Throttle cable appeared to be struggling stick slip and the carbs cannot go to idle by them selves easely so need to add an additional spring. This may have contributed to trouble starting the engine. I do expect some oil on the spark plugs as well so need a bit tweaking here. Need to evaluate this with my bike mechanic first to take proper action on this. However, when the engine was running there are no mechanical noises exept the exhaust which highly suprised me! I only needed to tighten 2 clamps on the thermostate to stop a light leaking. it got pretty hot over there but the rad was handwarm. The breather tank showed 2cm less cooling leveldue to trapped air and the coolant reservoir level was reduced only 1cm so that went pretty well! Need to add an aditional spring to the carb disc to close the valves to idle first before proceding. The good thing is the pedal connector and disabled alarm connectors are rewired properly but the clutch switch which appear to be switching the wrong direction had to be disabled and I like to sort this out as well. This switch cancelles out starting the engine in gear when the clutch is not pressed. if this is sorted well the clutch can be adjusted and system needs to be run to temp for fan testing which would end the build and start the paperwork. recharging batterie now  stay tuned  |
|
Deleted
Deleted Member
Posts: 0
|
Post by Deleted on Feb 24, 2013 14:15:38 GMT
Have you fitted LiPo batteries? If so be really careful, the have an awful habit of setting on fire. LiPo batteries fitted on the grounded Boeing Dreamliner, and what I use in my airsoft gun, both prone for bursting into flames when being charged,
|
|
|
|
Post by erik on Feb 24, 2013 15:52:19 GMT
The Shido batterie I use is Li-ion or LifePo but this isn't Lipo because this is not street legal. as far as I know there are no Lipo powered cars. Yes, they do catch fire if not monitored intensively.
I do reconsider to add connectors so i can place Lipolly cells in parrallel if needed when I am struggling to get the engine started but the Shido pack revs the starter engine amazingly well over 6-7 atempts yesterday.
working on the carb spring right now and it is snowing so no testing is short future.
|
|
|
|
Post by slugshot on Feb 24, 2013 16:40:57 GMT
Hi Eric
I had problems with my throttle cable at first, but once fitted with a quality cable with a nylon inner sleeve it was and still is trouble free.
You shouldn't need to add an extra return spring to the carbs if there is no kinks in the routing of the cable and it has a nylon liner.
Cheers
Kevin
|
|
|
|
Post by erik on Feb 26, 2013 21:48:59 GMT
Turned out you were right on the throttle cable, exept there was already a nylon outer cable in the steel outer cable and I used 150lbs nylon coated fishing line to make her move smooth as snot. The original uncoated cable had too much stick-slip which made it hard to control rpm. I did this mod after I installed a spring to the carb to close the carb. Turned out to be quite simple using the bracket which was already there. The mods haven't been made this morning and starting the anging was troublesome due to oil on the pistons and fuel in the exhaust. we cleaned the spark plugs which helped a lot. Lotsa white smoke out the exhaust but no smoke out of the gear box vent hole now. Murphy struck when the thermostate opened at 60C and the front rad cap pied coolant allover the place. Seems the rubber washers got brittle and i got me a new one. Only with this one I cut 1/3 of the lower rubber away to cancel out the valve and let air pass throught the top of the cap. Now I will be able to escape trapped air on the highest outlet which I closed with a piece of tube. recharging again. I'll fire her up tomorrow. Hope to have solved all these silly issues and adjust the cables properly and perhaps tweak the clutch cable as well. an other problem arised that dutch laws have been changed and we are alowed to use bike plates now. having welded the brackets for wide car plates made me a bit angry. Guess I'll stuck with the car plates because I do not see a neat modification for this moment.  |
|
|
|
Post by slugshot on Feb 26, 2013 22:07:54 GMT
Hi Eric
good to see everything works as it should...if you have a little trouble starting the engine make sure the idle speed is set at just over 1000rpm as they don't like much more when cold.
Cheers
Kevin
|
|
|
|
Post by erik on Mar 1, 2013 8:27:10 GMT
Yeah, we still are struggling to start the engine because of wet spark plags, exhaust pipes, and filter, mainly because we haven't been able to run the engine hot due to the rad cap happy bleeding syndrome... Ordered a valveless cap which wasn't included in my breather tank kit. Everything else works like a charm exept the clutch switch which seems to work in reverse and might have to add a ralais to it. I'll pick up the vinil today. Too bad the vinil cutter cannot read dwg or dxf files so i need to cut the number myself to save labour costs for scanning/redrawing. The oval will be machine cut only which is a no brainer for him. patience will be rewarded  |
|
|
|
Post by slugshot on Mar 1, 2013 16:35:36 GMT
Ah now I understand why you had to remove the blanked top rad outlet to bleed the rad.
With the valveless cap the trapped air in the rad should be forced out the other top rad outlet that goes to the header tank.
And just top the header tank up after its run up to temp a couple of times.
The two wires that go to the clutch switch are ether left disconnected or connected together I can't remember which, on mine it has to be in neutral to start the engine, I might change it so it will start in gear with the clutch in.
|
|
|
|
Post by erik on Mar 26, 2013 19:09:46 GMT
Much too slow progress here... Had to wait for 3 weeks until a new 1.3bar rad cap arrived which was no good either. I cut off the rubbers of the old rad cap and placed this on the new rad cap to increase pressure and better closure of the neck. I pinced the flange on the neck a bit as well and now the cap fits very hard on the rad. This morning the tr1ke ran up to 101 degrees and the fan controlled temp down to about 80. Turned off the engine and wasn't able to start her again. Possible cause was the 1st start went a bit tough because of a soaked engine and the 2nd time because of low voltage of the batterie which as been used extensively. Might be old spark plugs as well. Shouldn't be a major issue but this has been a struggle for several weeks now. i'm happy the rad cap issue has been solved properly. I onky needed to add 15mm of coolant in the reservoir which shows the hoses have been routed correctly. Need to make a good clamping point of the red starter cable as well. I think I will extend the bolt on the starter relais and the mass bolt on the engine. The poles of the batt needed to be located in a less ideal position to fit the loom in the red box without too much stress. When proper clamp connections are installed it should be much easier to fast charge and bypass batterie. managed to fit the decals on the bonnet. This is black an (light) cream white. Took me 2 weeks to decide this was the best setting and I am very pleased with it. This build took me close to a year to do and I think I needed this timespan to make up my mind on many details to make me smile. I think there is very little to be left to be desired right now exept a 3rd rear light. Hope to complete final testing within a few days if weather permits. It's way too cold and windy to have fun outdoors. br, erik  |
|
|
|
Post by slugshot on Mar 26, 2013 19:40:56 GMT
Hi Eric
After trying with no look to get you a valve less cap I came to the same conclusion myself. Removing the inner rubber seal would work ok .
It would seem that cbsonline only sell the correct cap in the kit with the header tank, and the other valve less cap they sell separately is the wrong size.
PS the number boards look good with a light cream back ground so it doesn't look too modern.
|
|
|
|
Post by erik on Mar 27, 2013 18:57:21 GMT
Yeah, I ended up having the wrong size valveless cap... One could not have seen this in advance...
batts have been recharged again. It is a trickle charger, only 15W. Not sure if a high Amp lead charger would be too much for the Li-ion cells.
Because the engine has ran up to 101C wwithout issues exept starting I'll get me some new spark plugs tomorrow anyway. Hope to have this sorted for once and for all. This testing takes forever...
need to reverse the clutch switch as well. Minor issue, no biggie.
Yeah I am pretty happy they way they turned out. Still looking classy.
br,
Erik
|
|