|
|
Post by paul56 on Nov 19, 2018 9:21:06 GMT
Hi
is the a comprehensive list anywhere of either all the parts I need keep from my donor vehicle - or of all the parts that come with the Exocet kit?
the one thing I'm not sure about at the moment is the fuel lines - do I need to salvage these from the (now removed) body or are there replacements with the kit?
Paul
|
|
|
|
Post by jason82 on Nov 19, 2018 9:31:58 GMT
Hi mate, scrap the lines, new ones are not included in the kit, so you need to get new 8mm I.d. hosing from kit spares. Make sure that it's iva marked. There is no instructions with the kit, you receive panels, the chassis & bolts. To be safe, scrap the mx5 shell & panels if they are bad & keep everything else. The fuel filler cap & hose (steel part) need to be kept. Label every single wire, even if you know where they go now, in a few months time you may not.
|
|
|
|
Post by jason82 on Nov 19, 2018 9:36:24 GMT
Oh, read people's build threads when you have time, there can be some amazing information in them, you just need to search for it. Go really careful with the rear lower hub bolts, they are a cow to remove & in my case I had to order new, parts were only available from Mazda dealerships for £20 each. Don't cut off ball joints with an angle grinder they can fuse into the hub, so use a proper splitter.
Good luck !
|
|
|
|
Post by Stiggy on Nov 19, 2018 10:21:28 GMT
Hi, there is a list on our site of what you need to take from your donor, I have copied it here for you together with whats included in the kit and a link to the build guide which also contains useful info on stripping the donor. MX5 donor parts include the front and rear sub frames, engine, gearbox, radiator, coolant pipes, calipers and discs/pads, flexy brake hoses (solid lines come with the kit), fuel tank complete with pump and sender, expansion bottle, all the suspension components, steering rack, steering column with cowling, steering wheel, light switch stalks, horn, side repeaters, brakes, transmission, exhaust system, wiring loom and engine management system, instrument binnacle, gear shift, pedal assembly, master cylinders, throttle cable, handbrake and cables, seats and runners, wheels and tyres (unless you choose grp seats or buy upgraded wheels), seat belts (unless you fit harness's), filler cap and pipes. There are also lots of useful nut and bolts and screws on the donor, and don't forget the boot trim, for the Exocet bonnet. Your kit will come with a bespoke chassis, alloy floor, front bulkhead panels (these have folds but need trimming to suit) and front centre tunnel (rear centre tunnel is part of the chassis), PVC side panels and rear bulkhead, grp front and rear panels, 4 grp cycle wings, 4 steel wing stays, roll of brake pipe, p clips, roll of edge trim, bolts, washers and nuts, to secure chassis to sub frames, and rivets for the floor. Even self tap screws are included! You also receive touch up paint, radiator grille mesh, a bonnet sticker and a smile! www.mevltd.co.uk/assets/documents/MEV_EXOCET_BUILD_GUIDE_1.pdf |
|
|
|
Post by Stiggy on Nov 19, 2018 10:27:05 GMT
|
|
|
|
Post by jason82 on Nov 19, 2018 11:10:29 GMT
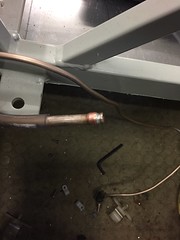
Just remember that if you take the hard line route, you will need to double flare the end of the copper pipe to stop the rubber pipes from slipping off. You will need to keep your bits of rubber pipe that go from the tank to the hard lines & from the injector rail to the hard lines. If you have a mk2, you only need one feed from the tank to the fuel rail, 4m from memory, or if you have a mk1, you will need a flow & return.the fuel pipes have an 8mm I.D. I went with the hose route. No joins, straight from the tank, to the fuel filter, straight to the fuel rail, then the return goes from the fuel rail back to the tank. If you use copper pipe, you will need to have a rubber pipe from the tank to copper, then a rubber pipe fro. The copper to the furl filter, short stint of rubber to copper pipe, up to the fuel rail, then flexi hose from the copper to the injector. Then on the return, short flexi fuel pipe to a copper stint up to the tank, then a rubber pipe from the copper to the tank. It's a lot of joins, a lot of potential for error or fatigue over time of the copper. The MX5 uses steel pipes for that reason. The copper pipe route appears cheap on the first glance, but if you have not got a flaring tool & a copper pipe bending tool it gets expensive. Take my advice, use the pipe from kit spares, then buy 15mm plumbers copper pipe clips which have the clip on them to hold the pipe across the ppf. I have a mk1, so I bought twin pipe clips, I then enlarged the fixing screw hole to 6mm, then bolted it straight to the ppf etc.
|
|
|
|
Post by jwagner on Nov 19, 2018 13:03:59 GMT
|
|
|
|
Post by hammy3601 on Nov 20, 2018 18:58:10 GMT
Mk2 needs feed and return. Mk2.5 needs feed only mate
(I have a 99 mk2 donor)
|
|
|
|
Post by p2tav on Nov 20, 2018 19:04:12 GMT
Mk2 needs feed and return. Mk2.5 needs feed only mate (I have a 99 mk2 donor) correct I have mk2.5 and only have 1 feed  |
|
|
|
Post by casesensitive on Nov 21, 2018 16:54:34 GMT
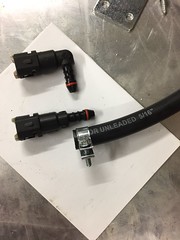
But if you want to upgrade the intake to, say, Throttle Bodies later, you'll need a return. I had to buy a second set of connectors for my Ford kit, best keep them on hand for later, just in case.
|
|
|
|
Post by tojeiro on Nov 24, 2018 11:20:18 GMT
Using existing connectors had been done be quite a few, me included.  by -Tojeiro 74- by -Tojeiro 74-For hard line, I second the use of Cunifer over copper, don’t take chances with fuel. For ends I was concerned over damage to rubber hose from a flare so I soldered plumbing olives on each end. After soldering you can dress the ends to get a nice rounded end.  by -Tojeiro 74- by -Tojeiro 74-I also sleeved my pipe with clear plastic tubing to reduce chance of damage, corrosion and rubbing. Cost only a couple of £. |
|