|
|
Post by sandancer73 on May 14, 2014 17:28:47 GMT
I have, it makes life alittle easier when taking it in and out.
|
|
|
|
Post by kiwicanfly on May 14, 2014 19:33:19 GMT
I'll do that when I get a better hole saw set (Silverline one is feeble). Mark it with a sharp scriber or dividers to get an accurate and clear line. Chain drill or jigsaw close to the line. File it out with that nice new half round you bought. Done. Hole saws are good but I don't find they work too well in aluminium as they tend to skid due to teeth profile being coarse to suit wood. Also above technique comes in a greater range of sizes  |
|
|
|
Post by Paul (madeye) on May 15, 2014 18:41:10 GMT
after fitting and removing so many times I just chopped the lot off
|
|
|
|
Post by casesensitive on May 19, 2014 7:18:02 GMT
Air-con replacement pulley mod
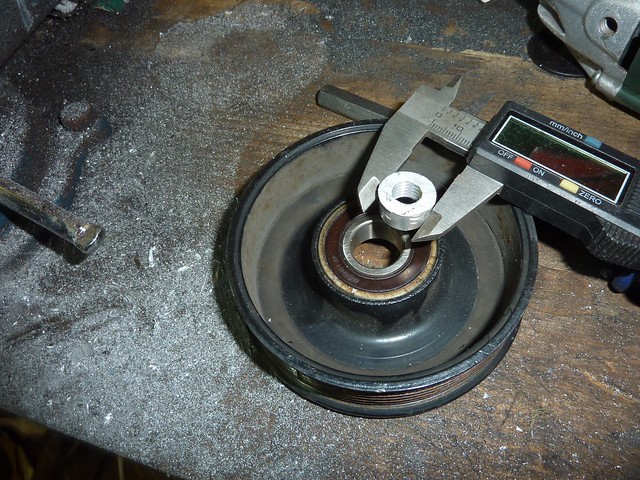
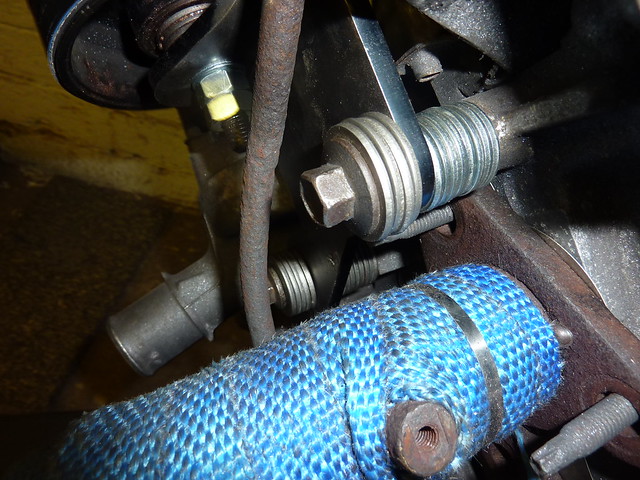
Like most builders, I've removed the air-con and power steering pumps, and if you've been following the whole thread, you'll remember that when I sent my engine off to have its aux belt replaced, it came back with the water pump effectively pumping backwards. A suitable bracket was sourced from RTR, a lot of washers purchased and my 'trainer' donor scoured for a suitable grooved pulley. The first step was to get the exhaust manifold back on, as the pulley goes over one of the threaded bolts for it. With the manifold and part of the engine over in place, it's going to be a tight fit getting the engine in again! Probably put it all together again after I put it in. Exhaust-wrapped in blue wrap, which disappointingly, goes white after a few hours of use. Single bolt is temp fixing.  Aux tensioner donated by he old Puma engine here, had great difficulty finding anything to drop right into the gap (16.3mm), so I went right back to the bracket and cut this protrusion off with a 0.8mm disc.   White and later copper grease to keep things moving  Thought the bag of thick M10 penny washers would last the duration of the project, should have bought 100!  Used 17 for the lower bolt, and 6 between pulley and bracket, and I'll need another 10 or so for the upper bolt. Edit: I've since had to adjust this, I have 10x 2.5mm washers on top, and 8 on the lower one. Lots of copper grease, they rub very slightly, and have been loosened half a turn so I'm a small bit concerned this'll work loose. Edit: fixed this by turning around the outer cap, duh!Need to measure the path for a new belt, and get more washers in. Edit, all done and belt was 1400mm in the end, because the pulley I put in was 90mm rather than the usual 60.Pulley needed 4x2.5mm washers to set it level with the other pulleys.  
|
|
|
|
Post by casesensitive on May 19, 2014 7:39:07 GMT
SteeringDrilled out some rubber washers and put one each side between the steering rack and chassis to absorb vibrations and aid in combating bump steer.  Finished painting and lacquering my steering column extension  Finally taking shape 
|
|
|
|
Post by casesensitive on May 19, 2014 7:43:12 GMT
Handbrake, fuel tank, gear leverMounting the Focus's handbrake was straightforward enough; 20mm M8s with washers top and bottom though I'll still have to do something with pulleys and source a new handbrake cable. Took the edge of a penny washer for the rear mounting point underside.  The old Puma gear knob was looking rough, plus my Getrag box has 6 forward gears, so the flapper disc (80 grit) followed by some 180, 400 then 600 was employed to improve things. I quite like the brushed look, but I may yet get some finer paper and bring it to a shine.   Fuel tank holes expanded out to M6, with a rubber washer raising them 4mm off the floor, which has a dozen small drainage holes in it. 
|
|
|
|
Post by kiwicanfly on May 19, 2014 9:17:28 GMT
Are the tags on the side of tank original from RTR or did you add them ? Mine were front and back.
I'd take the rubber washers out from under the rack, that needs to be solidly fixed. It has nothing to do with bump steer.
|
|
|
|
Post by casesensitive on May 19, 2014 16:45:17 GMT
Are the tags on the side of tank original from RTR or did you add them ? Mine were front and back. I'd take the rubber washers out from under the rack, that needs to be solidly fixed. It has nothing to do with bump steer. Tags are RTR's work, and aluminium welding is not something I even know anyone that does, so they'll stay where they are, tank cover permitting. I'll see how I go with the rack; the washers are 3.5mm and so compressed from the tightening of the nuts they're scarcely 1mm high now; still haven't put in on the ground, everything's likely to change if it's wonky on the deck! |
|
Deleted
Deleted Member
Posts: 0
|
Post by Deleted on May 19, 2014 18:26:09 GMT
I have to agree with kiwi.. Bolting rubber between the surfaces of the rack and mountings is introducing potential failure.
The rubber will perish and split, the rack will then be loose on its mountings.
Nylon washers would be more suitable, but you may not get any "absorbing" effect.
Personally.. I would not use them.
You are not going to feel whether they are fitted, or not fitted. You will feel when they fail.
|
|
|
|
Post by airforceone on May 19, 2014 18:49:48 GMT
They will probably get picked up during the IVA and have to be removed anyway better
to ditch them now.
You shouldn't need anything under the rack anyway.
|
|
|
|
Post by kiwicanfly on May 19, 2014 20:06:29 GMT
My rack sits on an aluminium mount with a recess in the top and spigot on the bottom giving a double shear fixing, even if it comes loose, within reason, it can't move. Again an NZ requirement.
Regarding the tags, mine were front and rear and a PITA, I had to remove them as they were a waste of time so good to see a positive change from RTR.
|
|
|
|
Post by casesensitive on Jun 10, 2014 7:02:45 GMT
Rear brakesAfter watching a video from 'Eric the car guy' on youtube, I realised that my rear callipers were likely extended and would have to be retracted. Here's a video of it. Here's my extended piston, with a wedge marked for size.  And here it is, ruined  One that I did earlier, next to this one to be done. I pushed down hard on it and turned clockwise, which is a bit counter-intuitive, but worked in this case.  Both done  And finally, fitted, currently with old brake pads and donor flex hose (cleaned internally). 
|
|
|
|
Post by mawdo81 on Jun 10, 2014 7:11:53 GMT
Bit late now but I have a rewind tool if anyone wants to borrow it for the cost of postage or collect from Derby or Nottingham.
Sent from my GT-I8190N using proboards
|
|
|
|
Post by casesensitive on Jun 10, 2014 7:16:29 GMT
Front brakesI went for the 4-piston hispecs with Focus ST170 rear (280mm x 10mm) solid discs in the end, after all my humming and hawing over getting the donor fronts to work. I sold the ST setup for €80 instead. Pretty! And under 1kg apiece.   I bought some M10 70mm (12.9) socket caps to hold it all together, and the fit at the cap is such that the paint comes off. There's also a 12.6mm gap (showing lower here, calliper closer to the disc) that would need spacing. It seems that fitting bigger (300mm) discs would simply be a matter of adding spacing.  Most people seem to use washers, but I didn't like the idea of that, so I went hunting around the yard for scrap that was about this thick. Lo and behold, I found a rusty bit of old iron that was exactly the right thickness. I cut off two ~150mm long lengths (well, 3, I made a balls of one).  Holding in place with a couple of clamps, and having covered the marking side with masking tape, I painted the curve of the caliper bracket onto the spacers, and marked for drilling. A LOT of grinding later I had a pair of spacers.  Test fit  And hammerite to finish 
|
|
|
|
Post by casesensitive on Jun 10, 2014 7:26:20 GMT
Front brake padsPossibly one for the technical section, but I was a little frustrated that the OEM fit of the Hispec brake pads wasn't obvious, these will have to be replaced pretty frequently, and I don't want to be locked into either RTR or EBC for pads. BMW E21 3-series or Lotus Esprit     The sliders go through here at 50mm  Pads are ~14.5 thick  These little pins pull up and out, and the 'rails' pull out to the rear. You push them back through the holes in the pads, and they 'hang' there.  I found the pins a bit of a pain to fit, they don't push all the way through, so don't try to force them!  I had to refit the brakes because the r-clip pushed the pad out a touch, catching on the disc. While I was about it, I sanded all the paint off the spacers, a few microns here but the difference by the edge of the disc was enough to cause the gap to be too small. I had a dime-bar moment trying to fit the springs, I think this is right, because it's the only place I could get them on!  And all put together  
|
|