|
|
Post by gwnwar on Dec 11, 2014 19:28:01 GMT
How about bowing all 3 tubes about a 1/4" to 3/8" Toward the bottom side.. Looks like you would still have good shielding for the tubes.. Might want to just knock off the sharp corner of the bolt head just enough to put a round to it..Hold it in that position when tightening the nut on the inside. Put plastic cap on nut..
|
|
|
|
Post by miket on Dec 12, 2014 18:15:10 GMT
Yes I think that whilst 'tape' may be pragmatic it's not very 'engineer'! I'll look at that and if it's not a goer I might run an inverted "U" up and around the bolt area. I've not seen how others tackle the issue of getting a vaguely straight pipe from a roll of tube so thought I might try feeding it in to a wooden 'tunnel'. What's the chances of me having a couple of bits of trim off a long-gone bed that go together to make two 5mm circular tunnels... 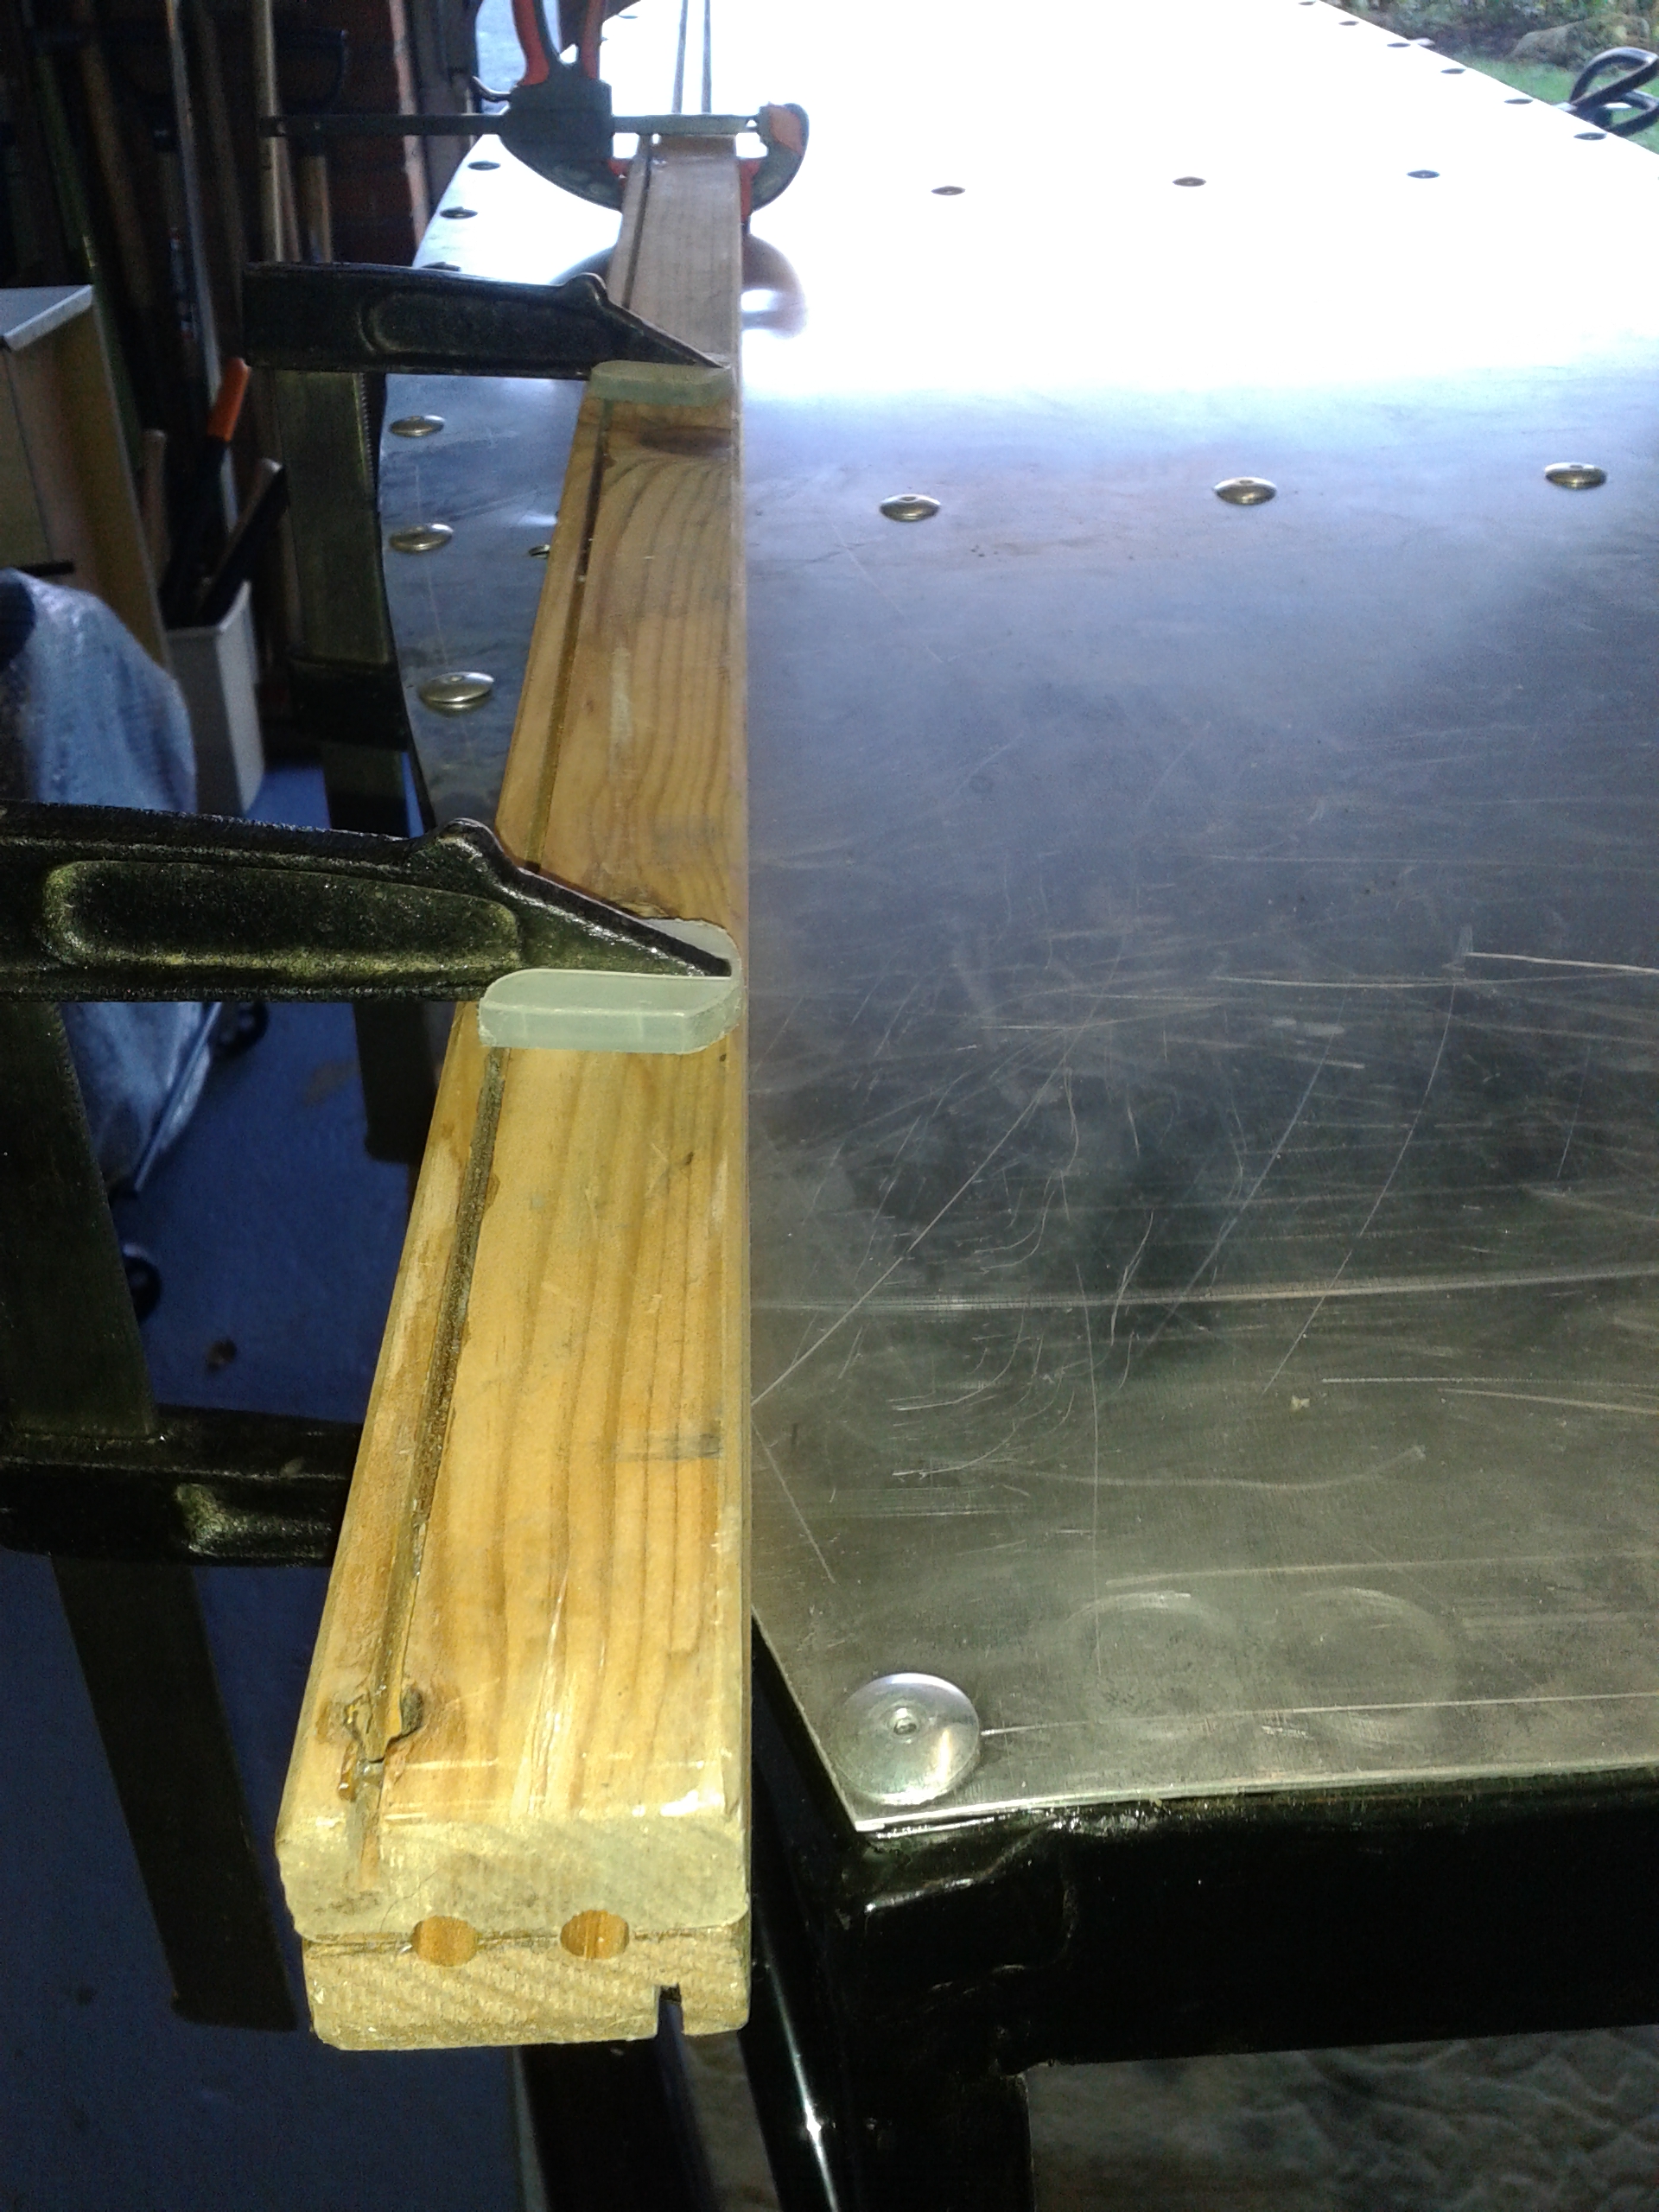 ... seems to work okay in the absence of me having any other ideas. Though once I've straightened it it's going to be a pain to manipulate such a long length without catching it on things whilst working on it. I started measuring out where to put the bends but was struggling to visualise where bits would end up when back the right-side-up on the subframes and what might obstruct, so as a neighbour happened to stop by, the 'body' had a test fit on the subframes. This showed that it fits on pretty well as long as the subframes are supported to the right angle. The suspension tops needed twisting around a little to align properly - as anticipated somewhere above I think - had to compress one spring a little to overcome friction. With a test fit a number of things became apparent:- 1. if I'd measured and bent the brake line I'd have probably been okay, but I'm glad I did it. 2. my recently re-attached earthing point on the ppf needs re-aligning to come in from behind and below to avoid touching the tunnel. Ideally I'd have put it lower where there's a bit more clearance. 3. A bolt on the proportioning valve touches the inlet manifold. That must have been encountered before so I'll have to look for solutions. 4. I'll give up on using the donor fuel lines - they head off in directions that don't fit any more when the straight section of them is based from the new body instead of an MX5 - and I don't suppose steel pipes bend anywhere near as obligingly. |
|
|
|
Post by miket on Dec 14, 2014 18:28:02 GMT
Whilst the kit was on the ppf I spent some time deciding on routing for brake/fuel lines at front and back once they leave the tunnel. Made some measurements and some marks for holes for clips to drill once the kit's back off the ppf.
As others found; at the back end of the tunnel there is very little gap between the wall of the tunnel and the ppf girder - congestion likely especially if using flexible rather than hard lines. The only saving grace is that the last of the holes/spaces in the ppf girder coincides with the end of the tunnel to allow some leeway for lines/elecs to exit the tunnel.
I'd made the mistake of leaving the mid-exhaust hanger in place - reminded me that it needs relocating - looks like it might hang from the ppf girder ok so I'll look into that.
I offered up the fuel tank to determine fuel pipe lengths. On inspection there were some areas of the tank where the plastic/foam covering was detaching from the tank - mainly round the edge but also a few under blisters. Pared the foam back and cleaned up the rust for treatment.
|
|
|
|
Post by miket on Dec 16, 2014 18:31:29 GMT
Further inspection of the fuel tank showed the rust getting in close to the seam. I suspect there are risks involved in novices setting to a fuel tank with an angle grinder so probed a little with a hacksaw - nasty:- 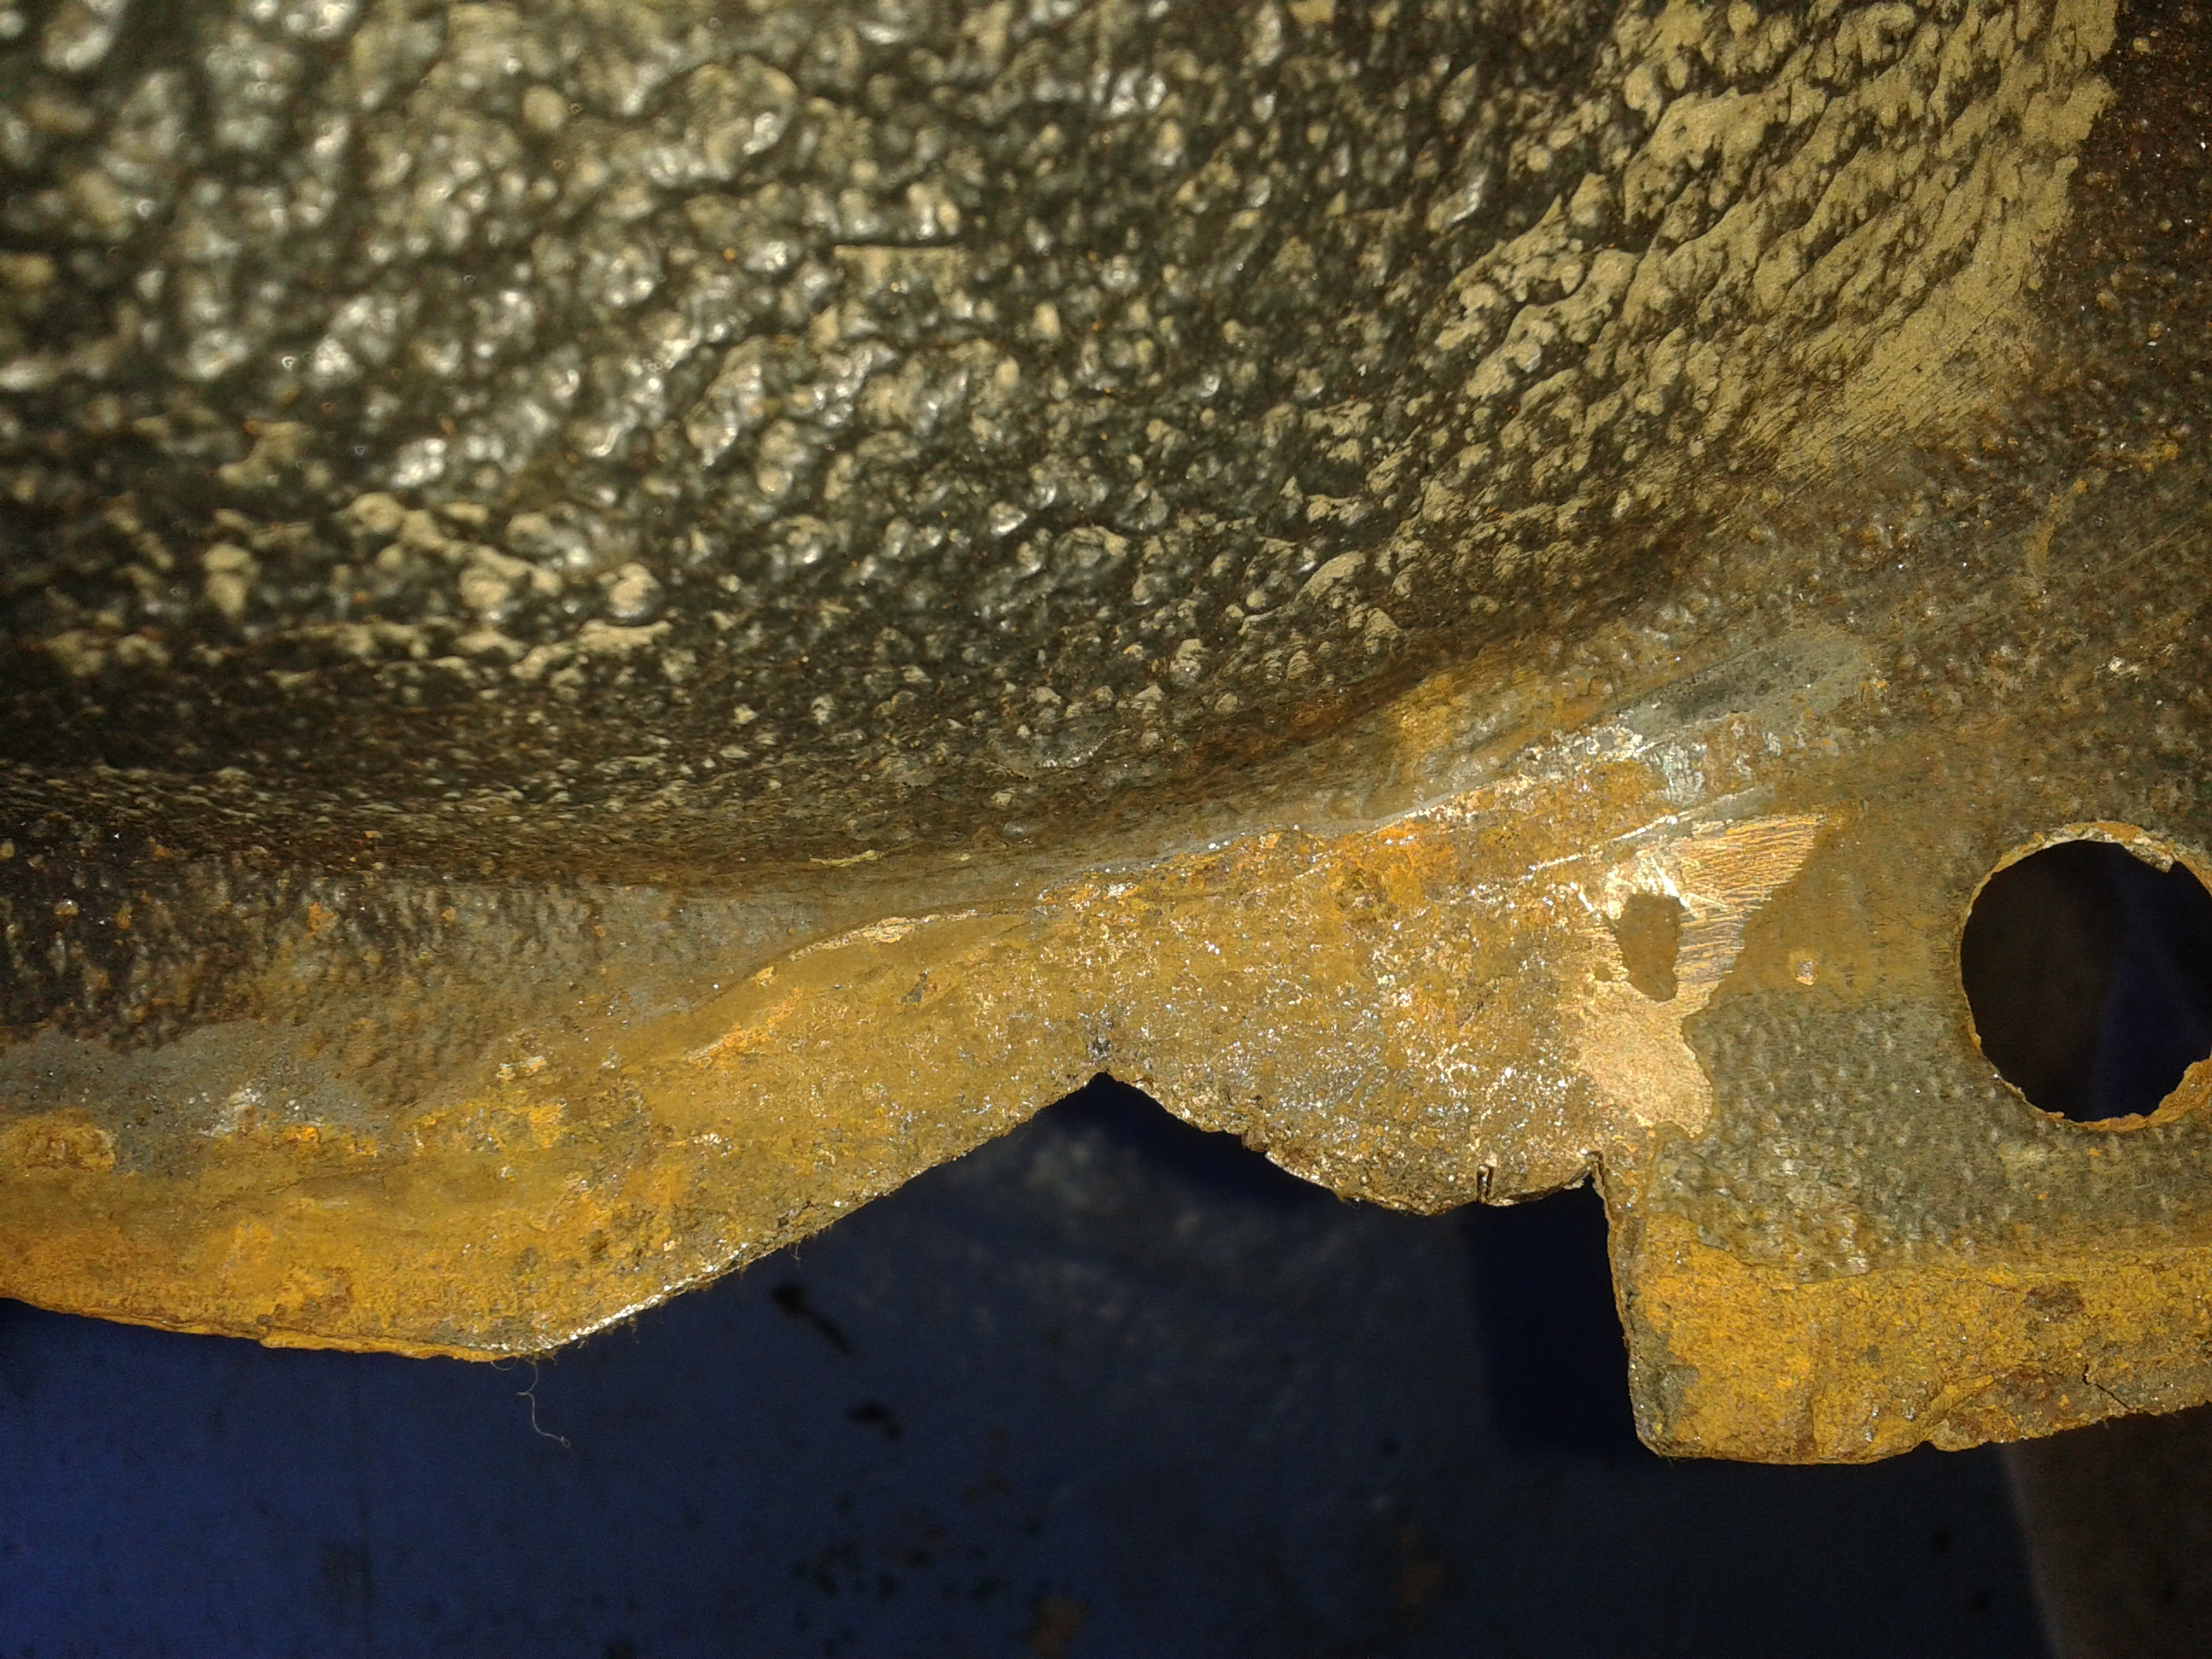 So I opened up the panels and had a look inside - also sub-optimal:-  So a replacement tank added to the shopping list. Feel free to tell me that the above wouldn't have been a problem! Took the kit back off the ppf having decided where to route the hard brake/fuel lines to. Improved the alignment of the front top hats to make the next joining of kit and ppf easier. Got electrics p-clipped along the ppf girder using the original holes except to the rear where I wanted the conduit to run at the level of the holes in the girder - to allow a gentler radius bend on exit out of the back of the constricted tunnel. Did a bit of brake pipe bending practise - realised that an old front piston makes a curve the same radius as my pipe-bender - might be handy in a tight space. I'm not yet decided on whether my front-rear brake line needs a bracket between leaving the front bulkhead and arriving at the proportioning valve - and if it does need one; where to put it. Looks like I could put one on the major framework tube or perhaps drop one down from the proportioner's own bracket. Thoughts / experiences welcomed. The other thing I could do with a steer on is what type of flare a fuel line needs where it goes to flexible hose. It's hard to imagine getting a hose over a double-flare so is a single one normal? |
|
|
|
Post by gwnwar on Dec 16, 2014 21:35:35 GMT
A small double flare will work if using a single flare round the flare tip with a file so it isn't sharp and will cut into the inside of the rubber hose..
|
|
|
|
Post by miket on Dec 17, 2014 8:06:25 GMT
Thanks gwmwar - I'll use a small double flare if that's recommended. I may have to come back to you about how to make a small one as opposed to a normal one, but I'll try making some tests first.
|
|
|
|
Post by miket on Dec 17, 2014 17:37:18 GMT
Today was my first attempt at running / bending a brake line ... closely followed by my second attempt.
On the first attempt I managed to measure several times and bend once, but had read the wrong number off my sheet and only realised after I'd committed to cutting the full length off the roll - idiot.
What I learned en route:-
1. It's not too hard to run a line, but very hard to run one that looks straight and true...
2. My choice to use the MX5 fuel/brake line clips has the advantage that the line can be clipped and unclipped fairly readily, but the disadvantage that every time you manipulate copper pipe in or out of them, the force involved bends the line a little. If I started over I'd probably do the classic bracket-and-pclip in a way that leaves a gap for seat belt mounting bolt access.
3. On the long front/back run the pipe is happy to sag and bend under its own weight - I ended up putting a splint on the straight run thru the tunnel while I worked on either end.
4. The wooden-tunnel pipe-straightener method works okay (until I find out how pros do it).
5. Pipe benders don't fit in to every place you need them to... I saw the start of a youtube vid where someone was using a small pulley instead - sounds a lot more compact and if I was starting over might go down that route. My pipe bender's smallest pipe channel is 6mm and whilst it bends 5mm okay, it'd be nice to have one whose 90 degree mark is correct for the pipe.
I'll post pics of the pipes 'cos I know I've found other peoples' pics of their methods and routes very useful ... but only if I'm still proud enough of the lines when they've been manipulated even more.
Had a look at what size hole a self-tapper needs and found that in theory you need to know the material you're fixing in to and either need a lot of very similar sized drill bits or careful choice of self-tappers. I wonder if this happens in the real world.
|
|
|
|
Post by miket on Dec 20, 2014 14:21:46 GMT
Replacement fuel tank arrived - looks healthier.
Did a bit a bit more 8mm practise. It occurred to me that several builds I see have pipes clipped on car, pointing upwards and not yet flared... so how do people avoid all the swarf from deburring and from chamfering dropping down in to the pipe for eternity? Blow thru with air?.. would you be convinced there was nothing still in there?
|
|
|
|
Post by mawdo81 on Dec 20, 2014 17:23:12 GMT
I've read that the advice is to flush through with whatever fluid they'll be used for, in this case petrol. You'd want to do this regardless I'd have thought.
|
|
|
|
Post by miket on Dec 23, 2014 17:20:10 GMT
I'd not heard of flushing the pipes through, but it's something I'll check out. It doesn't feel that the fluid/s and gravity would necessarily be sufficient to carry stuff along and round corners so presumably that'd mean putting the pipes on and bleeding the brakes before attaching pipes to callipers?
I guess if you locate the fuel filter in the flexible hose just before the fuel rail then any swarf gets captured that way.
Just a little progress today - ran the copper fuel lines, but now pending on the arrival of a flaring tool that'll cope with 8mm. My current flaring tool only does the 5mm brake lines... and I still need more practise and a smaller tool to debur the inner edge (as per separate 'flaring' thread).
|
|
|
|
Post by gwnwar on Dec 23, 2014 22:00:34 GMT
I have 2 tube cutters both have debur tools attached to them.. Just fold out.. Use a tube cutter not a hacksaw to cut tubing for a square end.. I found when doing the turns in the tubing use a piece of welding rod or coat hanger to make a template first then bend tube to shape..
|
|
|
|
Post by miket on Dec 24, 2014 15:40:48 GMT
The welding rod idea is one I would definitely adopt in future occasions. I also have this nagging worry that having fitted the lines I will later find that something else wants to share some of their place - another thing that experience will no doubt eventually help with.
Thank you, and the other contributors, for this and all the other sound advice and suggestions.
Have a great Christmas all.
Mike
|
|
|
|
Post by miket on Jan 14, 2015 8:49:33 GMT
Well the days since Christmas have been a little frustrating; though perhaps 'unproductive' would be fairer. Serenco asked me to send them their Powerhand flaring tool back and it looks like they're replacing it. If that fixes the problem of 'stepped' flares then great; otherwise more frustration as I'd like to have this tool up and running to be able to flare in situ.
In the meantime I feel to have got the hang of using a 'normal' flaring tool and I've had my first dabble in to rivnuts - so time not wasted really.
The rear transverse brake line is now on and finished.
I'm wary of cutting and flaring the main front/back brake line in case I cut it in the wrong place and find it doesn't meet up with the splitter. I'll either have to bite the bullet and trust to measurements or wait until the car meets the ppf and do it in situ.
At the front my brake line routing means either a 25cm leap from last p-clip to master cylinder or finding a way of putting another clip in space somehow.
I also need to think about exhaust hangers. I only seem to have one 'hook' from the donor to fix to the underside for the exhaust in the tunnel, but there's another hanger on the exhaust a foot further back in the tunnel that I need to buy or fabricate a 'hook' for.
|
|
|
|
Post by miket on Jan 19, 2015 22:16:47 GMT
Well it feels like it's taken a ridiculously long time, but at last the front/rear brake line and fuel lines are in and I can think about marrying chassis and ppf. Time spent learning to flare and replacing flaring tools under warranty etc slowed things down, but, as long as they work when I get to that stage, all's good. Though today my pipe cutter decided to start making spiral grooves rather than clean cuts just to make sure I don't get complacent. Reusing the donor clips resulted in a flamboyant loop around the seat belt bolt position and spaghetti where the brake loops under the fuels, but it feels solid. Having to remove the lines from the tight clips a couple of times resulted in them being less straight than I would have liked, but next time eh! 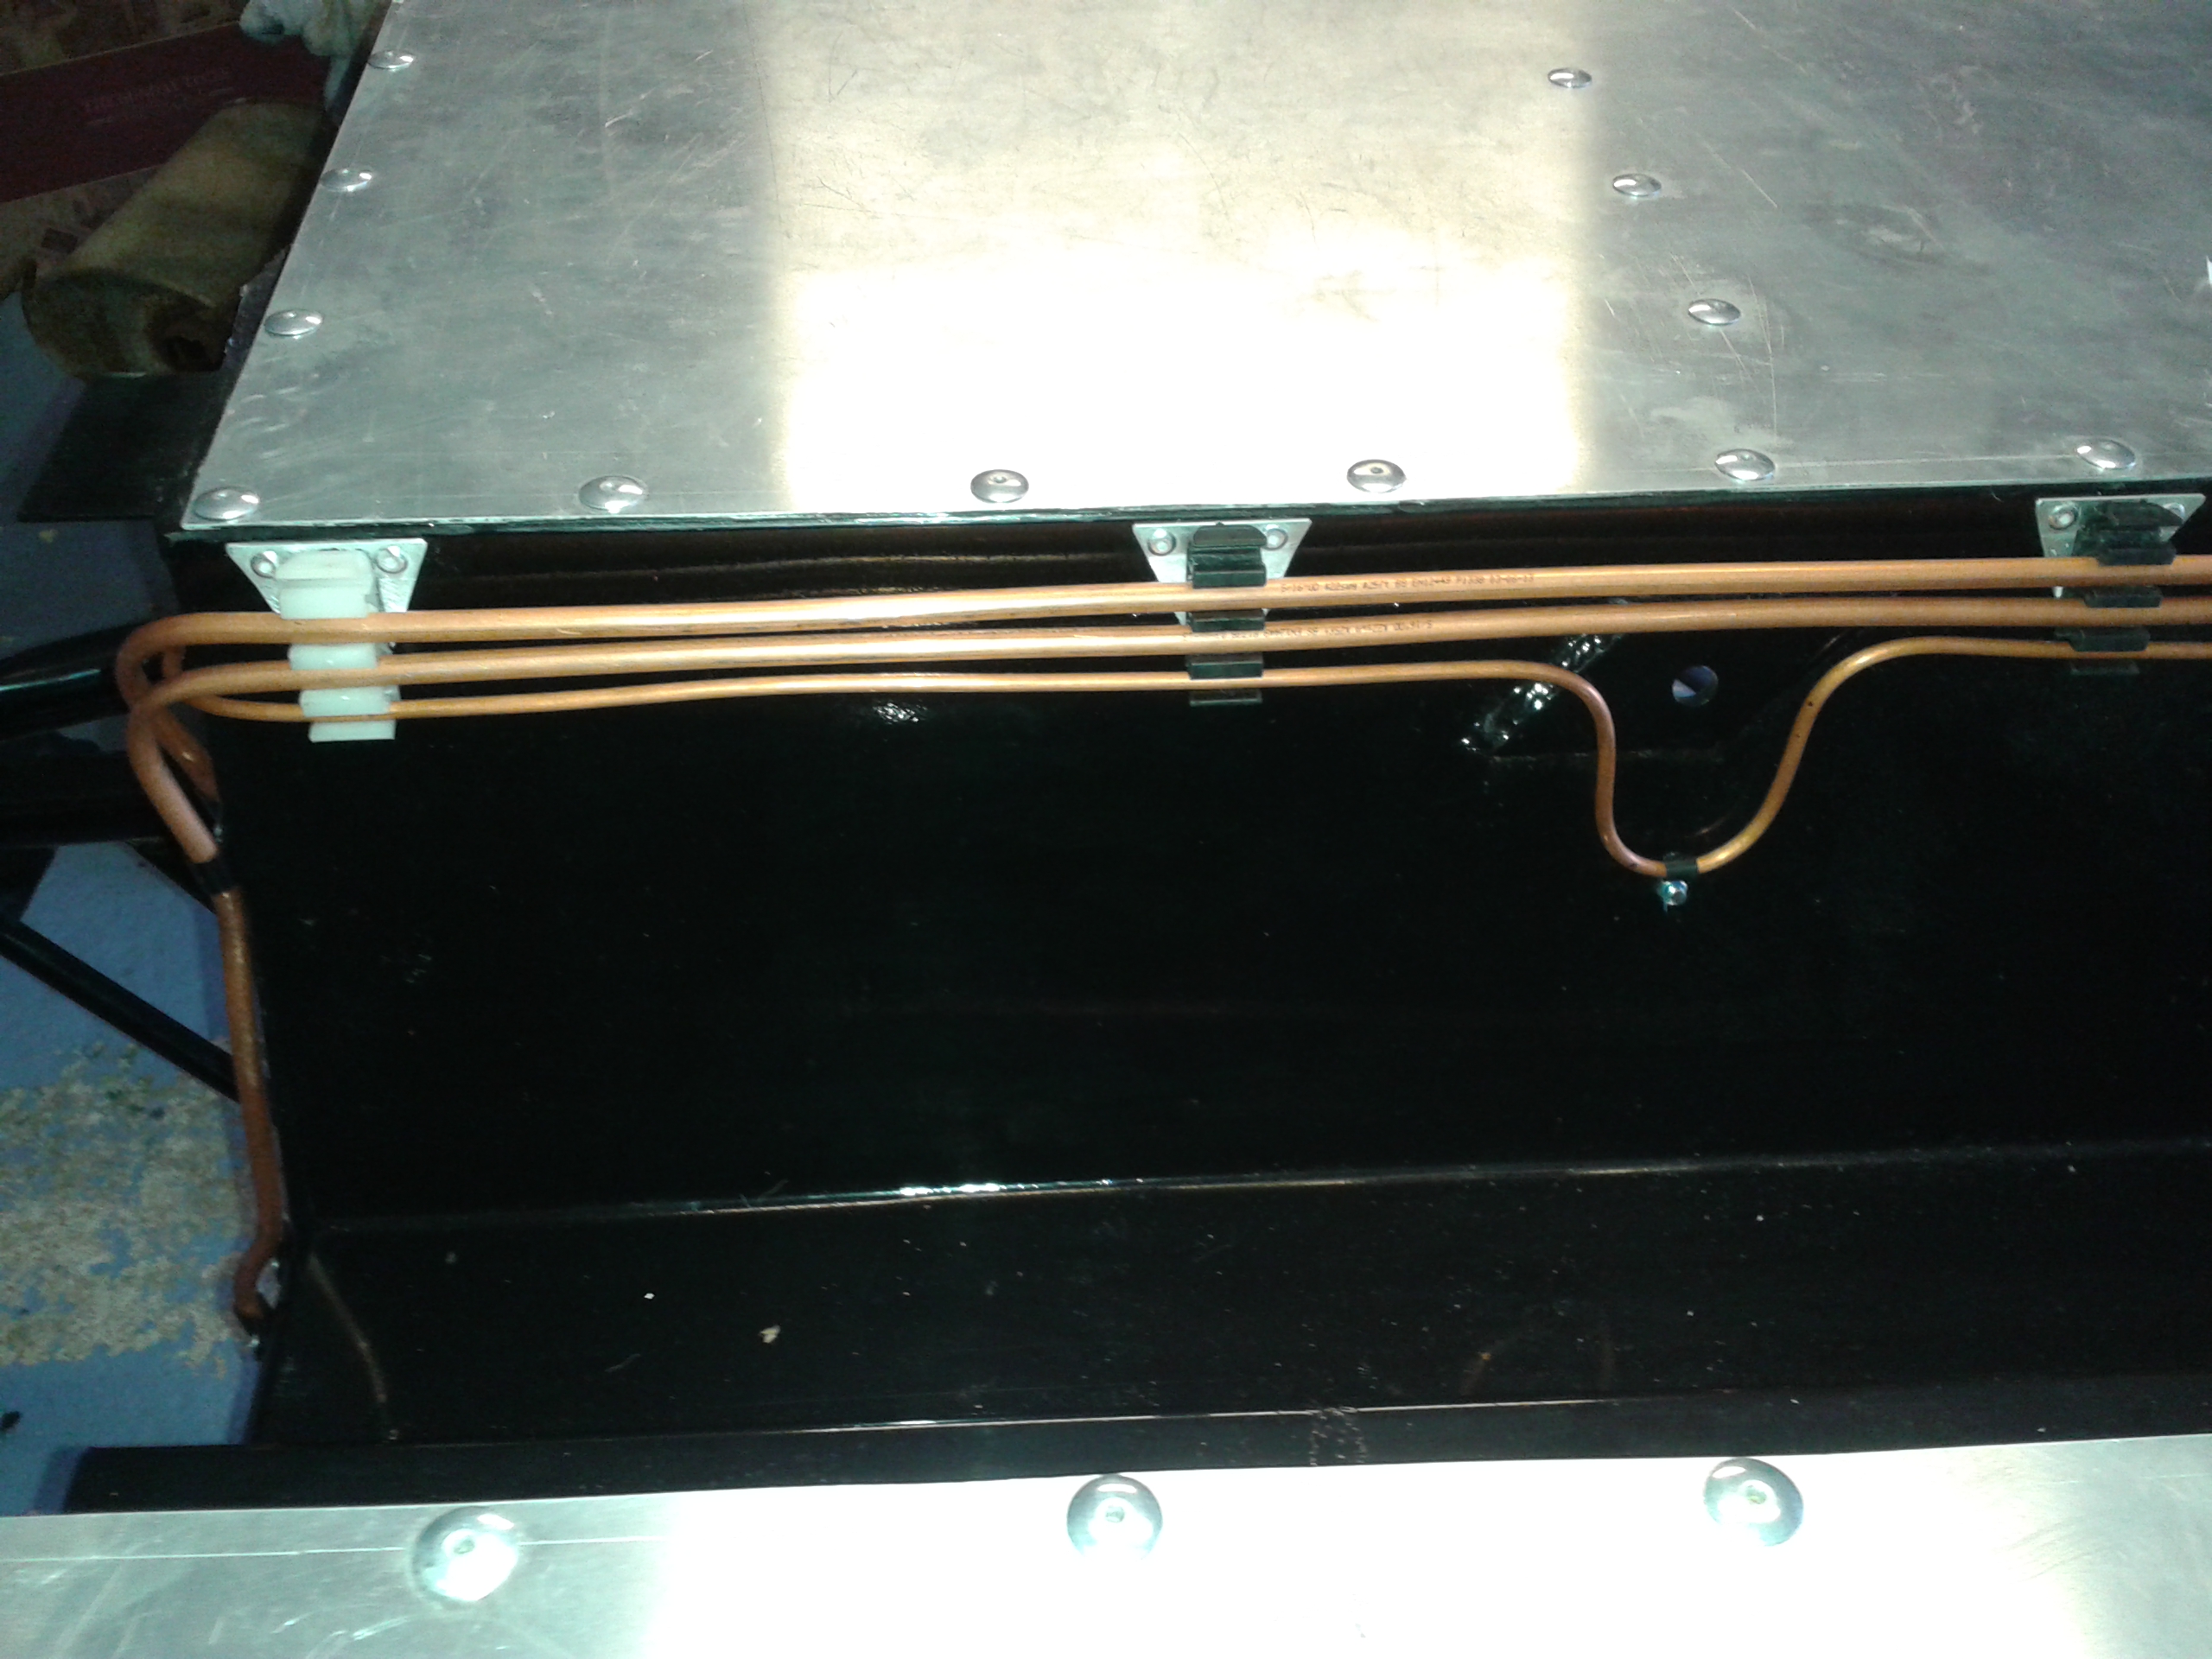 Having carefully remembering to walk around the over-long exhaust tail for the last few months; today I walked in to it and it broke off the back box! Better the weakness be found now than at the IVA test I guess. |
|
|
|
Post by miket on Jan 22, 2015 17:36:20 GMT
So having just broken the apparently rotten tailpipe, and whilst the chassis and ppf are still separate, my mind turns to a 'new' exhaust back end ...  It was always apparent that the standard MX5 back box was going to protrude way beyond the back of the Exo, so looking on the bright side, I now have a chance to consider how to improve the looks. I'm aware of the Road-Track-Race alternate back section, but otherwise I've not seen any other straightforward solutions that don't involve exhaust fabrication, bending, welding etc ... so if you have any ideas I'd love to hear them. I also need to sort out whether I have a 'cat' and whether I need one for the IVA. Reading around it seems that my 1990 Mk1 would once have been exempt, but the changed regulations mean that if the car had a 'cat' when made (and I believe all MX5's did) then it should have one one for MOTs and presumably IVAs. If anyone's got the the bottom of this already it'd be good to know. At the moment I have this fitted ...  ... to my novice's eyes it doesn't look much like a cat, but nor does it look like a plain pipe. Perhaps it's a modest silencer? More reading to do. So much to learn! |
|


