|
|
Post by Kevin Patrick on Mar 1, 2012 14:23:02 GMT
|
|
|
|
Post by Kevin Patrick on Mar 1, 2012 14:32:59 GMT
There are two very inexpensive tools that I used this time around that made the teardown much easier. I had not seen them mentioned in other builds, but figured I would mention them for new builders as they may not have them in their current tool collections. Trim removal tool - $8.99 for the set with coupon at Harbor Freight. Made quick work of all the plastic clips that hold down the wiring harness.  Hose Pick - $3.99 at Harbor Freight. This made removing hoses a breeze.  |
|
|
|
Post by sspogman on Mar 1, 2012 21:16:22 GMT
Not seen those hose picks before, looks pretty useful though.
With regards the trim removal tool, I used something that looks very similar out of my toolbox - a tack lifter. Worked a treat at getting all of those little plastic clips out that were holding things down.
|
|
|
|
Post by sspogman on Mar 1, 2012 21:23:52 GMT
Also meant to say - I wish we had Harbour Freight over here in the UK. You've posted a number of tools now that all seem to be cracking prices, much better than I seem to be able to find. The tack lifter I bought was about a fiver - that's almost the same as your pack of 6 trim removal tools!
|
|
|
|
Post by Kevin Patrick on Apr 19, 2012 23:23:31 GMT
Progress report - sorry they are all cell phone photos. Mike @ Highlite Motorsports did a great job rebuilding the engine:     I tried to get a few things drilled and test fit prior to powder coating like the pedals, master cylinders, steering column, rack and radiator, fuel tank, seat belts, and subframes/suspension. Reuse floor offcuts to make free radiator mounts:  (Photo shows one, but I think at least two pieces should be used for added strength/redundancy) Top radiator mounting bolts/washers:  Clutch M/C and pedal:  This fit perfectly compared to the first build and I did not have to reverse the reservoir. Brake M/C and pedal assembly:  This also went together much easier than the first. I did not need to cut the spacers off and move them to the other side of the bulkhead to get the brake master cylinder reservoir to clear the hood. Steering column:  Similar to the first build, I had to do some filing to open up the steering shaft hole for adequate clearance. New style front fender mount:  (Three 20mm long M8 bolts with lock washers are perfect for install) Tank mounted:  Fender test:  Yesterday it went off to the powder coater:  I've used Rustoleum Hammered to paint the steering column, pedal assemblies and parking brake. I tried the spray version this time and I must say that the final color is actually a darker black than the brush on which I like. I have also created a complete stainless steel braided braking system that is ready for install. I've got a few more things to do with the running gear to get it ready and by next week we should have the frame back and ready to drop it on. |
|
|
|
Post by John B on Apr 20, 2012 13:01:01 GMT
Superb pictures pal, these will help me out no end. Thanks.
|
|
|
|
Post by The Exocist on Apr 20, 2012 13:12:47 GMT
I really am glad/lucky somebody with so much experience is 20 minutes from my house.
|
|
|
|
Post by ricochet15s on Jun 20, 2012 4:02:45 GMT
Hi Kevin, have you made anymore progress on the build? Looking forward to seeing more.
|
|
|
|
Post by tbrown on Jul 12, 2012 21:11:43 GMT
Me too! Will you ship me one of those Left hand drive frames?  |
|
|
|
Post by Kevin Patrick on Jul 13, 2012 16:00:12 GMT
Sorry for the late response - I've been slacking on this thread and the car has been on the road for nearly a month! We got busy with preparation for Carlisle and getting orders out the door through May, so the project sat in the shop after it returned from the powder coaters. This time I went with a simple matte black from our new powder coating partner and I really like how it turned out. May 25th Trimmed and installed the floor. Used some black outdoor sealant and the rivets included in the kit.  The stock fuel lines were in good shape, so I straightened them and used two overlapping P-clips to attach them to the the frame with the screws included in the kit.   Time to flip the car over. Next the master cylinders and pedals were installed.  Then rivnuts were installed for the parking brake mount.     |
|
|
|
Post by Kevin Patrick on Jul 13, 2012 16:14:34 GMT
June 13 Powertrain is ready to go.  I went cheap on the exhaust system. Used the stock header, but removed all the heat shielding, ground down all the unneeded tabs and sprayed it with a high temp matte black paint. I also did the same on the stock exhaust. This car also features our prototype full braided stainless steel brake and clutch line option for the Exocet. Replaces the entire system from the master cylinder to the calipers. We should have it available for sale to builders soon as it really simplifies assembly of the brake system.  The rear brake run is attached to the PPF with p-clips.  On she goes! I made a mistake as I was lowering the chassis onto the powertrain and banged into the rear coolant sensor, breaking off the electrical connection. Thankfully it was only a $16 mistake. Steering bolted column and drop plate bolted up to the chassis.  The goal is to have her running and driving sans body panels by the June 16th Mazmart show in less than 3 days. |
|
|
|
Post by Kevin Patrick on Jul 13, 2012 16:27:21 GMT
June 15 Car is together and we've taken it out for a shakedown.    Stock '95 harness routing/mounting.  Fabricated some simple side view mirrors to be legal using some scrap floor offcuts and some $1.99/pair stick-on mirrors from NAPA.  90 degree bent piece of scrap floor offcut for the rear license plate/light mounts. (still rocking the Miata registration as we go through the proper registration process)  Retained standard seat belts and used floor offcuts to make a battery tie-down.  $165 new black vinyl covers rom eBay to replace the stock seat covers. Takes a few hours to do it right, but this is probably the cheapest option if you want to retain your stock seats and still look fairly decent while having some water resistance.  Some tired old rubber on the car right now, but with the extra lightness from lack of body panels, bulkheads, and fender mounts it is a blast to drive around as is. We are still running the stock springs with KYB GR-2 shocks - after disconnecting the rear anti roll bar it feels a little more stable with the current suspension/tires.   |
|
|
|
Post by Kevin Patrick on Jul 13, 2012 17:07:52 GMT
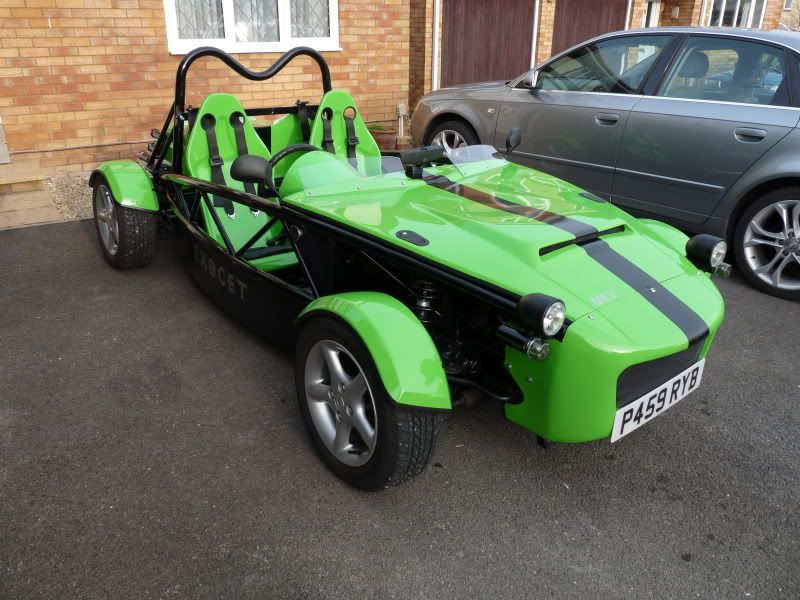
June 16 - Mazmart / Atlanta Mazda Owners Club Family & Friends BBQ Celebration We brought out both the Exocets to Mazmart so people could see what the "guts" of one looks like to one completed with all the body panels and fenders on. As you can imagine, these cars being different than the typical Mazda offering, we got quite a bit of traffic. People always have a hard time believing just how much weight an Exocet saves off a Miata - so I told them to lift it and find out!   Here are some photos another flickr user took at the show. I was too busy to take many photos!    Exocet #1    We had a great time at the show and hope to do more with the Atlanta Mazda Owners Club in the coming months. |
|
|
|
Post by tbrown on Jul 13, 2012 17:09:56 GMT
looking good! Do you conceal the steering shaft to clean it up a l itle?
|
|
|
|
Post by scooby1929 on Jul 14, 2012 19:38:31 GMT
Looks great kevin. This thread has been invaluable
Thanks for the tip on the tool to remove the wiring harness clips i got one of those tools and it made life so much easier
|
|