|
|
Post by roger32849 on Jan 20, 2017 0:49:33 GMT
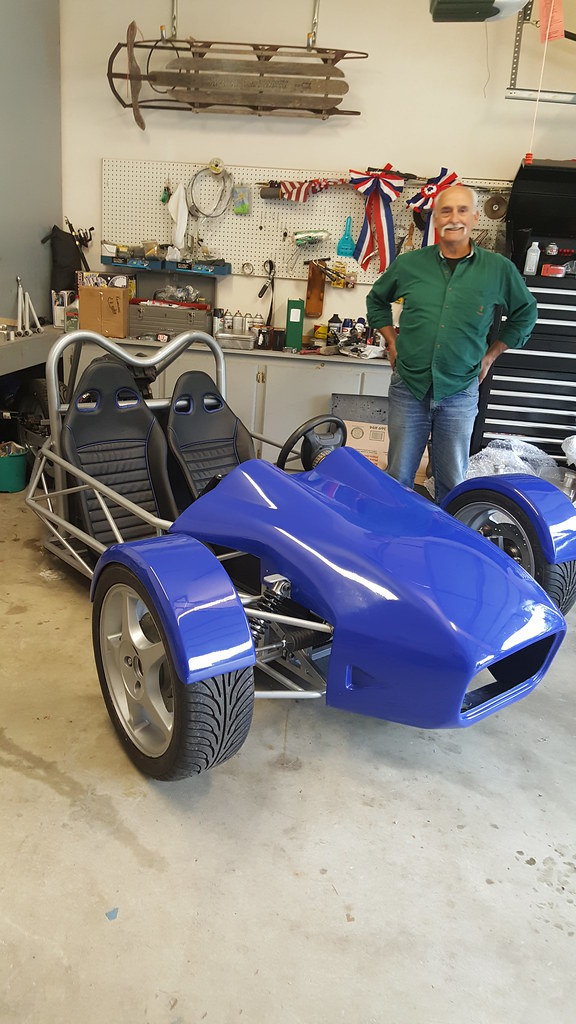
I have held off posting my TR1KE build until now. I took delivery of my RTR built kit this past October. For ease and economy of shipping the dealer arranged it as a rolling chassis with some of the aspects of a normal build completed. Trust me, there was plenty of work to do once it arrived. It is from this platform that I choose the beginning of this thread.... simply continuing the build initiated by the seller and his associate.
For those that may ask, this kit is considered NOS "New Old Stock" and carries a Manufactures Certificate of Origin dated October 2013. Road Track Race was in business from 2009 - 2015. It is solidly an RTR product when imported to the USA.
I also am the owner and builder of an MEV Eco-Exo-R. It was the 1st one on the road in the USA, and it is quite fun to drive. That being said, I need to press forward and do some photo posts and bring this TR1ke thread up to speed.
It is my aim to start the updates in the coming days.... give me a few days to arrange my photo bucket account and upload some pictures to post here on the forum .
Best regards to all..
Roger
Worcester, Massachusetts
|
|
|
|
Post by roger32849 on Jan 20, 2017 12:12:30 GMT
 After receiving TR1KE from the dealer and getting the protective layer of cardboard removed this is what it looks like. My friend Allen, was of great assistance in this process. The fenders were placed atop the tires for this photo. |
|
|
|
Post by roger32849 on Jan 20, 2017 12:27:48 GMT
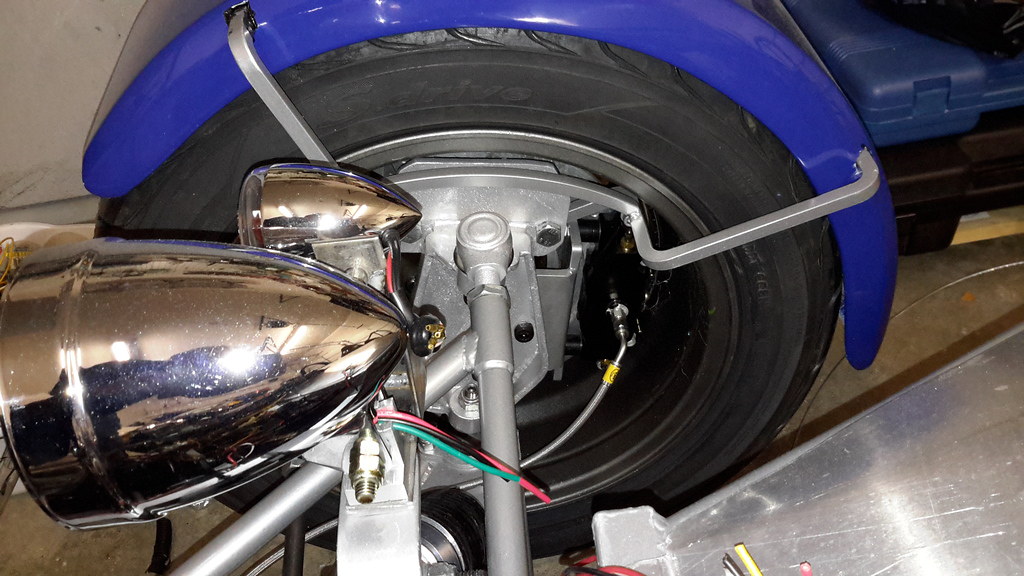
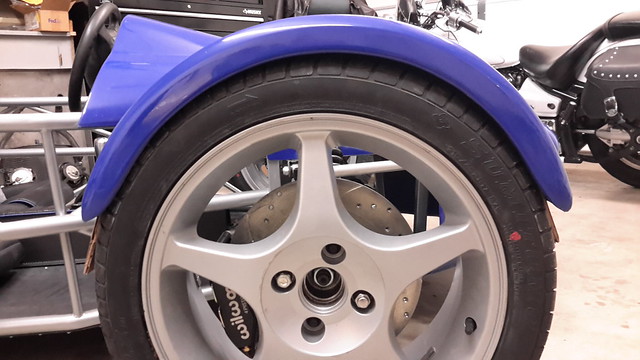 The kit was shipped with the Ford Focus SVT wheels and tires. I found these 17 inch X 8 inch bruisers to be oversized for the look of TR1ke. The front fenders looked awkward and did not follow the contour of the tire once properly spaced so I had to purchase something that would not only fit, but allowed the fender to follow the round contour of the tire... 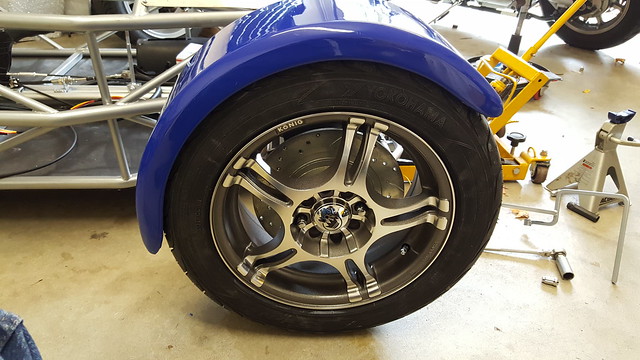 I selected a 15 inch X 7 inch wheel. There was sufficient clearance inside for the Wilwood brake calipers and for tape on balance weights. The fender follows the contour of the tire with ample clearance. Yes, it is snug, but nothing rubs. I measured 1/2" of clearance. Now, I need to sell the mounted Sumitomo tires and SVT wheels. |
|
|
|
Post by roger32849 on Jan 20, 2017 12:59:22 GMT
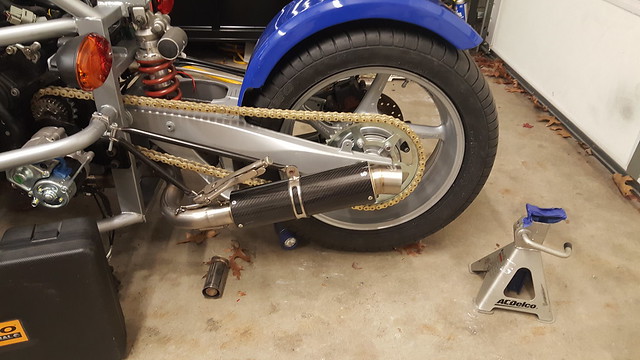 The dealer sent up the stock 2005 R1 mufflers, however after examining all the modifications needed and having to weld titanium my thought process changed to aftermarket mufflers. These are carbon fiber wrapped Danmoto mufflers. I ordered the optional baffles to bring the exhaust down to a mellow tone. DanMoto markets these as direct replacements for OEM. When I ordered the TR1KE kit, I also purchased the optional exhaust "Y" pipe. The Danmoto mufflers were nearly a perfect fit. It cost me $10.00 to have the "Y" pipe exit ends expanded to fit into them. I was considering a Leo Vincent system, but the price was prohibitive. I made two support brackets for each side. One to support the muffler, the other to support the "Y" pipe. I ordered 2 chrome handle bar clamps last year and never used them. The clamps provide the support to the frame. The supports are rock solid and secures the entire system. The "Y" pipe is stainless steel and is excellent quality. If you have a TR1KE and want to install dual exhaust, this is the ideal solution. This photo was taken during the design phase of my build. So excuse the vise grips.. 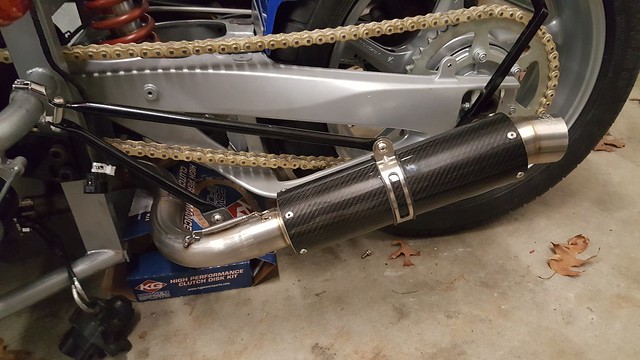 Completed exhaust installation with stainless hardware......and supports were powder coated. As you may notice, the clutch kit beneath the trike is an indicator of where I was and what I was doing a week or two ago. Roger Worcester, Massachusetts |
|
|
|
Post by roger32849 on Jan 20, 2017 13:15:26 GMT
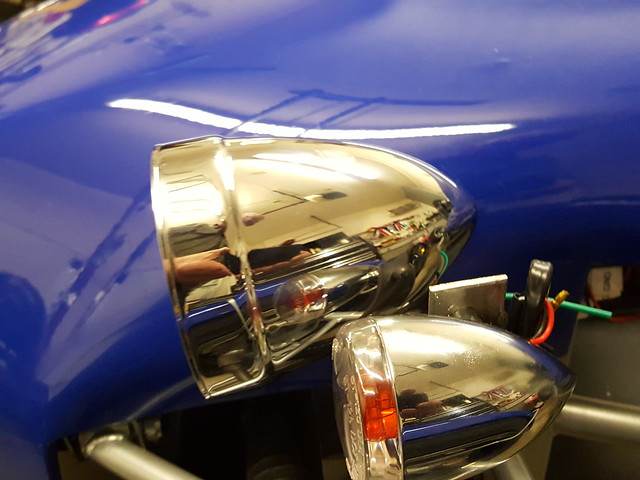 I bought the Adjure Headlights. I found a nice matching (or close enough) pair of turn signals as well. The chrome touches I am adding will be kept to a minimum. The headlights came with both LED and halogen electrics. I opted to keep the halogen. After speaking with the folks at Adjure I am confident the Halogen bulbs will provide ample lighting. Since I am using incandescent bulbs in my tail and brake lights, all other lighting will be incandescent as well. The excess flat stock I used to manufacture the turn signal mount will be trimmed and shaped before powder coating... Well, so far so good...... Roger Worcester, Massachusetts |
|
|
|
Post by roger32849 on Jan 20, 2017 23:24:51 GMT
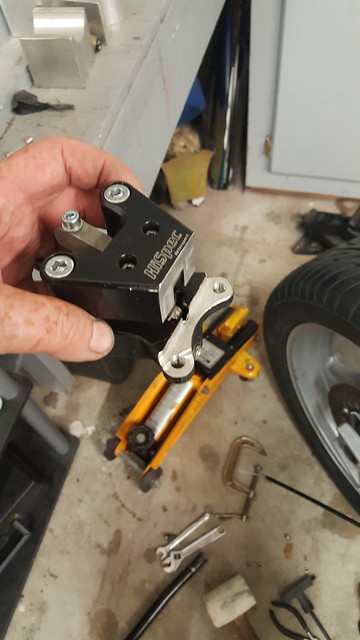 These mechanical disk brakes are not really suited for anything more than to hold the Trike on a gradual incline. When I received this already attached, the brake disk pads would not fully engage the rotor. I would say about half the pad was hanging over the outer edge of the rotor and was completely ornimental and not functional. I milled the inside "nose" down about 3/4". The brake pads now fully engage the rotor. For what it is, it will have to work for now. I am working on modifying a Suzuki Burgman rear caliper. They are both hydraulic and mechanical. This caliper might be better suited to something like a Go-Cart. 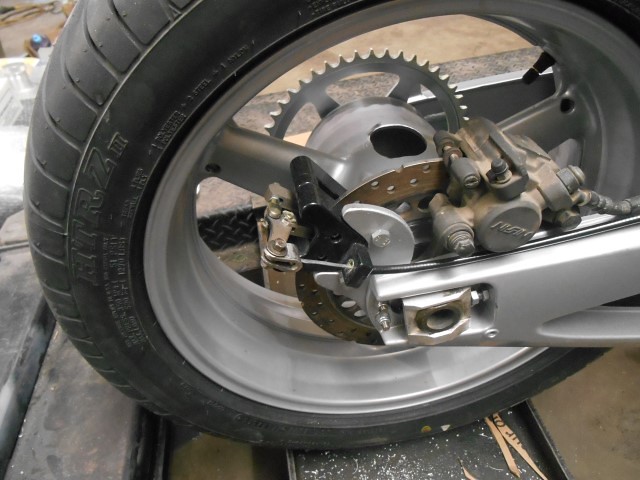 The caliper came mounted on this adapter. It wasn't a bad idea, it was nicely made and sturdy...... but..... if I needed to adjust my chain the caliper would not move with the rear wheel. The fit is VERY CLOSE and any wheel adjustment could cause the caliper to contact the center hub. 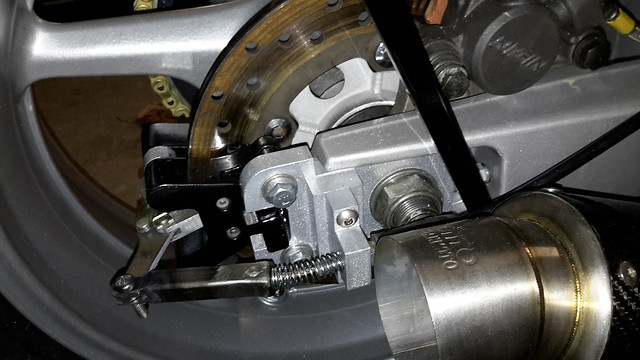 I found this mount and decided it was a stroke of genius. I "borrowed"... Okay... Shamelessly nicked the pattern and adapted to my modified caliper. It serves as the spacer and adjuster hard point. It is thicker than the original I patterned this after and the entire system moves with the rear wheel when adjusting the chain tension. My hat is off to the original designer.... Roger Worcester, Massachusetts |
|
|
|
Post by roger32849 on Jan 20, 2017 23:32:59 GMT
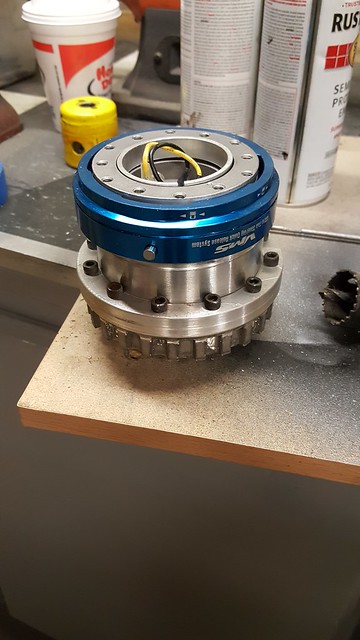 After buying a Momo (counterfeit) adapter and having absolutely no luck making it fit, I returned it and made my own. I used the OEM Ford Focus steering wheel. I cut the center out of it and milled it to fit an extension made from a piece of 2-1/2" aluminum round stock tubing with a 3/8" wall. By the way, the Ford hub is white metal. It will NOT weld like aluminum. The quick disconnect adapter was easy enough to fit. My lathe indexing wheel made it a no brainer. |
|
|
|
Post by roger32849 on Jan 21, 2017 0:20:53 GMT
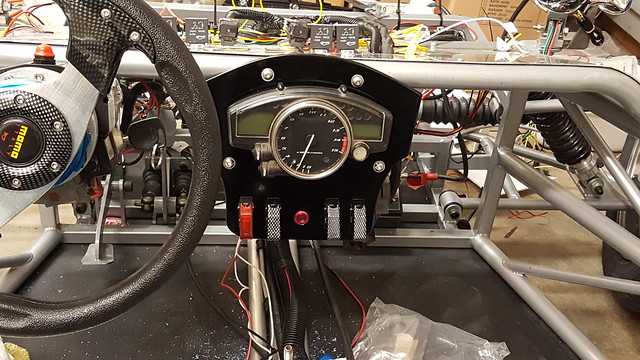 I mounted the "clocks" on a 1/4" thick piece of aliminum and had it powder coated. The switches are for Run/Stop and the Red one is for a safety when using reverse. The red switch is provided a ground from the neutral switch and when toggled passes the ground on to a button on top of the gear selector. So, in order to use the electric reverse, you need to place the gear selector to neutral, toggle the red switch then depress the button on the gear selector. The other two switches are for future consideration such as driving lights and for the optional camera mount power. The key point about the way everything is mounted on the aluminum is this allows easy removal of the bonnet. The entire piece is hinged at the bottom and will swing rearward once the two mount screws are removed. The speedometer plug doesn't need to be touched. The entire assembly is quite sturdy. Below is a mock up of it mounted with the bonnet attached.  |
|
|
|
Post by roger32849 on Jan 21, 2017 14:46:44 GMT
There are more photos coming. It is my intent to provide an overview of the work so far. Even though the kit came as a rolling chassis, that only means it can be pushed off the delivery truck and into my garage. A lot of the assembly to make it a roller was not suitable as a permanent assembly. It required some re-work and proper hardware to be safe. I needed to address the steering column installation and do some welding on the attach points. I also needed to order the steering rack extensions. These must be a hard item to get. I asked the dealer to order from his source around 6 - 7 weeks ago and nothing yet. I finally ordered the 14mm X 2 tap and some hard roll stock and made my own. When I contact the dealer he has been very proactive in obtaining parts and items needed for the completion of my project.
In the initial order I purchased a good deal of accessories. Upholstered seats and console instead of the standard seats and bare aluminum console. The upholstery is first quality or better. It is going to add to the comfort and design of the entire TR1ke. I would highly recommend this option. The dealer installed the shifter and cable as well as the parking brake assembly. Both needed tweaking, the shifter cable required a better mount at the engine, and I already covered the issue I had with the parking brake. Other accessories included the custom exhaust "Y" pipe and electric reverse. Two thumbs up on both of these. The "y" pipe is stainless and is custom made for the TR1KE that is designed for the 2004 and newer R1 donor. Reverse naturally speaks for itself.... The dealer went out of his way to offer powder coating on the swing arm and front and rear wheels. Naturally there is a cost associated with all of the services and options, but they needed to be done and the color continuity remains consistant. In retrospect I should have waited to do powder coating at my local business, and taken advantage of a package deal. As it is, the front wheels (and tires) were replaced as well as the rear wheel. The front wheel and tires would have "worked" but the fenders just looked to small when placed over the tires. As for the rear wheel, it turned out to be an older 3 spoke R1 and was missing internal parts. The 3 spoke wheels are married to the older 150 HP R1 engine. The 2005 engine in my kit is 180 HP. I had very serious concerns about it being able to withstand the 30 extra horsepower and the extra weight. The dealer shared this concern as well and generously replaced the wheel with a 2005 R1 spec wheel and included powder coating and shipping.
In the end, I am very pleased with what I bought. Yes there were some areas that needed to be addressed and they were taken care of either by me or the dealer (Dove Racing LLC). The chassis construction was/is superior. The welds, materials, accuracy is all professionally done. Whoever was responsible for chassis assembly in RTR had his s--- together.
There is much more to do and I have the winter to do it. I have slowed down a bit in order to spend some time inside.
Roger
Worcester, Massachusetts
|
|
|
|
Post by roger32849 on Jan 21, 2017 15:20:10 GMT
 I had an unfortunate incident with this fuel tank the powder coater left the cap on to bake the powder. The silica media melted and glued the cap to the filler neck. I bought a Chinese assembly on ebay and had it repaired and recoated. I also had a fabrication shop remove the vent stems and install 1/8" NPS threads for the approved roll-over safety vent. All three tanks were modified. I would recommend to the factory to do away with the open vent and install the roll overs. Roger Worcester, Massachusetts |
|
|
|
Post by roger32849 on Jan 21, 2017 15:26:09 GMT
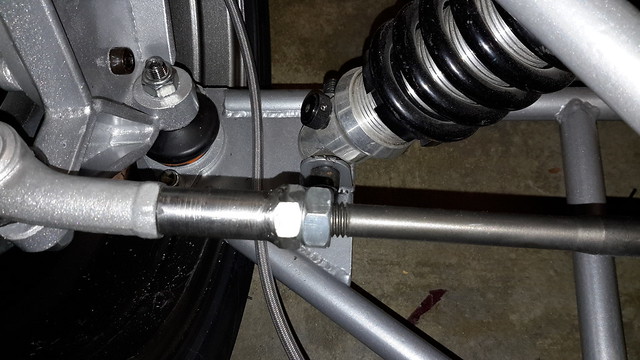 The home made steering rack extension right and left 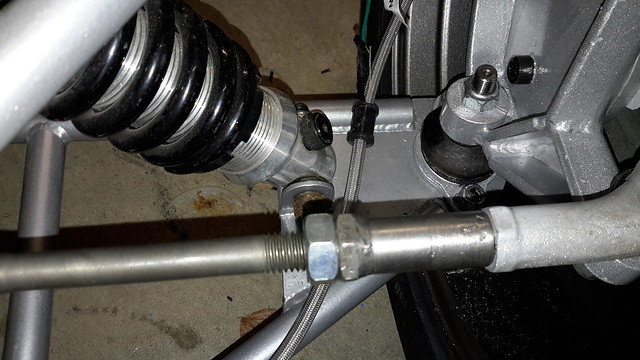 |
|
|
|
Post by roger32849 on Jan 21, 2017 15:35:43 GMT
 Fender mount on hub. I used 13mm nuts and bolts. The GRP fender was adhered to the frame with windshield adhesive. This stuff will glue water together. I ordered stainless steel brake lines from HEL. They are fantastic company and are willing to work with you on anything that needs brake lines. Hidden inside the Konig wheel is the Wilwood Caliper. |
|
|
|
Post by roger32849 on Jan 21, 2017 15:39:53 GMT
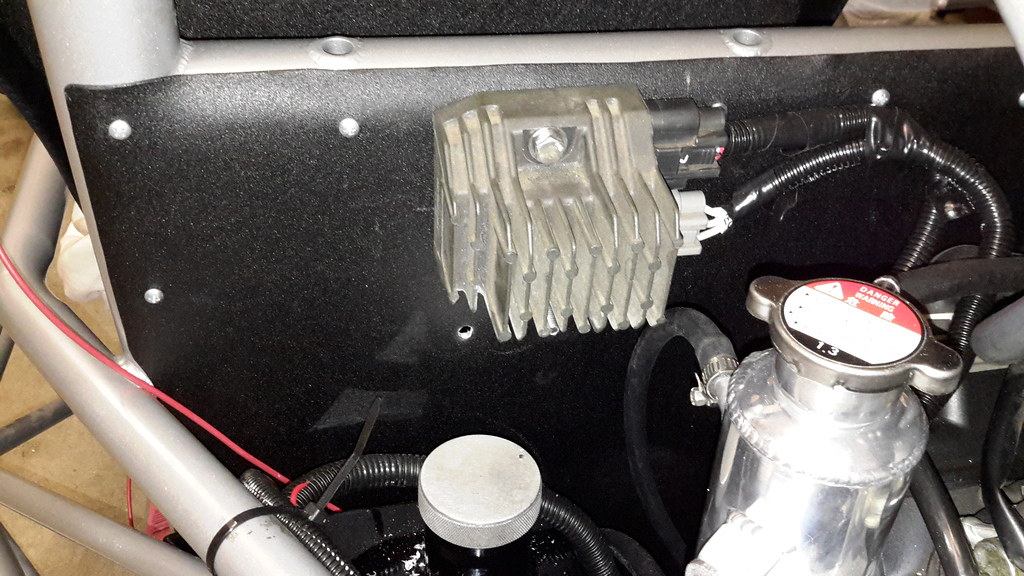 I mounted the rectifier on the rear left bulkhead. The small hole in the bulkhead is for securing the wire loom seen in the photo. Below that is the "Carbing tank". Since my radiator is lower that the engine, it seems necessary to install the tank. |
|
|
|
Post by roger32849 on Jan 21, 2017 15:45:46 GMT
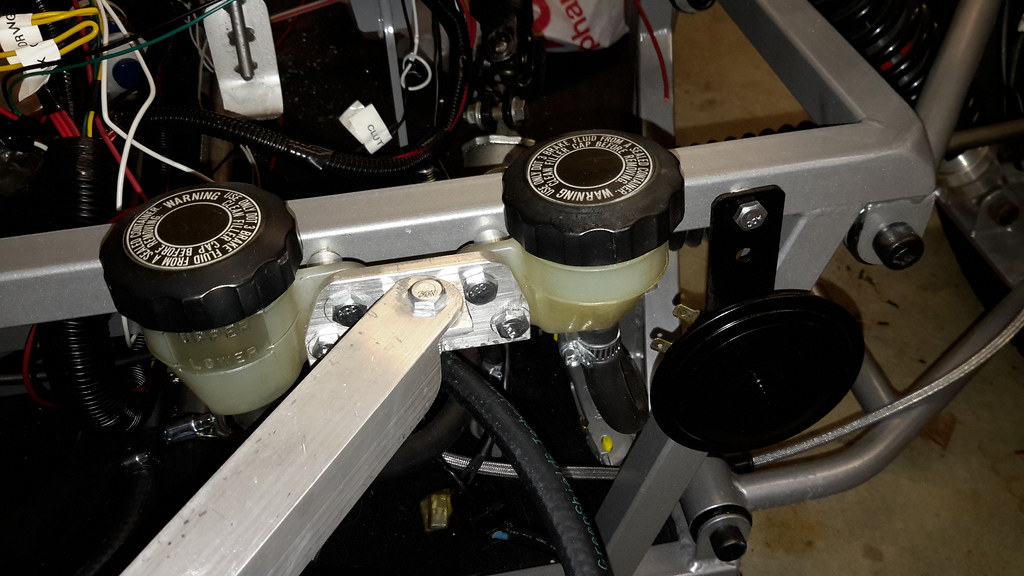 I used Honda GL1100 rear brake reservoirs for the front and rear brakes. The master cylinders were fitted with AN fittings and barbed connectors to the reservoirs. The aluminum brace in the photo is for the radiator. |
|
|
|
Post by roger32849 on Jan 21, 2017 15:49:40 GMT
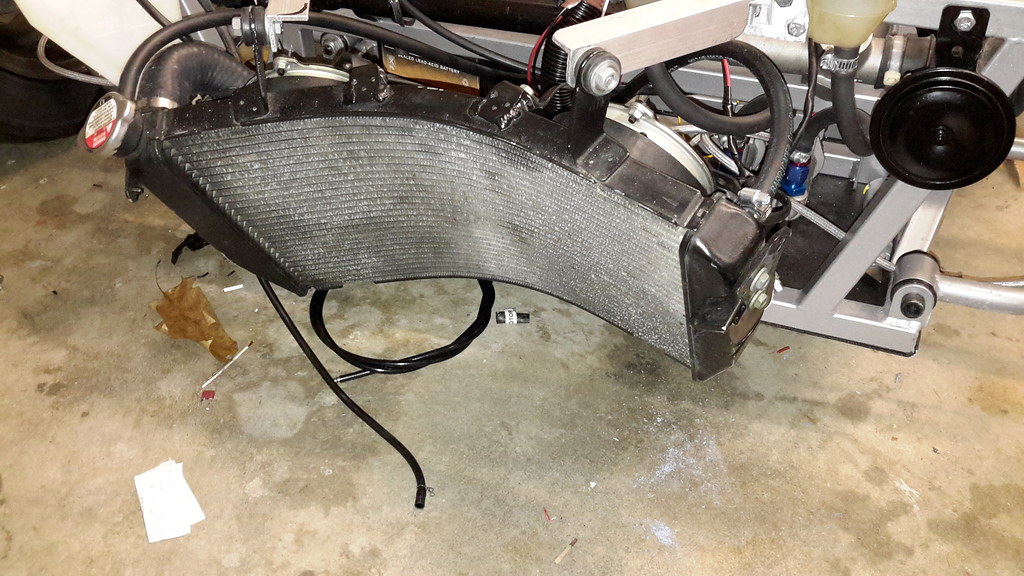 The radiator was easy enough to install. All hoses are connected and system is ready to be filled. I have held off doing that just in case I need to remove the lines or open the system....... |
|

