|
|
Post by gwnwar on Dec 13, 2013 5:35:14 GMT
Stuart you got to it before me.. That set up will lead to vibration through out the car..
|
|
|
|
Post by red5 on Dec 13, 2013 18:42:02 GMT
Hey guys
looking very clean - and a quality build so far.
My twopence worth = don't permanently fix the tunnel to the chassis - ive had mine off a couple of times to get into this area ,there are a few sensors and gearbox fluid top up points as well as the general access.
Ive used Rivnuts and dome heads for fixing, with Velcro to keep the carpet flush.
|
|
|
|
Post by James on Dec 13, 2013 19:32:51 GMT
It's Christmas! The three wise men!  Thanks very much you guys. The bracket is such a simple and silly mistake, I can't believe it. The extension of the bracket over to the shock bolt was an afterthought so I'll strip it back - it was pretty stable without it. Thanks, too, re the tunnel. Yep, we've just screwed it in place. Easy access will be dead useful. Thanks again for looking out for us. Thanks very much you guys. The bracket is such a simple and silly mistake, I can't believe it. The extension of the bracket over to the shock bolt was an afterthought so I'll strip it back - it was pretty stable without it. Thanks, too, re the tunnel. Yep, we've just screwed it in place. Easy access will be dead useful. Thanks again for looking out for us. |
|
|
|
Post by James on Feb 9, 2014 17:36:27 GMT
Right here we go ... this is what we've learned about getting the body on - which was, for us, quite a long process of fit and refit of the dash, it's components, the body, steering etc. before we got it something like. This is how I recommend you go about thinking about it.
First decide what instrumentation you want on the dash. If, like us, you want to use the panel of dials from the donor then you need to start from this point as it effects everything. Stripping off the old façade of the instrument panel is best done with a Dremmel tool or similar. Make a template of the flat face when you've finished and with some time and patience you will discover where to cut out the hole in the dash and where to drill for fixings. The pod of instruments must be as high as possible in the dash bulge and as far right as possible - really bang it up in there. I spent quite some time over Christmas doing this carefully at home, adding several after-market MX5 accessories to the instruments at the same time.
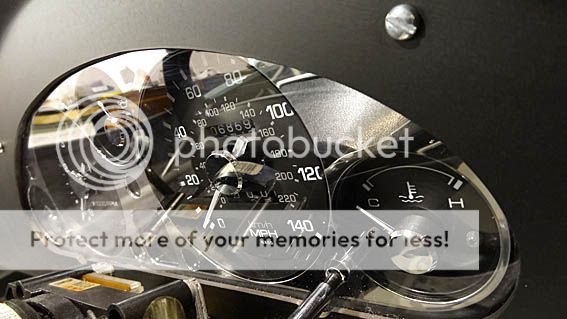
After I cut the hole in the dash I used a permanent marker to colour the edges back to black, fitted my own clear plexi cover and siliconed around the whole thing except for two places on the bottom to let it breath a bit (in case of condensation).
Now put your seats in and fix them. Then make sure your steering wheel position is as low and as far left as you can possibly get it and still be comfortable - really push it. This will all make sense in a minute. Now offer up the dash and pull it as far back towards the steering wheel as possible and cut a recess in the bottom of the dash to allow the dash to go as low over the column as possible. If the dash is too far forward the body will rest on top of the instrument bulge and you want the body to be as low as possible to try and get it to meet the sills. The only satisfactory way to have the instruments is central to the wheel and the bulge - hence the positioning suggestions made earlier. Even with all that, the dash, when aligned nicely with the wheel, will still be off-centre towards the right by a couple of inches. We decided this was acceptable given the imperative to see the dials nicely. Make some brackets to fit the dash onto the space frame in this position and flat to the top of the space frame.
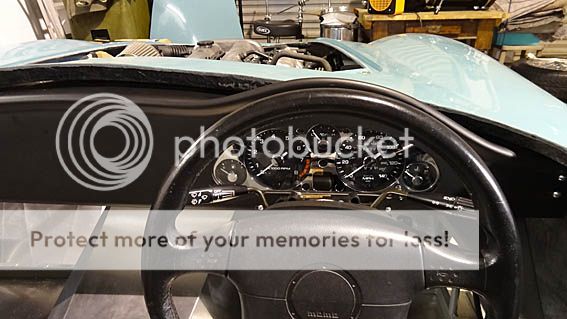
The wheel, display and bulge now all line up pretty well while minimising the drift to the right of the whole dashboard. If you intend to use separate Smiths dials or the like you should still consider a lot of what has been mentioned. We have the body banged right down on the dash now with that flat to the space frame and we're still (bizarrely) higher off the sill on the right compared to the left. However, other measurements and visual confirmation says we have the body nice and flat across the car.
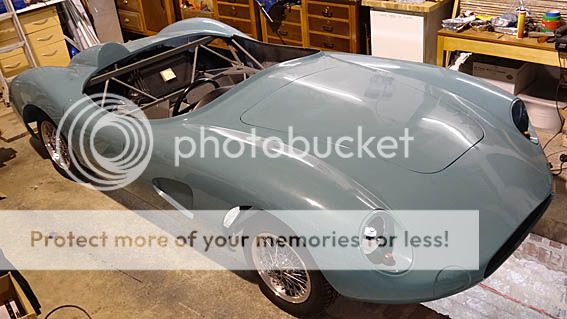
We were happy enough to fix it permanently and we made brackets for the front first in the corners of the bonnet.
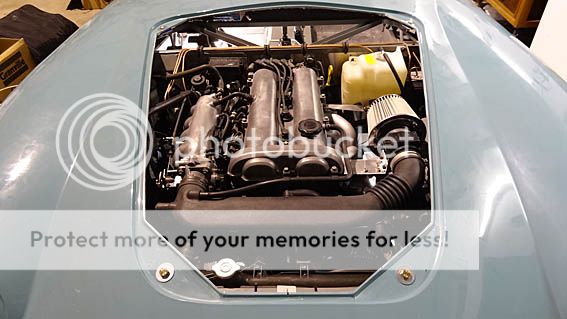
These were fixed to the front top rail above the radiator and gave us a finite positioning so that we could work on the back bracket.
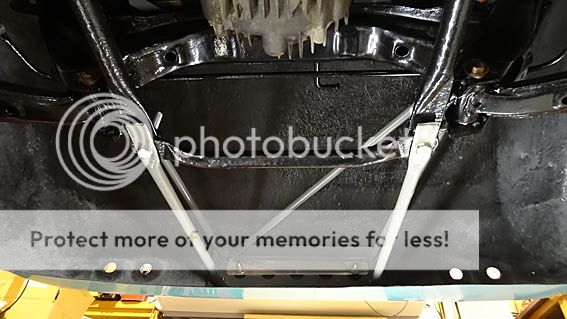
An hour or so of measuring and drilling got this nice and rigid and fixed through the rear number plate recesses. We made a long aluminium plate to stretch between the two body bolts. All body brackets have been cushioned with high density foam pads where they meet the tub and then tightened right up to compress.
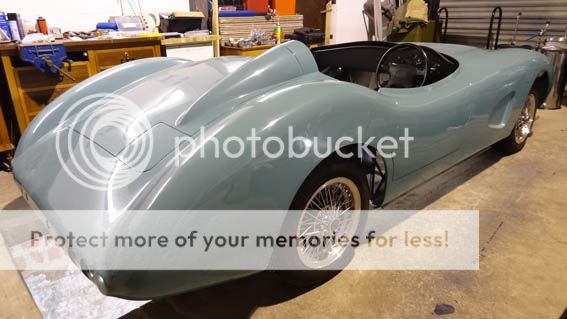
The wheel positions were checked throughout and the arches meet up well. You can just see here how the sill will have to bent up quite a lot to fix onto the tub.
No matter what trials and tribulations you go through, this car keeps on giving back in spades! We're on the last stretch now and we can't wait to get going. Sorry we're taking so long!
|
|
|
|
Post by np4wicked on Feb 9, 2014 20:57:22 GMT
Got the wires on this time James, and dash looks ace but I thought you might have gone for individual dials. Two months nearly since your last post so I bet there,s been a lot of fitting and removing again, last pic shows no seats but you fitted them to adjust the steering column ( you said)' so just how many times has that body been off and on I ask?
|
|
|
|
Post by snowbird1 on Feb 11, 2014 2:19:44 GMT
Nice work James! I've been playing with dash/body position, not ready to bolt it down yet but been getting on with other stuff. I will update my post soon.
|
|
|
|
Post by R2S on Feb 11, 2014 13:43:04 GMT
Sounds like the dash was a real challenge but looks worth the effort, with the body on do you think a full size spare would fit over the tank thro the chassis in the cabin? My plan was to use the original space saver but now realise the difference in dia/circ to the new tyres is likely to be too great.
Do you know yet which IVA test centre you are going to use?
Any thoughts yet on fuel filler?
|
|
|
|
Post by np4wicked on Feb 18, 2014 21:20:23 GMT
As a get you home only will the space saver diameter really matter? I have had a good look at the photos here and access from cockpit to put a wheel above the tank is a non starter that is all blocked by cross members and the tank itself.
There seems to be plenty of room behind the rear subframe but access would only be from underneath or by opening up the top somehow, that's the beauty of Stuart's design, have doors-don't have doors, have boot-don't have boot etc. you build it so you can take it as far as you want to. In the end every Replicar will be different dependant on the builder, kinda like the original DBR1s. Food for thought!
|
|
|
|
Post by gwnwar on Feb 18, 2014 22:48:10 GMT
James.. What size wheels and tires are you running..
|
|
|
|
Post by James on Feb 23, 2014 14:26:57 GMT
Hi R2S. Np4wicked is right - there is no room above the tank for a wheel and dependent on how the exhaust ends up - I suspect a spare might not be possible in that 'boot' area either. I think there's an IVA test station in Carlisle? Aston fuel caps might be a non-starter for IVA so I've bought a lockable 'aircraft'-style flush one with unleaded insert. I will have to replace later and sell the IVA one. However, it might look ok? I'll fit it this week and let you have a look.
Hi Gwnwar. Yeah, I know they look small. I couldn't afford the 15" chrome rims that Stuart has used. These are some Eunos 14" wires that we picked up with good tyres for about £200 all in for four on Ebay. I like the alloy look better than the all-chrome but I know they should be 16" with spinners and nice high Avons. For IVA we'll use the original alloys and tyres from the donor so that all instrumentation stays relevant. Post IVA we want to try putting the highest possible tyres on our wires and see if that fills the arches better. If not, sell 'em and save up, I guess.
Here's some sill pics from our last session :-

Looking down from the cockpit edge you can see the back of the seven rivnuts that we used to attach the sill to the tub.

Countersunk stainless fasteners used on the exterior. It's a two-man job to marry the elements together but it is satisfying because the resulting rigidity in the car is enormous. It suddenly feels like steel. We think we might brace the rear-end wheel arch inwards to give some extra tension and rigidity in that area too - and to echo the nice curved sides that we have achieved. |
|
|
|
Post by snowbird1 on Feb 23, 2014 15:15:37 GMT
Hi R2S. Np4wicked is right - there is no room above the tank for a wheel and dependent on how the exhaust ends up - I suspect a spare might not be possible in that 'boot' area either. Spare wheel location is a challenge for any car designer, even if you use a 'space saver' there is the question of what to do with a full size flat tyre is you have to use it. Several manufactures now just supply a sealer/inflator bottle and subscription to a roadside assistance service! |
|
|
|
Post by R2S on Feb 23, 2014 18:25:20 GMT
After the previous comments re spare i tried the space saver that came with the donor and even this is a tight squeeze through the frame! Snowbird1 makes a good point about what do you do with the wheel that comers off and i think the road side assistance service may be the best option although i'm note sure how reliable this might be if i ever do make it to Le Mans (I know this year is out of the question based on my slow progress, although looking to lift body off donor this week whilst my boy is on half term and can supply some muscle). Love the way the floor ties into the sill, from the photo it looks like the floor is bending upwards, if so any idea how much at the outer edge? I am looking to put in a side exhaust and was going to box this section in alloy but i'm thinking it might be too rigid to pull the body to if there is no flex in base (hope this makes sense). On the subject of tyres I am looking at Vredestein Sprint Classic 185 R15 to fit the wires i bought from MEV, strangely they were advertised at £85 from Camskill (when they had them in stock) but are now priced at £111 (when they don't have any in stock!). Bit pricey but i've always bought the best tyres i could afford (just means the wife will have to miss a couple of meals out). By the way i have also bought some fake spinners from Europa that don't look bad. ![]() ![]()  On the fuel filler i am retaining the MX5 cap and catchment with over flow pipe, I am going to blend into the body hence my questions about the tank position relative to the lines in the body. Hopefully by end of week i'll be in a position to answer the question on best position for cap using my own chassis and body. ![]() |
|
|
|
Post by snowbird1 on Feb 24, 2014 1:11:28 GMT
I'm still thinking of using the stock Miata filler neck, cap and vent hidden behind the headrest on the 'aero hump', I've made a bracket that bolts onto the RH upper seat belt mount. Still have to figure how to route the fill pipe about 140 deg to connect to the tank.
|
|
|
|
Post by R2S on Feb 24, 2014 11:53:44 GMT
have moved response to tank discussion, and spare, to my thread rather than James' build.
|
|
|
|
Post by James on Apr 6, 2014 16:20:11 GMT

More fabrication at the front of the sill. We have chosen to split the cockpit sides into the upright section and a separate flat top. You can see the 90 degree bracket running along the top. Rivnuts will be used to allow access into the side cavity. |
|


 Thanks very much you guys. The bracket is such a simple and silly mistake, I can't believe it. The extension of the bracket over to the shock bolt was an afterthought so I'll strip it back - it was pretty stable without it. Thanks, too, re the tunnel. Yep, we've just screwed it in place. Easy access will be dead useful. Thanks again for looking out for us.


