|
|
Post by edvb on Apr 19, 2014 4:59:18 GMT
Hi Erik
Sorry you feel that way.
At least in this forum we have three that looked at all we have done and incorporate each others ideas into our build even if it is slight. I would not of gone as far without you two so I want to thank both of you for contributing your ideas in getting to where I am now.
I did learn once you move from stock you open another can of worms to deal with that I did not expect.
The good part of that is I learned a lot about suspensions and feel pretty comfortable talking about it now.
I also understand what was needed to get my suspension to work properly and what I needed to achieve that goal.
Let's hope my understanding and calculations are correct and when I fit the shocks they will be correct.
But like me we have challenges on our builds we have to overcome.
I think the three of us have met those and are finishing our builds the way we envisioned.
Edward
|
|
|
|
Post by roger32849 on May 9, 2014 10:01:07 GMT
Erik:
When it comes to posting information about a build it is always helpful data to someone that may need it in the future. Guys like Ed and I in the US post as a journal. We log our information as a reference not only for others, but for ourselves. When we started there was no one in the US doing a build other than Jimmy Cox.. (Not sure where he went), it was just us two and you Erik in The Netherlands. Together we got as far as we did and it looks like all us will be driving our trikes this summer.
My build was the first one to be registered in the US. I live in one of the most difficult states for Kitcars to be registered, but since it has been a legal driver, three others were sold and Uncle Mark, after seeing recent photos has decided to order. Did the fact that mine made it through one of the toughest states for Kitcars influence their decision to buy.. Possibly, but I can't say for sure. One thing I can say though, I read your threads, and Ed's, nearly every day. Both of you guys posted (and continue to post) valuable information that helped me push through to the end. At no time did I ever feel I was doing this alone, or for "no good reason" and neither should you Erik.
I agree with Ed concerning the spirit of what we write, we incorporate each other's ideas into what we do. Thats what makes our trikes unique, while retaining the character and design built in at the Turner garage. There will always be buyers that get into a project then abandon it because of a lack of skill, time or interest, but in this case, the Eco-Exo was designed with simplicity of build as an avenue to completion for the average guy.
In short, if you help only one builder,the entries you made were worth your time... In this case Erik, you helped two of us and who knows how many others read but do not post... So, from me to you, thanks for what you entered in your threads. While I may not have followed your design or engineering exactly, it provided a great deal of insight on the direction I needed to go in several aspects of my build.
Roger
Worcester Massachusetts
|
|
|
|
Post by erik on May 10, 2014 18:33:54 GMT
Hi Roger edand Edward, Thx for the thumbs up  The enginering part I did may not be too clear in the pics I posted, but prio#1 was to clean her up as much as possible especially behind the seat. Some brackets took quite a while to install them right on strange angles but they have all been made with a minimal tools (axle grinder, small belt sander and drilling machine) which are cheap tools to get and simple to duplicate. However, if I were to build a new one again I'd make more serious effort to place all electronics on the same location as in the An400 which I believe it could be done. I may even chose the MK1 version for recumbend bike style steering bar which creates the space one needs for the key switch, batteries, regulator and solenoid I moved around the fuel tank. This would easy the mods of the loom by cutting and extending the main loom only. It's not that I'm keen on building for complexity. if you see it for real you may understand it's well thought and with reason tough I must admit under the tank it appears to be cluttered which is a result of the shape of the original components and fixing points I used. The chasis has been final welded and needs to be cleaned up, increase hole sizes so I don't have to bore them up after coating. I am halfway now. when this is completed I'l start making the floor plate and drill the holes. When this is completed I guess it's ready for coating. I think I could continue this project quite soon because it seems little 4 teething issues on my tR1ke have been solved. I'm quite amused this project has been completed in a very far state before it was street legal. it's a finished project with nothing left to be desired on it but spending time driving it  br, Erik |
|
|
|
Post by roger32849 on May 11, 2014 9:40:04 GMT
Erik:
As far as I know, none of us are professional Kitcar builders. In my case, this is the first time I attempted a kit vehicle of any sort. It does take patience and some amount of mechanical skill, but is isn't brain surgery. If I can do it, then anyone can. What I have come to realize is this, if you get it to work. Then it must be correct. Just because yours and mine are different than anybody else's doesn't mean we did ours wrong, it is that we found a way to simply get it done. The only wrong way, is if your efforts do not function properly. The only special tools I have are a welder and a small Atlas 6-18 lathe. Both came in handy, but aside from that, I could have hired the pieces welded or turned. The remainder of my tool collection are the usual suspects.
I am sure when you finish your Eco-Exo it will be correct and will run like it should. Every time I take mine out I have confidence in my work enough to trust my life to it. This is true of Scott's work as well. I feel comfortable to cruise down the road with other traffic shooting past. It is truly a fun vehicle to drive. In a nutshell, build it like you want to, then start it up and drive it.
Roger
Worcester, Massachusetts
|
|
|
|
Post by erik on May 30, 2014 18:22:06 GMT
Back on it again The tR1ke passed with flying colors for the road tests. Only relocation of the fuel pump and an additional hand operated idle lever was all it needed to make her good. Just some pics how I work on my chasis. It took me quite some time to clean the welds and remove the stains. By now it's ready to trim and bore the bottom plate. I did prefer to have the bottom plate flat but it needs to be bend to meet the front bonnet brackets. I hope to make me a neat one. When this is finished i'll mount the grp parts and rad on the chasis for testing the brackets angles. I guess it should be close to powder coating by then. br, Erik 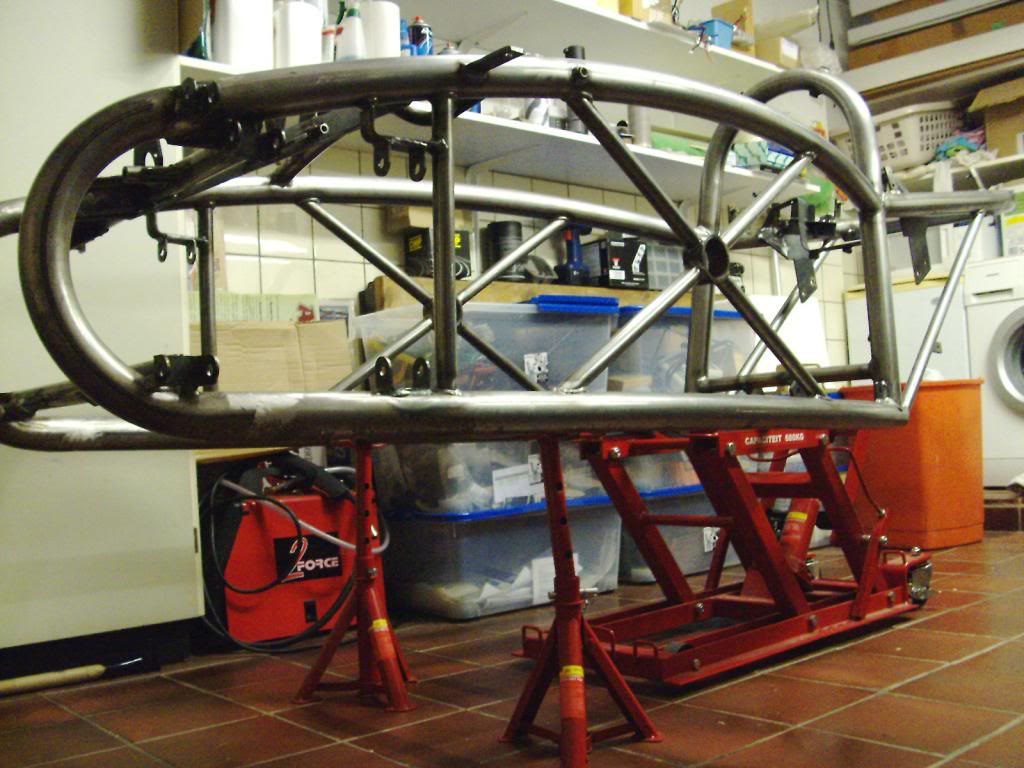 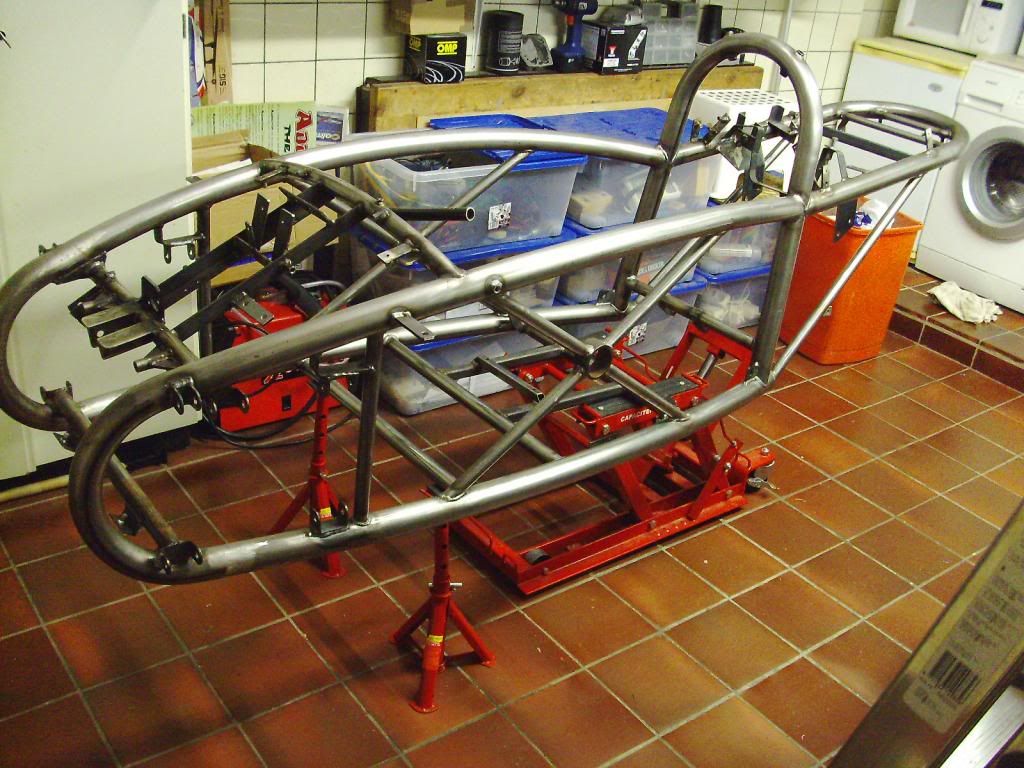  |
|
|
|
Post by erik on Jun 9, 2014 19:50:22 GMT
|
|
|
|
Post by edvb on Jun 11, 2014 0:20:42 GMT
Erik
Great job on the rivet holes! Did you talk to Scott on his Buck for the side scoop? Otherwise the one you made a template for is perfect for the minimalist side of you.
Edward
|
|
|
|
Post by roger32849 on Jun 11, 2014 9:51:50 GMT
Erik: it is good to see your progress. I can assure you your air scoop design will keep the temperatures right in the neutral zone. The coroplast mock up I made for mine keeps the temperatures normal. The air scoop opening is 3" x 8.5" and it covers the radiator core only. I have ridden in 90 F deg weather in excess of 65 MPH, and down to a bumper to bumper crawl and no overheating issues. Yes, one does need a scoop for the side mounted radiator. I will be designing one of my own after I return from my Holiday to California. I like your design, but the one I build will be covering the complete triangle area of the left side. Scott tells me he is also building a buck mold for the scoop because of temperature issues. Good to see your progress.
Roger
Worcester, Massachusetts
|
|
|
|
Post by erik on Jun 11, 2014 15:57:17 GMT
Hi both! I haven't spoke to Scott for a while and missed this scoop . I just sen him a pm for info. I have converted the foam block in a cardboard foldout which is close to be converted to left over alu sheet. The cutting and bendling will be a pain for sure which shows interest in an original eco-exo.com scoop. The mockup I made needs no additional fixing points. The engine bracket has 2 holes for the engine pivoting brackets which is a good fixing point. On the front of the scoop it will be held on the chasis surrounding the rear part of the 2" dia bulkhead tube. Good to see a scoop is worth living. I am not sure if I am in need for one because I don't have a bulkhead plate in front of the engine and I expect some improved engine cooling here but I do assume this will not be enough occasionally. if the fan turns on occasionally i recon this is still safe. pics later |
|
|
|
Post by roger32849 on Jun 11, 2014 20:37:18 GMT
I did some fast driving this winter with no overheat issues (with no scoop). As soon as the weather warmed up, then overheating was a problem. I mad the coroplast (plastic corrugated equilivant cardboard) scoop and simply used package tape to hold it all together and in place. As I mentioned before, I leave for an 8,000 mile motorcycle ride in a few days and will fabricate my scoop after I return.
One of my stops is to visit Edward Van Belkom in Oshkosh Wisconsin. He offered to show me a few procedures for molding with fiberglass. I am leaning toward making mine out of carbon fiber and fiberglass combination, but will have to give it a little more thought.. Waiting to see what you land on as a final design.
Roger
Worcester, Massachusetts
|
|
|
|
Post by erik on Jun 13, 2014 20:56:56 GMT
|
|
|
|
Post by edvb on Jun 14, 2014 0:14:16 GMT
Nice job Erik! That should keep it cool now.
Edward
|
|
|
|
Post by erik on Jun 14, 2014 6:19:46 GMT
Thx It's kinda boxy but i couldn't make up something which would be eastatically sound with the grp cover... Some minor tweaking and trimming needs to be done. Still a bit in doubt for the fixing points. For the best options i may have to mount the scoop first before the rad which is hard to consider seriously. Still crunching my brains on this. perhaps I might find a way to cancel the rear fixing tab. Like now the rear bend touches the rad where i would have liked to have foam to prevent wear. Tolerances became very tight in alu sheet. Still not good enough but getting closer |
|
|
|
Post by roger32849 on Jun 14, 2014 9:50:10 GMT
I am sure you will get it sorted out. The nice thing about having your project still in bare metal is you have the option of welding in a fastening point or two. When I test drove mine with the mock up I made, (which is very similar to yours) the temperature gauge did not raise past the halfway point. I believe this falls in the ideal temp range... Not to hot, or not to cool. Your design will work, all you need is to figure out how to fix it to the chassis. It looks good!! and will blend in with your overall plan.
Roger
Worcester, Massachusetts
|
|
|
|
Post by erik on Jun 18, 2014 17:01:20 GMT
Aaargh... Murphy stikes again...
I wanted to weld the last brackets for the scoop and the CO2 tank of my welding machine ran empty. I have only a 5Litre tank and a new tank will be available next week. Total weld lenght only 2" to go now....
This is the last thing before coating. The scoop may have a cosmetic modification to match the Exo design a tad better and make it look less boxy.
CU
|
|


