|
|
Post by kiwicanfly on Mar 7, 2019 20:18:22 GMT
Spot on carlyd I finish all edges with files. Also use them for big holes in things like the throttle body filter plate, amazing how quick it can be. Key thing in aluminium is support it close to the cut otherwise it will bend. |
|
|
|
Post by carlyd on Mar 8, 2019 14:10:16 GMT
I even bought my fuel tank without the hole for the fuel pump (as my fuel pump was a Honda) I then cut my own and filed it all into a circle. Not as easy as it sounds but worth the effort.
|
|
|
|
Post by casesensitive on Mar 8, 2019 18:15:19 GMT
I even bought my fuel tank without the hole for the fuel pump (as my fuel pump was a Honda) I then cut my own and filed it all into a circle. Not as easy as it sounds but worth the effort. If only... You know when you just stare at a problem and think "nope, can't fix that". Well, I had one of those last weekend with the fuel pump hole. Any attempt to weld the rivnuts to a piece of aluminium just produced mush. My half-plan now is to cut a fresh square of aluminium, cut a hole slightly smaller than my fuel pump with my new plasma torch (soo much fun!), and file it to within 0.5mm of the diameter of my actual fuel sender. Then put M4 rivnuts (I broke the M4 mandrel, gotta wait for the new applicator to arrive) in to meet the fuel sender pattern, and then, fingers crossed, a reasonably neat aluminium to aluminium lap joint. Lots of cleaning, acetone etc. Pray to the welding gods for me. 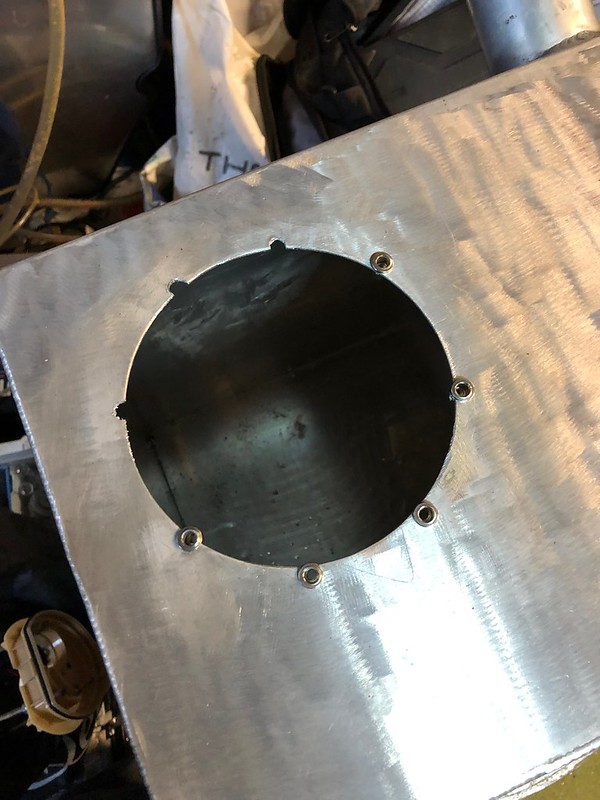 |
|
|
|
Post by kiwicanfly on Mar 9, 2019 2:48:41 GMT
Cut out a plate and put a hole in it slightly oversize, presumably this is the 0.5mm you were referring to.
Then drill, tap and countersink this plate to suit the pump.
Screw in countersunk screws and seal the heads, a) to stop any fumes escaping up the threads b) to ensure they don't come loose.
Ideally you would weld the heads over but not sure if this can be done easily.
Weld that plate to the tank with the screws sticking up (heads to the tank).
Drop on the pump with a large o'ring under it.
Cut another ring of aluminium and drill a set of clearance holes in it.
You can now clamp down the pump and ensure no leaks but be able to remove the pump at any time, you won't require any sealant either.
Alternatively if you do stick to rivnuts do ensure you use blinds ones as open ones will be a pig to seal.
|
|
|
|
Post by Stiggy on Mar 9, 2019 9:01:39 GMT
add a large alloy washer cut from 3 mm and seam weld, then you can drill and tap to sit the pump body flush rather than on top of the rivnut shoulders.
|
|
|
|
Post by casesensitive on Apr 5, 2019 13:00:16 GMT
add a large alloy washer cut from 3 mm and seam weld, then you can drill and tap to sit the pump body flush rather than on top of the rivnut shoulders. This and Rob's suggestion between them should give me what I need to get this right, might take some thinking but. Rather than order online and not have it for this weekend, I googled metal fab shops, and called the first likely sounding one. He didn't have any offcuts of ally, but he gave me another number, and they did, and what's more, not only did they let me root around for what I needed, they wouldn't take money for it. What a lovely bunch. I'll bring the Rocket round and give them a spin what it's done. 460x450x3.3, 600x150x6 aluminium, nice one B and C Fabrications.  edit: I probably should post on my own thread... |
|
|
|
Post by kiwicanfly on Oct 29, 2019 7:02:52 GMT
It's been a while since I posted but I've been pottering away at little changes, the following posts cover what I've been up to. Front distribution board. This ways always something I wanted to change considering it was made of wood and became very messy. However it was not really hanging loose, I just got a couple of pics before it came out fully!   Replaced with plastic wiring channel which has a snap on lid so all the wires are contained inside. The relays all have integrated fuses and the three stand-alone fuses are panel mount. Much neater methinks.  |
|
|
|
Post by kiwicanfly on Oct 29, 2019 7:03:57 GMT
The COR (Cover Of Randomness) is now, in my opinion, a COP (Cover Of Precision). It fits neatly flush to the floor, rear bulkhead and centre tunnel. I split it a while ago, hence the centre stripe, so I can get to the electric without moving both seats.  |
|
|
|
Post by kiwicanfly on Oct 29, 2019 7:06:23 GMT
I have never liked the four point Sabelt harness I originally fitted, I could never get it so sit low on my hips and, being pull down, it was always a prick to tighten fully. Last year I fitted a six point Schroth Clubman to the driver side, now moved this to the passenger side. It also required a plate to line the harness bar holes up correctly with my seat and also to allow eyes to be used as you can't buy eyes long enough to go through a 50mm bar. Note also the excess shoulder strap is wrapped below the belt, once when I unclipped the shoulders straps to fit to the bolt in roll cage and forgot to clip them on. At that time the excess was on the top and hid the fact that the clips were not connected! Now easy to see.   Driver side now has a Schroth Profi harness, would have put another Clubman in but they stopped supplying these in red. The Profi has adjustable crotch belts and better adjusters.   |
|
|
|
Post by kiwicanfly on Oct 29, 2019 7:07:13 GMT
Made a cover for the electric water pump controller, it is sitting in hole created when I removed the gear stick, the hole was quite ugly and the cover has ended up being bigger than it could have been but still neaten things up.  The buttons are for the compressor power and launch control. |
|
|
|
Post by kiwicanfly on Oct 29, 2019 7:08:00 GMT
Added a blipper to the throttle cable, it is controller by the Hadron system. I made this out of two 16mm pneumatic cylinders converting them from single rod into double rod with the cable passing through the middle. Still playing with timing settings but it blips nicely on downshifts.  Also reprogrammed the engine cut function on the Omex allowing the Hadron to actuate it for up-shifts. |
|
|
|
Post by kiwicanfly on Oct 29, 2019 7:08:38 GMT
When I fitted the ITB's the engine cover was removed to accommodate the filter. However I didn't like the lack of panels on the side plus I needed something to mount the fuel filler and master switch. Made two aluminium panels cut and fitted to be as close to the chassis tubes as possible and secured on the centre line of the tubes. Painted them and applied my car club race numbers. Oh and, as they say, read the small print   |
|
|
|
Post by carlyd on Oct 29, 2019 9:36:29 GMT
Quality work as always Kiwi  |
|
|
|
Post by casesensitive on Nov 4, 2019 13:56:53 GMT
Replaced with plastic wiring channel which has a snap on lid so all the wires are contained inside. The relays all have integrated fuses and the three stand-alone fuses are panel mount. Much neater methinks. Yeah, I like this. Mine just looks so exposed. Or I think it did, haven't seen it in months. |
|
|
|
Post by casesensitive on Nov 4, 2019 13:58:42 GMT
Made two aluminium panels cut and fitted to be as close to the chassis tubes as possible and secured on the centre line of the tubes. P Do you mind me asking how you attached these? I've put off attempting to make panels for the various places I want to because I can't affix them neatly in some of the tighter spaces. You don't seem like a zip-tie sort of bloke, so I imagine you've got something better :-) |
|


