|
|
Post by Paul (madeye) on Jan 11, 2013 8:58:08 GMT
well good luck mate is all i can say.
the check list thing.. well, maybe a coffee stain covered that 20% of the sheet
|
|
|
|
Post by kiwicanfly on Jan 13, 2013 7:26:34 GMT
A little more progress today, yesterday the garage was off-limits :-( but today no limits  Spent a couple of hours at work making up the dummy suspension bushes.  44 doesn't seem many until you realise you have only made 12 and have another 32 to go, starting to have sympathy will the lads on the shop floor now when we issue a job for 2000 off ;D Also shortened the two SS adjusters to the correct length, can't hang around waiting for such things as I think it would be a while. De-burred all the wishbones (thoroughly recommend the tool in the picture, makes de-burring a breeze) and dropped in the bushes and crush tubes giving me an active suspension without the rattle.  Interesting when I came to slot it all back together, would it or wouldn't it line up? Turned out not too bad but found the easiest way was to put the lower rearmost bolt in last, I was then able to pull things into line with a screwdriver and minimal effort compared to some stories I have read.  I tried other bolts last and this was definitely the way to go, not sure how that would have affected powder coat though, but the levering wasn't too aggressive. Not a lot for a days work but a good chunk of time was spent entertaining curious visitors who had heard about the project. Also played around with the uprights after reading the instructions! Found that the spacers required for the stays had been not sent  Will knock some out in the week, also thinking of having the front hubs anodized before fitting them. Oh did encounter another small problem, it was just so hot today in the garage, you know what it's like, labouring away, no cooling breeze to give respite, wearing only shorts and a tee shirt, all you want to do is stop for a long cold beer, but you have to struggle on so you just mop the sweat from your eyes and grin and bear it - come on guys I sense no sympathy why not? ;D ;D ;D |
|
Deleted
Deleted Member
Posts: 0
|
Post by Deleted on Jan 13, 2013 8:53:07 GMT
Good progress.. Maybe there will by sympathy in six months when were both getting a few feet of snow? The weather in the uk is somewhat broken right now lol.
|
|
|
|
Post by kiwicanfly on Jan 13, 2013 8:56:22 GMT
Good progress.. Maybe there will by sympathy in six months when were both getting a few feet of snow? The weather in the uk is somewhat broken right now lol. Never snows at my house - we did however just have a small earthquake (honest) Don't panic though, I checked she's still on the stands.  |
|
|
|
Post by Paul (madeye) on Jan 13, 2013 9:32:43 GMT
Well its promising snow for us this side of the pennies, just in time for me driving the country to get to work
|
|
|
|
Post by jacksdad on Jan 13, 2013 12:23:47 GMT
Really like those temporary aluminium bushes did you have to turn each one ??, we have quite a few photos on our build for the uprights, the large washers are to space out the hub when fitting the hub and disc onto the stub axle in order to centre the disc in the caliper, we have some diagrams of this in our build, PM me anytime if you have any specific questions
Good luck looks great so far, i think getting it powder coated later is a v cool idea.
Jon
|
|
|
|
Post by kiwicanfly on Jan 14, 2013 8:51:45 GMT
Big coup tonight - managed to do some work on the Rocket in the living room ;D Whilst Vicki was present as well ;D ;D
|
|
|
|
Post by kiwicanfly on Jan 15, 2013 17:54:14 GMT
Had a good long chat to Paul last night and hopefully all the missing parts will be despatched this week by air.
Fingers crossed.
|
|
|
|
Post by kiwicanfly on Jan 16, 2013 6:14:09 GMT
Had a busmans holiday today, spent the afternoon on leave at work. Managed to get the hub bearings pressed in and the rack apart but first I anodized the front hubs.  I put 24 micron on them after taping all the bearing surfaces, they must have a high silicon content in the alloy as they went a darker silver than normal but the main aim was protection not cosmetics. Then the bearings were pushed in and the rest of the assembly completed for trial fit. I will then disassemble them and grease them prior to final assembly. I found one of the bearing fits a lot tighter than the others. I then moved onto taking apart the steering rack. With the guide this was easy much helped by access to gear at work.  A 20mm allen key is not the sort of thing I find in my tool box but we had 20mm hex bar on the shelf so grabbed a piece of that - worked a treat.  Knocked up a tool on the lathe to take out the Pinion Retaining Nut, cut the teeth with a hacksaw and gripped it in the vice. |
|
|
|
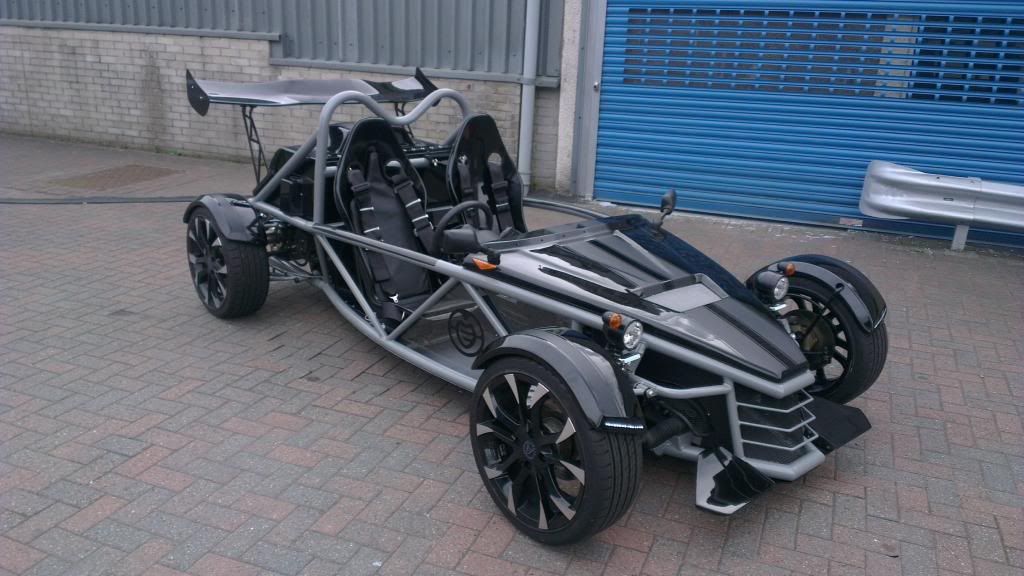
Post by kiwicanfly on Jan 17, 2013 8:37:34 GMT
Put the quick rack in tonight a fitted the pedal box, then started on the steering.  Can anyone advise where to position the steering column? The mounts on the frame are longer than required on the column, so towards the back or the front? Also what is the purpose of the the piece of spring wire attached to washer type thingies under the mounting points shown in the picture? |
|
|
|
Post by airforceone on Jan 17, 2013 8:49:25 GMT
The position of the steering rack depends on your driving position or how tall you are.
I set the rack as far back as I could this gives me enought room so that my arms are not
bent to much when I drive.
Problem comes if you set it too far back and when you fit your seats it's all gone to pot.
Just remember that the focus steering rack (in the UK anyway) can be pulled forward and back as
well as up and down by releasing the adjustment lever underneath so you will have some play on
position once fitted.
Ned
|
|
|
|
Post by Paul (madeye) on Jan 17, 2013 8:58:48 GMT
different to ned, and due to being a short arse, i hacked mine up and moved forward, putting my elbows in the widest part of the car.. remember our seats are very wide.
then make up the difference on the steering adjustment.
again have a look at what was done. i had to adjust the forward mounts to accommodate the column.
paul
|
|
|
|
Post by kiwicanfly on Jan 17, 2013 9:25:46 GMT
Cheers guys.
You have confirmed my thoughts that it is best to hold of finalising the position until the drivers seat is in.
I am going to get a couple of small G clamps at the weekend (got 10" ones on at the moment) and leave drilling to much later.
Springy bit? - Any offers?
|
|
|
|
Post by kiwicanfly on Jan 17, 2013 9:30:52 GMT
Should have mentioned a small problem encountered when fitting the quick rack parts.
The circlip holding the bearing on the pinion would not seat properly. A trick I always use is to see if it turns in the groove (although should not be pissy) this one would not budge.
Luckily we use one the correct diameter and about 0.4mm thinner in a product we make so in it went and worked a treat.
All in all the whole quick rack upgrade went without hitch which was good.
Got to source some springs for the ends though - hey perhaps we will have those at work as well ;D
Rob
|
|
Deleted
Deleted Member
Posts: 0
|
Post by Deleted on Jan 17, 2013 19:34:02 GMT
For the column mounting, I set it far enough back for the slip joint (the collapsable slidey bit) to fully compress together into the column UJ, after weighing up where the extension rod to the rack will be mounted. I didn't want the joint to foul the bulkhead.
Two clamps, and a few measurements. Plus, being 6'2", I still mounted the column to the nearest position, and have lots of arm adjustment.
|
|