|
|
Post by rusperala on Feb 10, 2015 20:59:12 GMT
Definitely going for the mx5 tank - plan is for this to be my only car (at least to start with), so keen on having a decent range between fill ups. Besides, if I need storage I'll just kick out the passenger  . Think it's going to be a few nights work to get the tank all mounted up but from what I've seen so far it doesn't look like too much modification is going to be needed to get it to fit... haven't been brave enough to put the body on top yet to double check though! Did you guys have any major issues on that front? |
|
|
|
Post by p5curly on Feb 10, 2015 21:49:42 GMT
Yup it needs some sort of modification ours just didn't fit
|
|
|
|
Post by rusperala on Feb 12, 2015 10:48:41 GMT
I never expected building a car to be easy, so I wasn't surprised at a couple of smallish setbacks yesterday. The first one was a classic 'Oh S...' moment - I was about to start making a bracket to hold my new fuel filter while I carry on thinking about the fuel tank/rear shell issue, when I realised that the diameter of the pipes built into the filter and my copper lines were't the same... Turns out I had (without thinking about it), riveted 1/4" fuel lines to the chassis instead of 5/16", which (having cut up my old lines) is what I should have gone with!  So, for anyone in the future wondering what diameter lines to use, the mx5 came with 5/16". I briefly considered staying with 1/4", but I don't want to run into issues at a later date caused by being unable to get enough fuel through to the engine, especially if I end up upgrading it. My next job therefore is going to be to replace the fuel lines mounted to the chassis. I've got a feeling that this might being a bit of a pain, but there's no way I'm taking the chassis off the roller skate now! The second setback was a letter from the company which owns my garages letting me know that they want a 25% increase in rent (!). Since the second garage is only housing body work at the moment I'm going to give that one up and just keep the 'workshop'. The result of this is that my immediate plans have changed slightly. I still want to get the engine running as my next job, but instead of spending time now getting the tank perfectly mounted, I'm going to do it with the tank unattached. Hopefully this will save time, as I'm thinking of, once the engine is running, getting the majority of the body at least loosely fitted so that I don't need the second garage. Once the bodywork is on, I'll then revisit the tank, which should hopefully be made easier by the fact that I'll know exactly where the shell will be sitting. |
|
|
|
Post by p5curly on Feb 12, 2015 16:00:29 GMT
Shame to hear about garage problem I was lucky to have seperate storage for my panels but they have got a couple of battle scars from being moved around a lot
|
|
|
|
Post by rusperala on Apr 17, 2015 17:54:45 GMT
So I realised today that it's been a little (long!) while since I updated here so I thought I'd quickly upload a picture of roughly where the car is at now . I'll do a proper update this weekend of the process up to here as there's been a fair few nights spent on it. 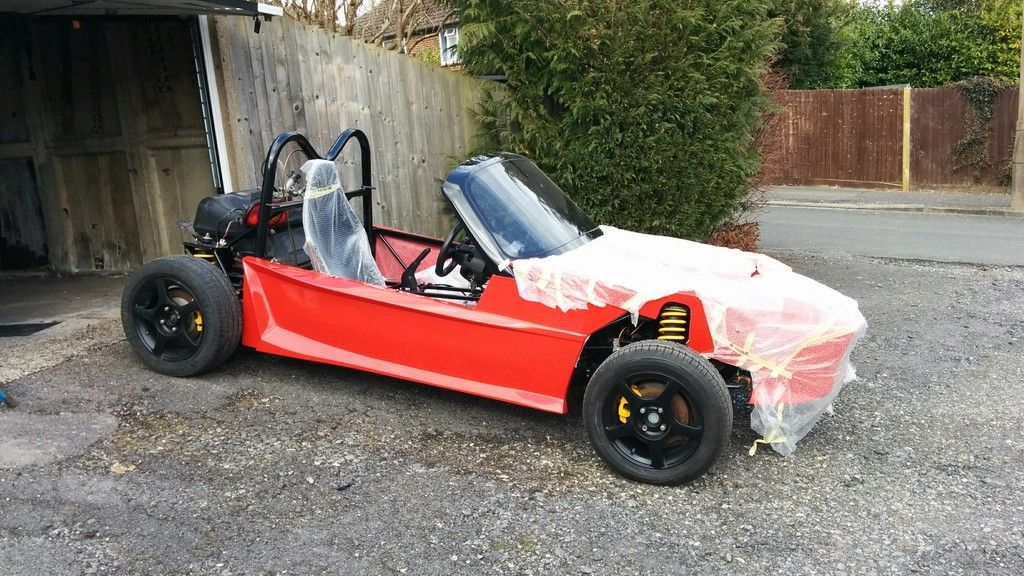 |
|
|
|
Post by rusperala on Apr 20, 2015 21:38:11 GMT
Not got masses done over the weekend aside from the odd bit of bracketry, but it was really good on Saturday to meet the p5 lads, and to see their really high quality build. I was grinning all day after a run out in it! They had some great tips about the IVA and fitting the fuel tank which have given me loads to think about.  In particular little bits of attention to detail like tethers to stop the bonnet hitting the floor when open and an 'under dasboard panel' really add together to make it a great example. To give a bit of a proper update on how my build's going since I last did one, the first thing I did was to replace the under-sized fuel lines and fit the loom to try to get the engine started. As I found while stripping out the old immobiliser I'm not a soldering expert! 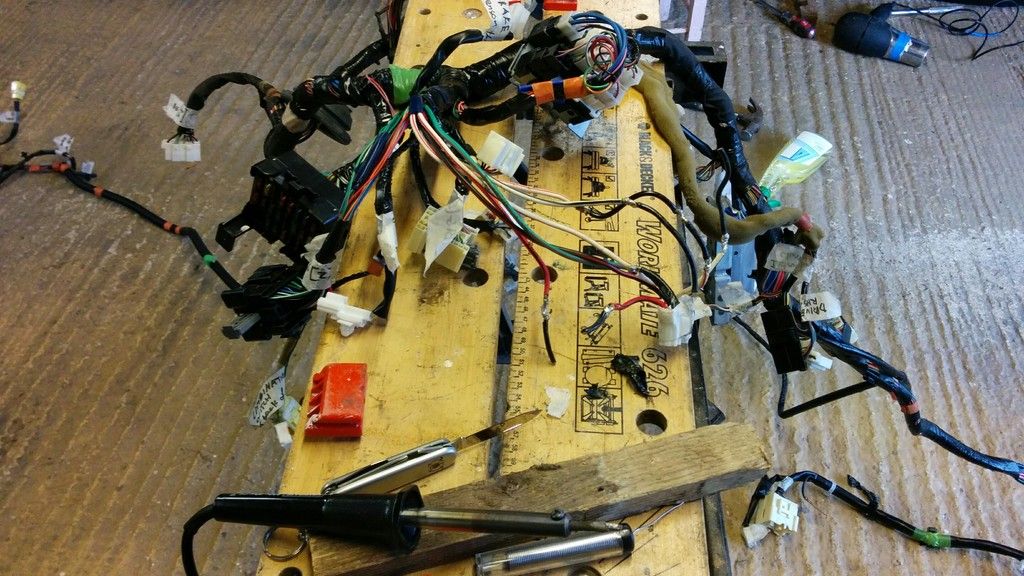 Getting the engine started wasn't quite a smooth as plugging everything in and turning the key, I was having issues with not getting power to the fuel sender unit. A couple of hours double checking that all of the earth points were connected fixed that though. The first time it roared into life was definitely a relief and a bit of a milestone! Pretty sure that it won't pass the IVA without an exhaust though so that's on the list of things to do. The next pic shows the first go of putting the loom in - I've tidied it up a bit since then. You can also see the original air filter box in the background which was never going to fit - that's since been replaced by a nice shiny K&N filter. 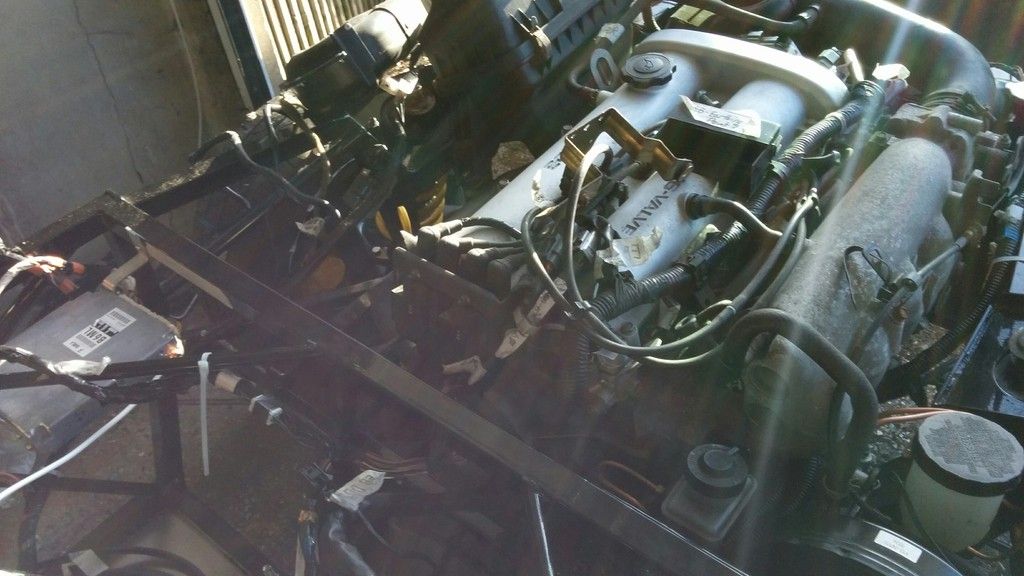 Once the engine was running it seemed like a good time to get the clutch and steering sorted. Since my donor was a mk2 it had an airbag on the wheel so I grabbed a new one off ebay. (Fingers crossed that it'll be IVA Compliant - I may put edge trim around the centre) at the same time I got the horn working and worked out why the indicators weren't working - I'd missed a plug! 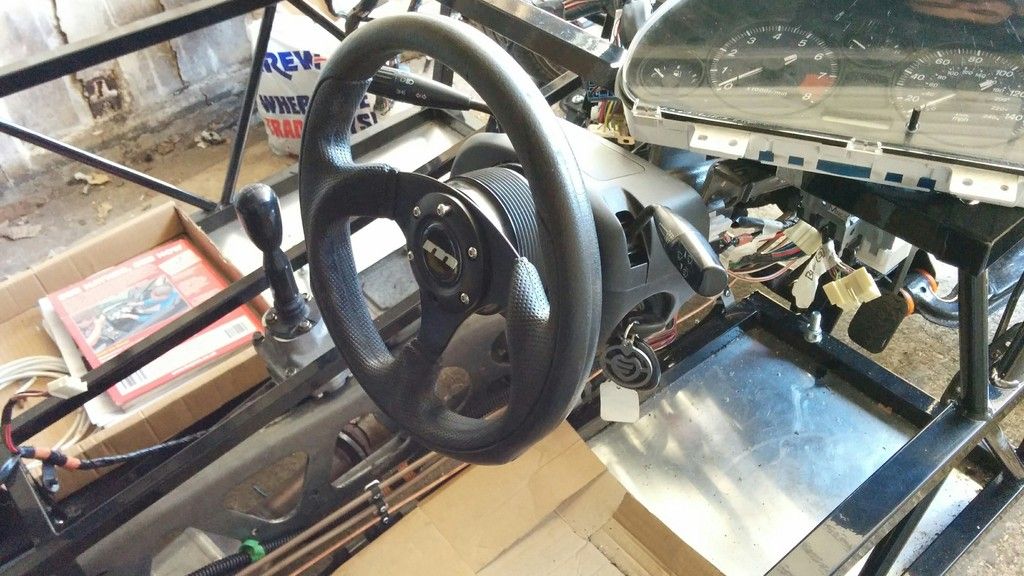 At this point (after one or two other small jobs) I was running out of time on my second, storage garage, so it was time to start thinking about fitting the bodywork. I'm keen on being able to take the car apart easily in case of problems/because it's relatively early in the build to be attaching it, so I've decided to fix everything using rivnuts and rubber washers (similar to how Nitram did: mevowners.proboards.com/thread/3069/nitrams-build?page=4In an effort to reduce vibration I'm using self-adheisive rubber strip between every panel and the chassis: www.carbuildersolutions.com/uk/25-x-6mm-self-adhesive-foam-rubber-stripThe next few pics are from the body fitting process. 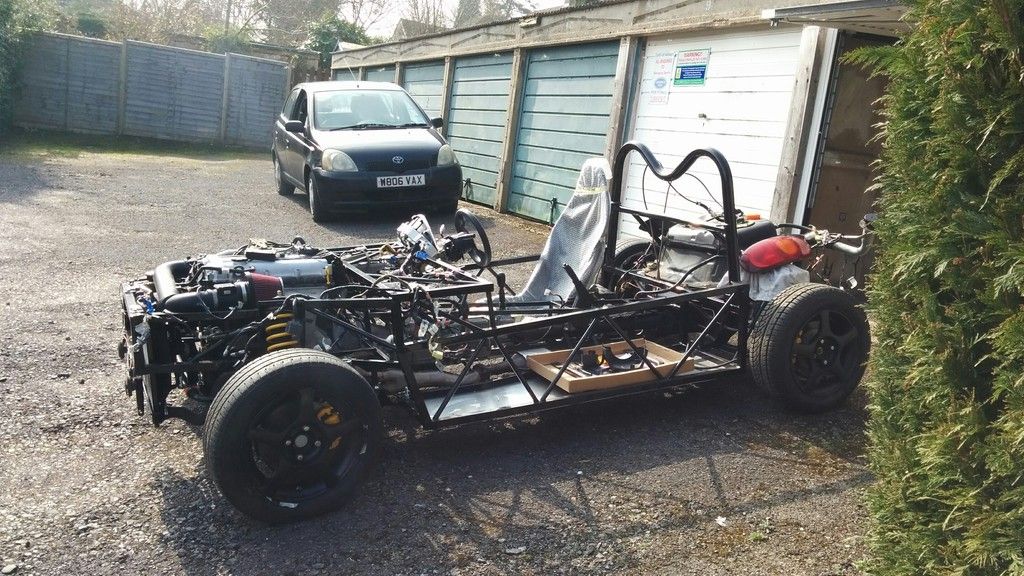 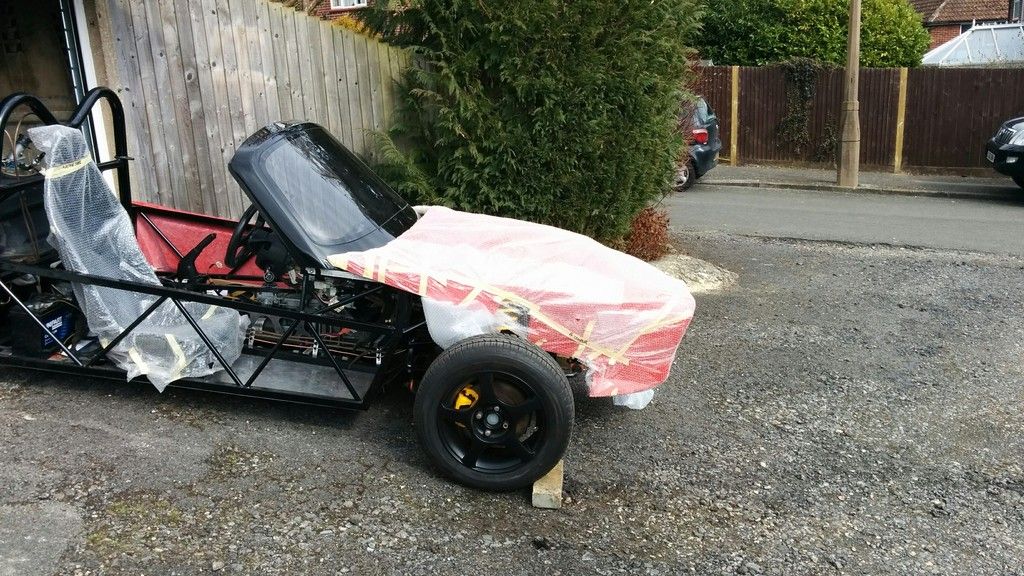 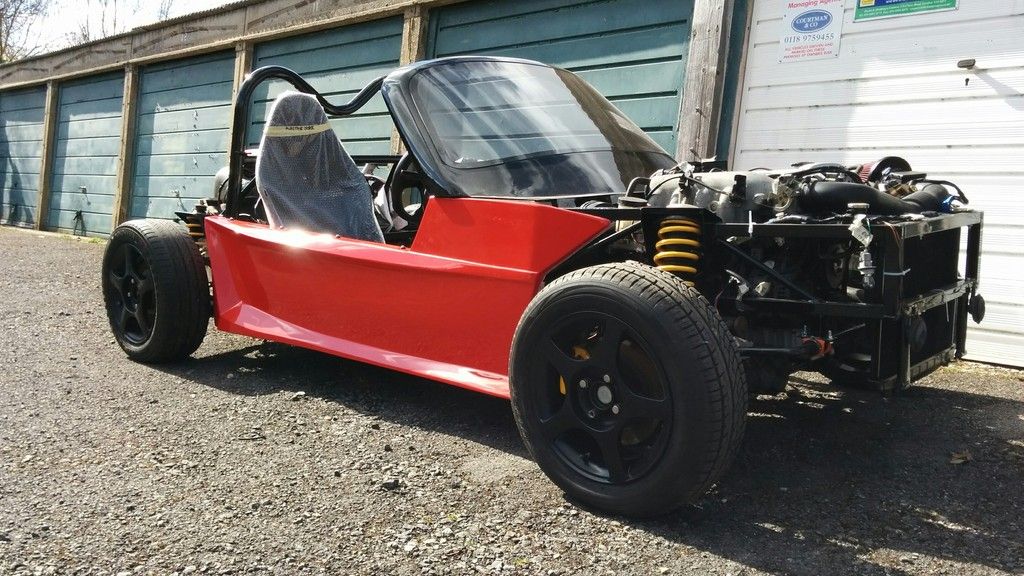 The next steps now are to get the fuel tank/drip tray/rear clam fitted. Once I've done that I'll be able to start getting lights in as so far I've just been using the original MX5 ones, and get the loom position finalised. If I don't post an update again soon it's not that the build has stopped, just that I've forgotten to turn on the laptop and do it! |
|
|
|
Post by p5curly on Apr 21, 2015 18:46:13 GMT
It's been a while since we have been called the P5 crew
|
|
|
|
Post by rusperala on Jun 8, 2015 21:28:04 GMT
Time for an update! Since the last one a lot of little steps have been finished to add up to a fairly big change, so here goes. Last time I posted I had recently been working on getting body work fixed and was scratching my head over the fuel tank/rear clam fitment. This went on for a fair while, but eventually I worked out that with my tank (mk 2) the easiest option was going to be 'backwards'. To do this I built brackets out of angle to hold the back (below), and put holes through the frame to hold the front. I'll fit rubber spacers of some description at some point later. 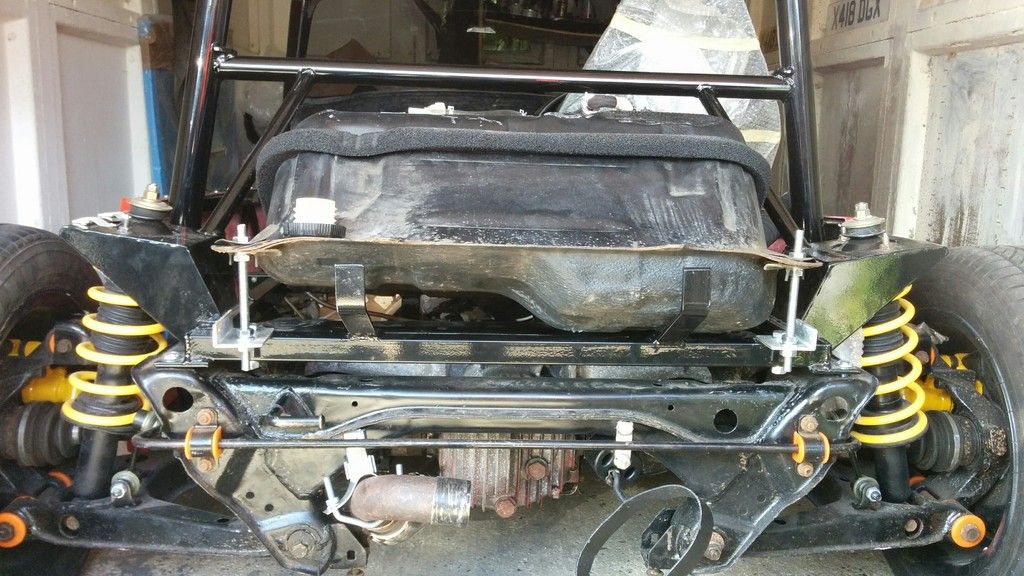 Once this was mounted I fancied a change from working on the rear end of the car, so moved forwards to the windscreen wipers. I started out with a bit of a mock up to check that everything worked with the holes the distance apart that Stuart had specified in the demo build (I was a little concerned that there may be differences between mk1 and 2 - there are, but not in this regard!) 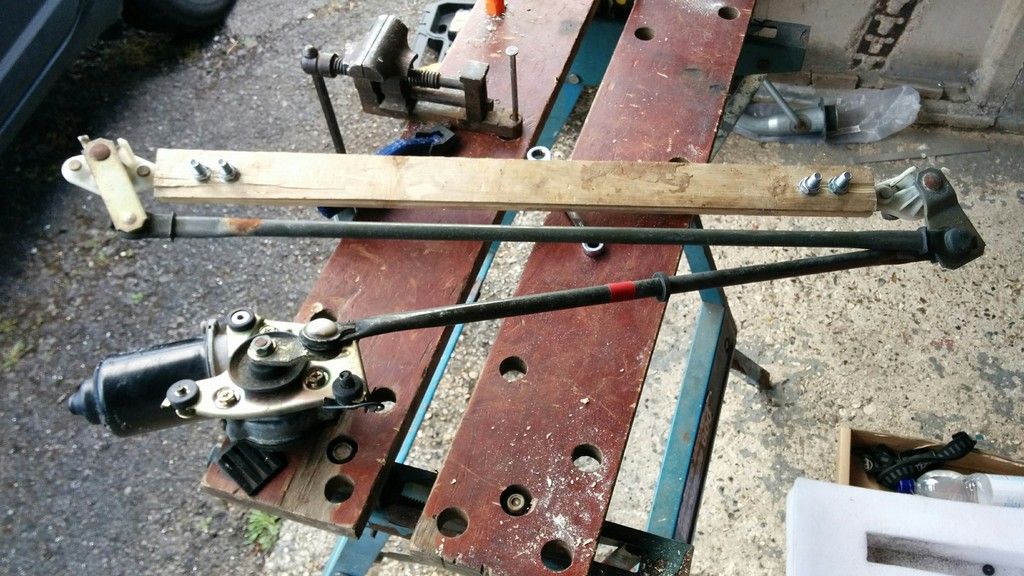 Next it was time for a bit of a diversion from building to go to Stoneleigh where I was lucky enough to get some great advice from a few people (thanks all!) and new tools and parts. As my first visit to a show since I started the build I was really impressed at the huge range of cars and friendly people there, and certainly hope to be able to drive next year!  This was another great kick up the whatsit to get cracking with the build, so back to the garage to carry on with the wiper system. First step was to get the first blade fitted (after adjusting the length of the arm) to act as a reference. 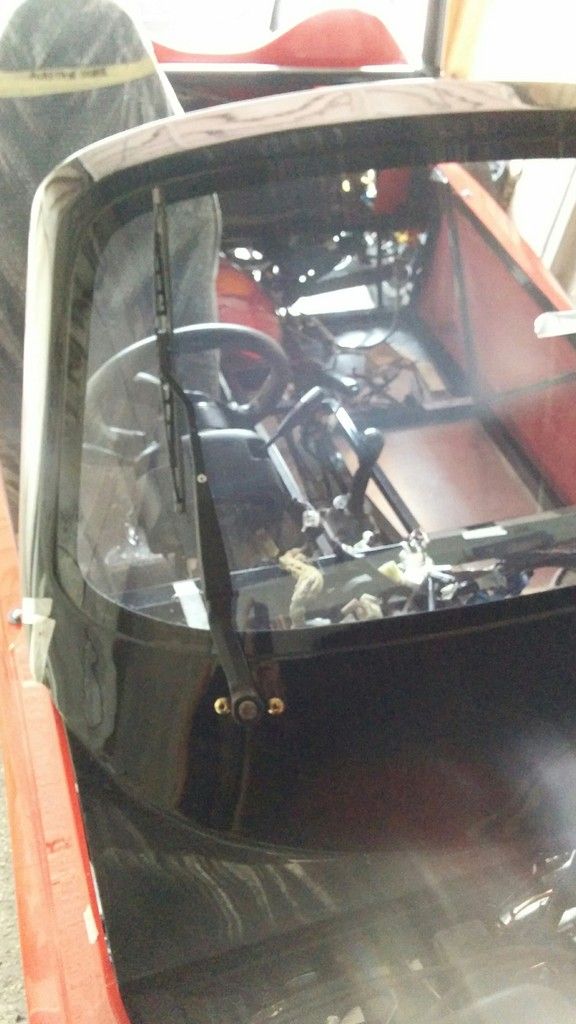 It was next, while looking at attaching the second blade/motor that I found a difference between the mk1 and mk2 wiper system (at least, as far as I can tell from looking at other people's photos). If you look in my pic below, you'll see that I've got the passenger wiper is connected to the driver's by a linkage going to the front of the drivers blade arm thingy , while the motor is connected to the drivers blade arm thingy at the back. ( I hope that makes sense). Originally it was the other way round, so passenger to back, motor to front. I've had to chop each linkage and swap ends to get it to work without some major clashing:  What you can also see in the pic above is the second iteration of the bracket I've made up to hold the motor. The first was made just using bent aluminium strips, but they bent horribly first time I ran the motor. It generates a surprising amount of torque. The final version of the bracket is below. The thing on the left hand side holding the cylinder of the motor is actually the original fuel filter bracket - it just happens to be the perfect size for this! I wanted everything to be completely solid as the intention is still for this to be my only car so it needs to be usable in heavy rain.  Next was back onto the rear of the car, but before I could fit the rear clam I had to take care of a mistake I'd made. In my fitting the fuel tank I'd bent the lines into 'final position's', and p clipped them in place. Unfortunately one of the lines had got a little bit kinked. For the third time, it was time to fit new lines to the car (I'm not doing it again!). At least, since I knew exactly where they needed to go they came out perfect this time.  Finally I could get the rear clam in place. To do this I first mounted the front using the system below (the orange spacer is a left over poly bush), then did the rear. Lining up holes with the brackets on the frame was a nightmare, until I thought of using round magnets. I first drilled and rivnutted the brackets, then put a long steel bolt into them. The magnet was attached to the bolt, and the bolt extended such that when the clam was put in place it was just touching. Then it was a simple job to take a second magnet and hold it up to the outside of the cclam to see where the hole needed to go. Annoyingly I didn't take any photos of this process, but if anyone wants to see it I can recreate as the clam is just as removable as the rest of my bodywork.  I should say that the rear of the clam was a little way from the brackets, so I used a similar method to that above to bridge the gap. Next up was the grill at the front (I was getting bored with it falling on my head every time I needed something from my shelves. I used a similar method to that I've seen across the forum to make this removable. I used PU adhieseve to attach zip tie brackets to the clam, then fettled and attached the grill. I realise that I may need to replace it with something with larger holes in the future, but that's a problem for another day   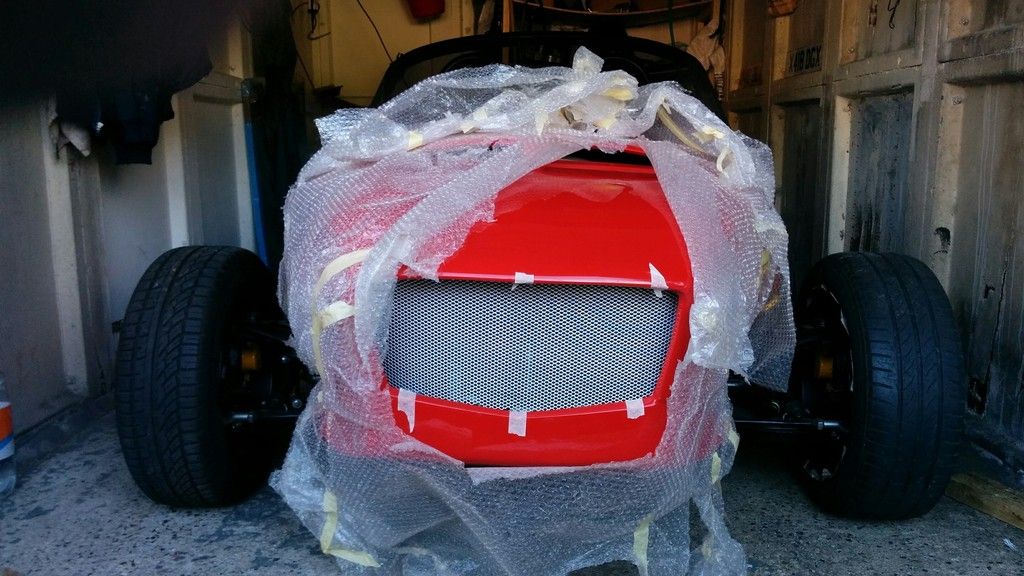 Next stage was going to be the lights, but the bonnet was moving around too much to reliably mark up the headlight holes. Therefore the plan changed and I got my aero catches mounted instead. This was tricky to mark out and required minor bending of the pins, but I'm happy with how it turned out. 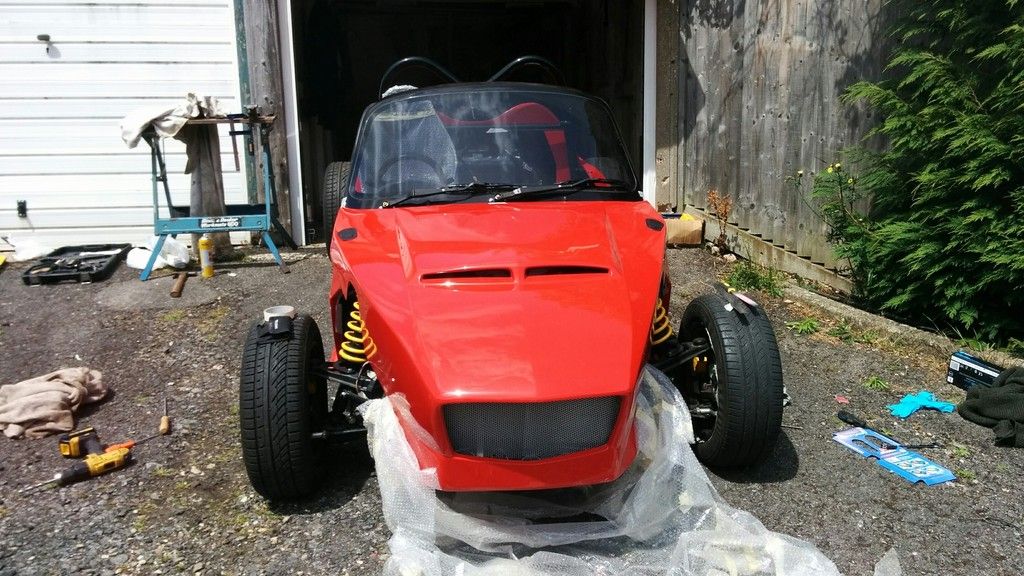 I was at this point enjoying cutting holes so much that I decided to do the fuel filler cap too! Prior to this point I had already blocked up the small 'breather hole' which allowed air in when filling the tank. This made even filling up from a jerry can horribly slow... After thinking long and hard about how to get around this (as I was envisioning spending countless hours filling up), I decided to mutilate the original filler neck, and put this in line with my aero filler cap, connecting them with the ultra flexible filler hose that I got from CBS. 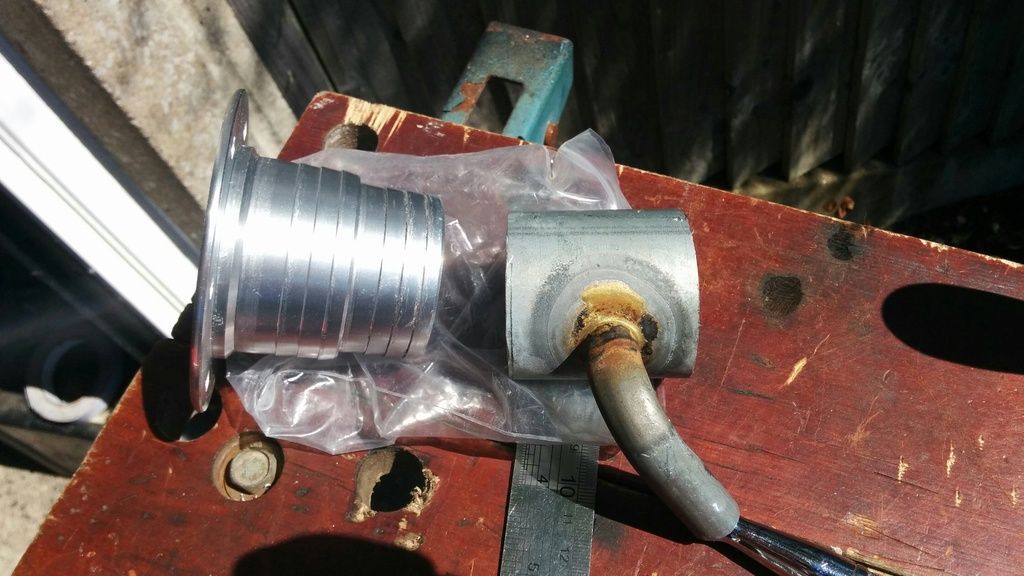 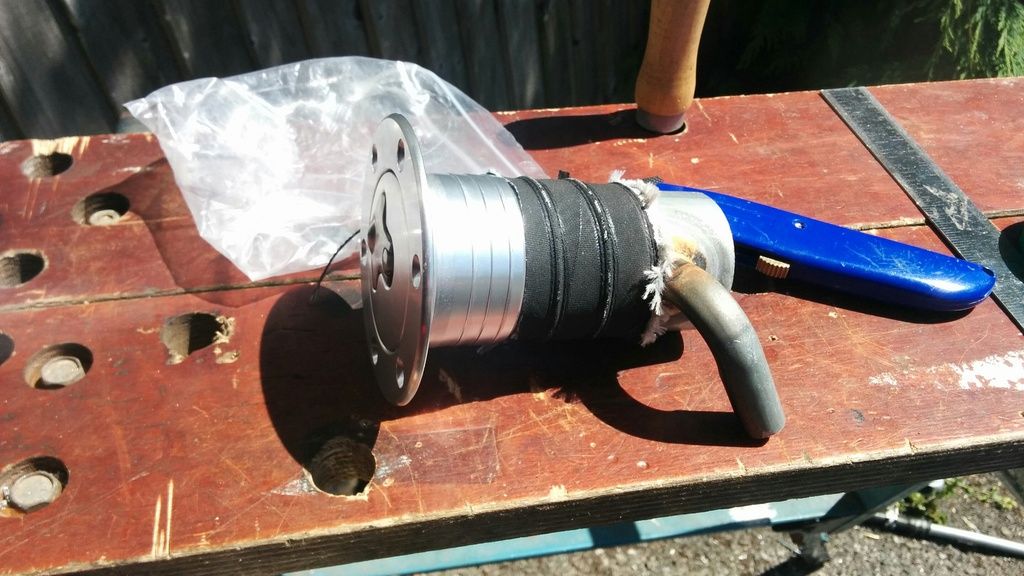 I'm just waiting now on a replacement hose for the overflow/air release, but the theory is that the filler pump will go beyond that point allowing the air to flow past. I've fit it all temporarily for now, but also need to sort out a tether before the IVA. 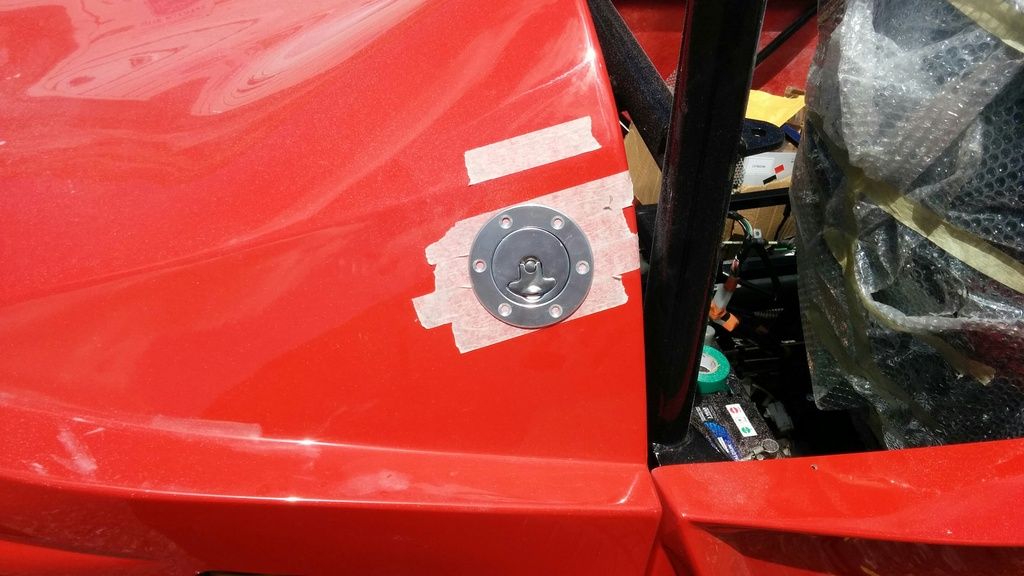 This is more or less where I'm up to now. Next stage is now the lights - I've started marking out where the headlights will sit, but it's tricky without an obvious datum point! I've mocked it up tonight using rattle can lids but I'm going to go back fresh tomorrow to make sure it still looks right before I start drilling holes. Then it's onto finishing the exhaust system and getting the interior and mudguards fitted before last pre-IVA checks.... it doesn't sound like much when you put it like that but I'm sure it's going to take a little while yet! |
|
|
|
Post by p5curly on Jun 9, 2015 9:41:03 GMT
Good to see your still cracking on
|
|
|
|
Post by rusperala on Jul 10, 2015 21:24:43 GMT
Update time! Since I last posted there's been some progress, but also some backwards movement. I'll post the progress first, then I've got a couple of questions I'd like to see if anyone has any ideas on. First thing was to get the headlights and indicators attached. As expected it was hard to find a good reference point for measuring from, so in the end I used the garage door! At the time this pic was taken most of the lights were working, with the exception of the nearside indicator - the sidelight would flash instead! I eventually traced this to a broken earth wire deep in the loom. Tracking that down was a frustrating week! 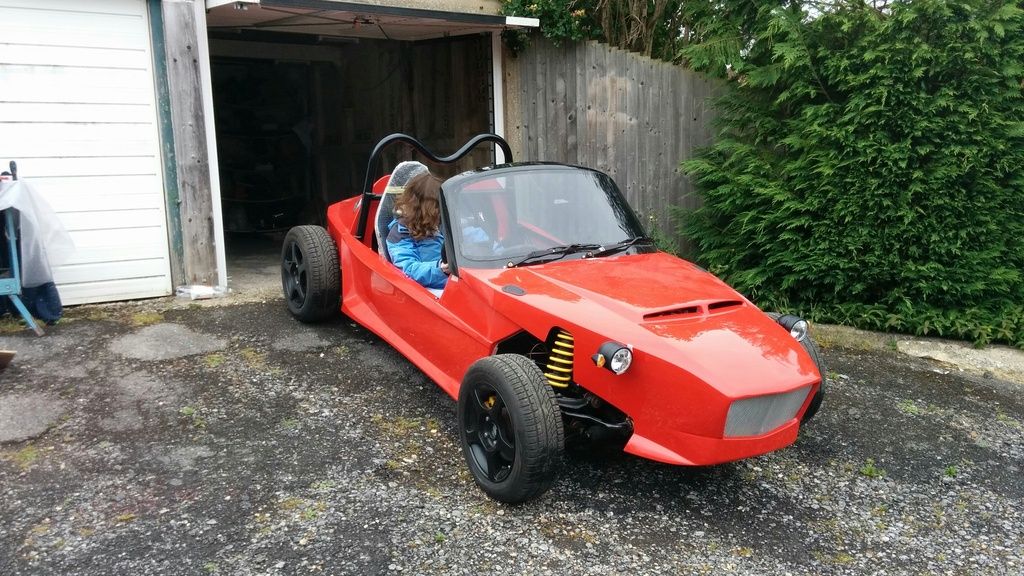 Next move was to go onto the rear lights. As with a lot of the rest of the build, I thought it might be useful in the future to have the ability to take them off at a later date. This, along with the fact that the holes already drilled into the bodywork were much larger than the lights themselves, so straight gluing on would have been tricky, meant that I decided to mount them using brackets. In the pic below I was using a plank of wood on each side to make sure that the lights were going on in line. This worked well, but some adjustment was needed afterwards with washers to improve the angle to ground.  And here the are on the car! (exhaust still needs work) 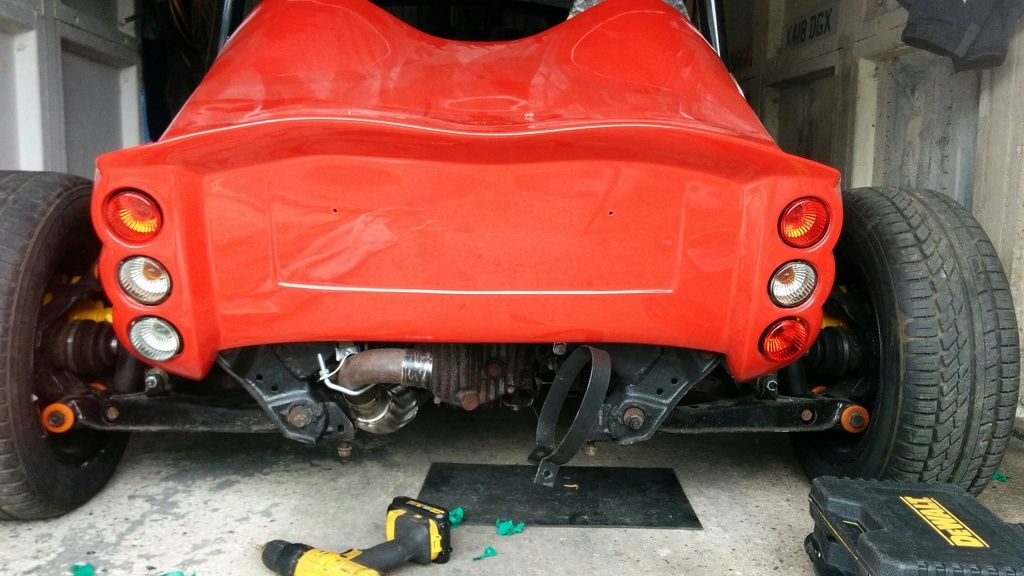 I was then away from the car for a week or so for work, but when I got back it seemed like a good time to put an drip tray below the fuel tank for IVA reasons. I've seen mixed accounts of whether the testers look for it, but it seemed worth putting it in just in case. 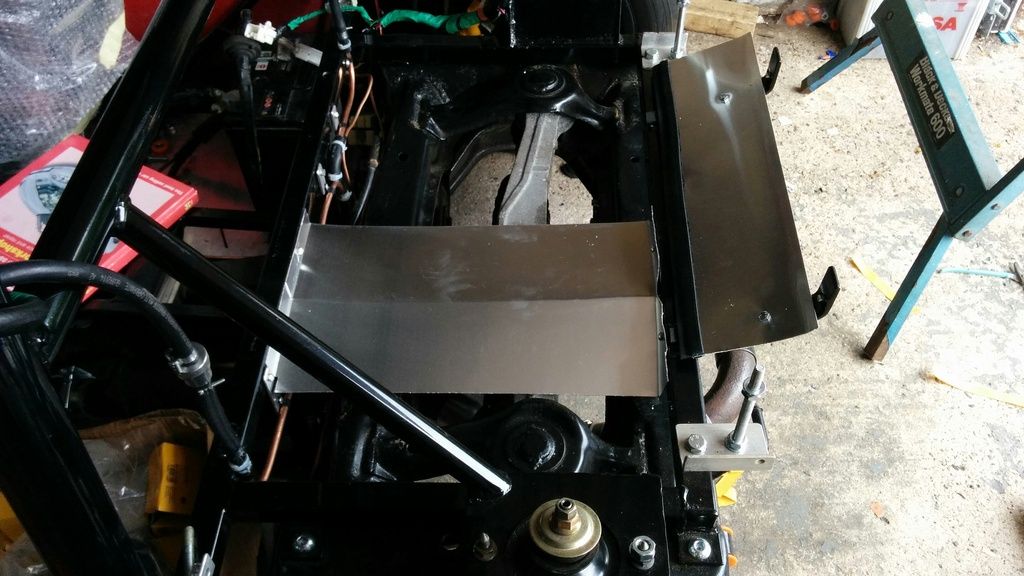 Now I'm onto the dashboard/instrument cluster. This was held back initially because the original instrument cluster stopped working, but an ebay special later I had a much nicer, newer one. Imagine my horror when that stopped working straight away too! It turned out that identical tracks had burned out on the back of each unit. I traced this back to either the broken earth wire which had been affecting the indicators, or, more likely, an earth point I'd forgotten to reconnect last time I was working on the loom around the dashboard area! I've since had a friend who's handy with a soldering iron repair both instrument clusters, so happily I how have a spare. The pic below is using the older (more battered) cluster. There's still some work to do but I'm happy with how it's turning out. 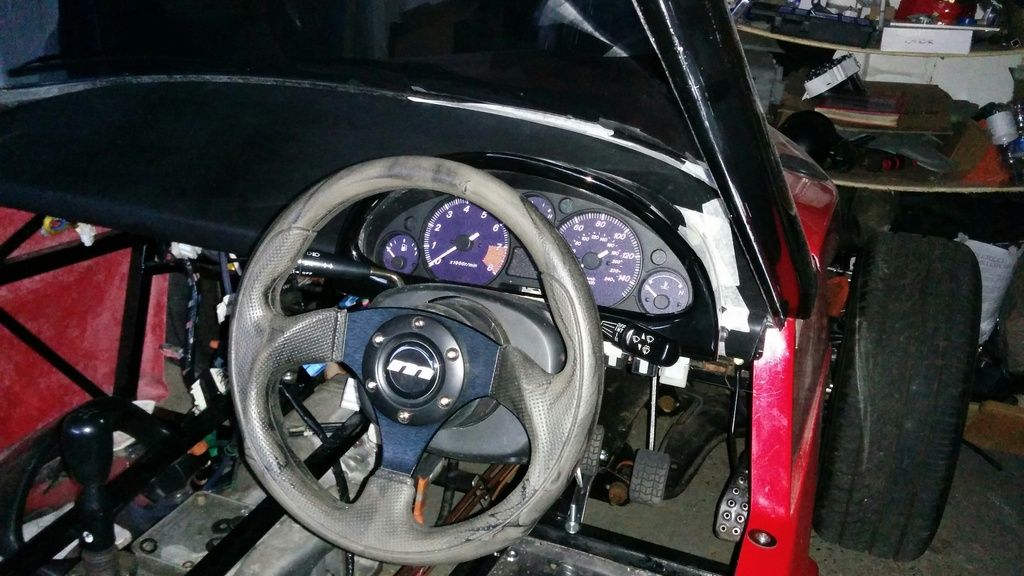 Next job is to finish mounting the cluster surround thingy, then to start attaching mirrors etc. But first I have a couple of questions... |
|
|
|
Post by rusperala on Jul 10, 2015 21:35:35 GMT
So there have been two set backs over the last week that I want to run by you guys to see if you've got any ideas. The first one is a bit of a mystery to me. I came back to the car the other day after a couple of days away and was treated to a nice large crack from the top to the bottom of the windscreen! The pic below is the best focus I could get, but it still doesn't show the full length of the crack. Obviously this will need replacing before the test, but does anyone have any idea what could have caused it? My initial thought was that I have some flex in the frame when the windscreen wipers are running, but I'm sure that this didn't happen while they were - surely I'd have noticed! I also checked for anything which could have fallen on it but nothing was immediately obvious... Any ideas what could have caused this?? 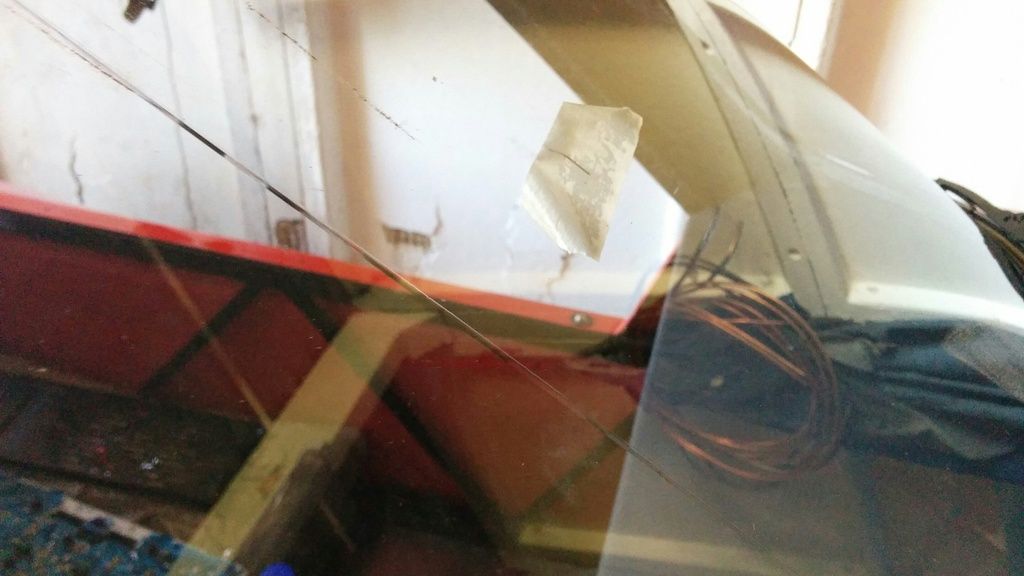 The second setback is a little more urgent/immediate. The other day I was running the engine so that I could move the car in and out of the garage and it was working fine. I had just put it in when I realised I could do with straightening it up so that I could get to the other side of the garage, but when I turned the key nothing happened. Or rather, the starter motor is turning the engine no problem at all, but I'm not getting any life out of it. My suspicion is that fuel isn't getting to the engine, but there are a couple of other symptoms going on, so I wanted to see if you guys recognise before I start testing the fuel pump etc. Usually, when I turn the key to 'on', but before starting the engine, there is a humming sound coming from the engine bay. There now isn't. Also, the battery is getting drained fast. The first time, I thought that maybe I'd left a side light on, so I took it home and charged it. I put it back in this lunchtime, making sure all the lights etc were turned off, but when I got back after work it was dead again. My guess is that these are related, but I'm not sure how. I'm going to start attacking everything with a multimeter tomorrow, but in the mean time, has anybody seen anything like this before? Any help greatly appreciated |
|
|
|
Post by p5curly on Jul 10, 2015 22:38:08 GMT
I am crap on electrics but as for the windscreen I think Stuart told my bro it was from a VW beetle 1303
Has something dropped onto your screen
Have you ran the wiper motor at full speed ours rocked on full and after Scotland trip one of our bolts had worked loose on wiper arm mount
|
|
|
|
Post by gwnwar on Jul 11, 2015 5:38:47 GMT
With a good battery installed key out of switch pull the neg cable off and put a test lamp in line between the neg terminal and the cable..If there is a draw the lamp will light.if so start pulling fuses to see if lamp goes out..
same for relays.. Do you have a ground wire from battery to PPF there is a spot for it at the rear of the PPF. and from engine to frame of car
|
|
|
|
Post by p5curly on Jul 11, 2015 18:54:57 GMT
Oh and fog light needs to be at 90 degrees to the floor and not following the contour of the body you may need to re jiggle your bracket .oh and what ever you do don't break the rear lights as they are not cheap
|
|
|
|
Post by rusperala on Jul 14, 2015 7:54:33 GMT
Thanks very much for the advice guys . P5curly, those are definitely points I need to check out sooner rather than later! Thanks also for letting me know which windscreen it is, I'm going to leave that until the end of the build for the time being though on the basis that at least it doesn't matter if I drop anything on it now! Gwnrar, that was a great idea on using a lamp between the battery and the negative cable to see if there was a short, I never would have thought of it! Using this technique I've had mixed success - I went through the relays with no luck, but when I came to the fuse box, in an effort to quickly narrow down the issue I took out a few fuses at once (ABS, Stop, STN1 and STN2) which fixed the light coming on problem! Unfortunately, as I went through replacing them to see which had caused it, the light didn't come back on :/. I tried the engine again and everything worked fine, except for the speedo and rev counter which had stopped working. On close inspection I found that another track had burnt out on the back of the instrument cluster! Has anybody seen anything like this before? Any and all advice greatly appreciated since now it is starting to feel like I'm moving backwards. 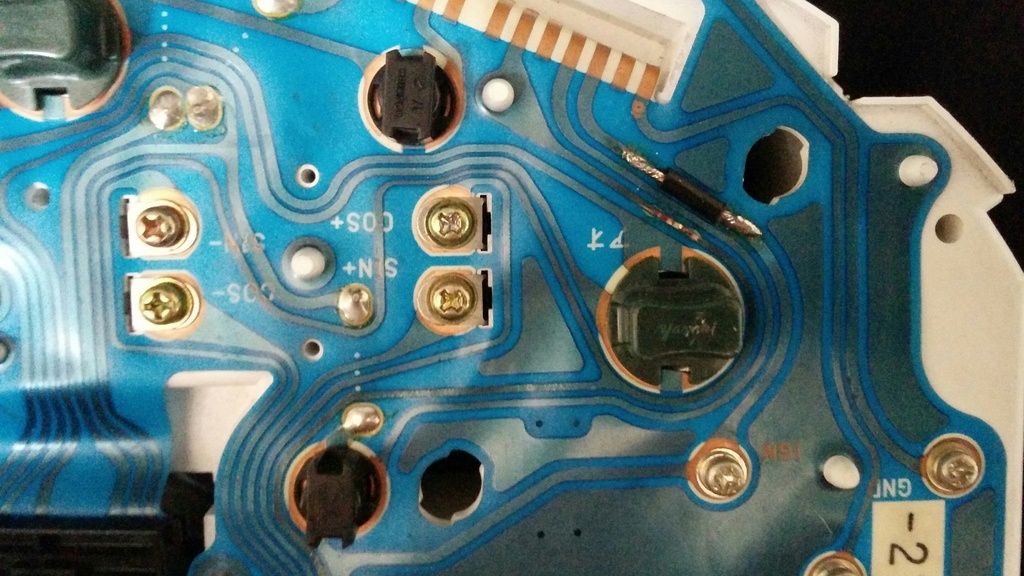 |
|


 .
.


