|
|
Post by roger32849 on Mar 14, 2016 22:41:25 GMT
Great progress Fred. The trike is coming along nicely. This summer will be a lot more fun if you can get out of the store and get some driving done. Make sure you keep everyone up to date on what you are doing.
Roger
|
|
|
|
Post by erik on Mar 15, 2016 18:00:17 GMT
Looking great! Nice detail on the switch stalk!
One suggestion: move the brake fluid bottle in eyesight this will save you a brake fluid level indicator and additional dash light. It's easier to fill her up if needed too.
|
|
|
|
Post by edvb on Mar 15, 2016 19:04:07 GMT
Looking good Fred. Now to figure out the mounting of the windscreen and you should be on the home stretch. I hope you found a seat that is comfortable as that was the hardest to find. I just ended up making my own. It is fixed and works well.
Edward
|
|
|
|
Post by smokinguitarplayer on Mar 16, 2016 0:37:14 GMT
OK ..thanks for the comments.
re: Seat .. so far I've bought 2 different ones ...and might have to buy one like Roger used. The tractor seat I have is OK for now .. .my "push" is to get the thing on the road and I'll tweak it later.
I have the windscreen more or less figured out ... when I did my test drives the original didn't block the wind at all ...so I bought a huge Givi which I saw in Erik's photos .. I mounted that and all that wind resistance, caused my mounting to fail and the thing hit me in the forehead !! So , I've beefed everything up and that will be the last thing I work on .
I've been pushing to get as much done as possible before this Wednesday night, when I have my weekly session with my skilled helper so we can reinstall the swingarm and he can show me (again) how to get the cooling and brake lines all filled and ready . Electrics should be good ..I've spent a couple of days cleaning up a few dubius connections. ...
So we shall see but in a week or 2 it'll be basically done for this season.
FB
|
|
|
|
Post by erik on Mar 16, 2016 16:48:37 GMT
You'll be amazed the Givi screen proofed to be awesame in my 1st testride @ 60mph. Cut it on the correct height.
The Kreidler seat+rails are universal fit. I don't fit go-karts seats but these are amazing ,cheap and padded for road use.
|
|
|
|
Post by smokinguitarplayer on Mar 19, 2016 21:55:52 GMT
3-19-2016 update ... Approximately one year since I started ...almost done. I have decided to hold off tearing down the trike to get things powder coated etc. until after the season ...so for now , I tore it down, finished the floor, did all the needed welding and finishing and fitting, and reassembled it. First Pic ... almost complete assembled. As you can see I added a super huge GIVI windshield as Erik did. During my shakedown runs, I found that the original equipment windshield did nothing .. if I didn't have a face shield I would be eating bugs etc. and I sometimes don't wear a full helmet so I needed a bigger windshield. This one is overkill for sure. It looks like Erik cut his down. If you are reading this Erik, please tell me how / what saw / etc. you used to cut it down . Also notice in the pics, the air cleaner is almost touching the back of my seat. I see on the original bike (3rd picture) that the air intake / filter is turned and sticking out BEHIND the frame rail behind the seat .... I have a 90degree bend pipe that I can stick on the air intake but it'll still be in front of the engine, right behind the seat ...can somebody tell me how to get it off the the side of the engine? 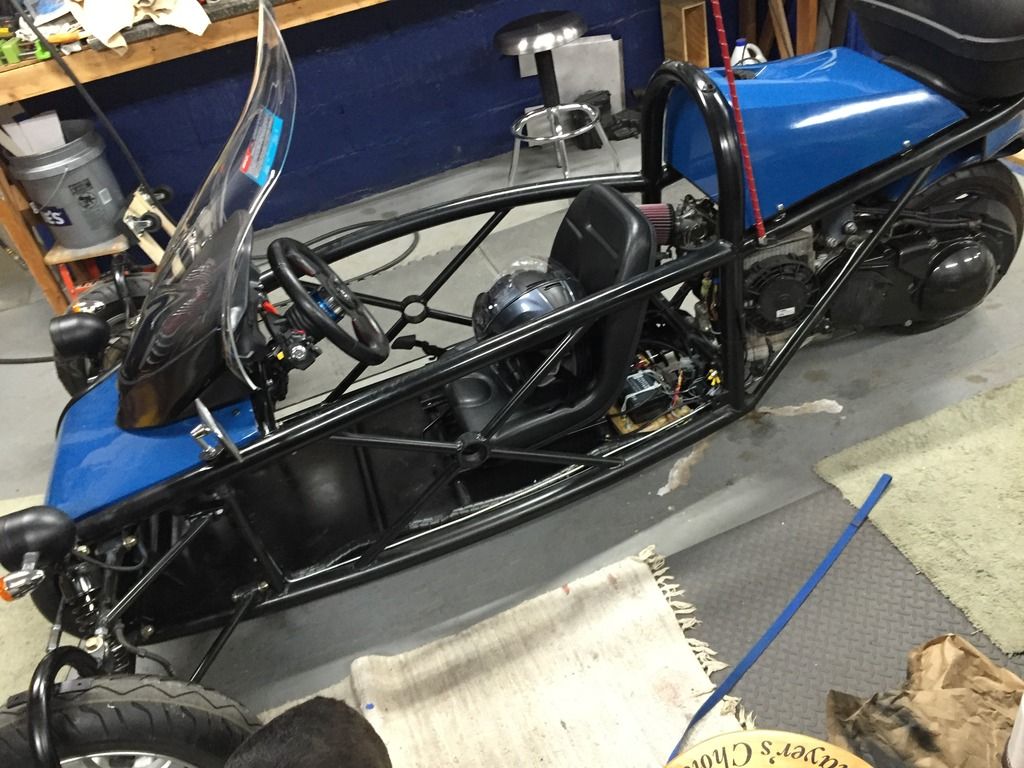 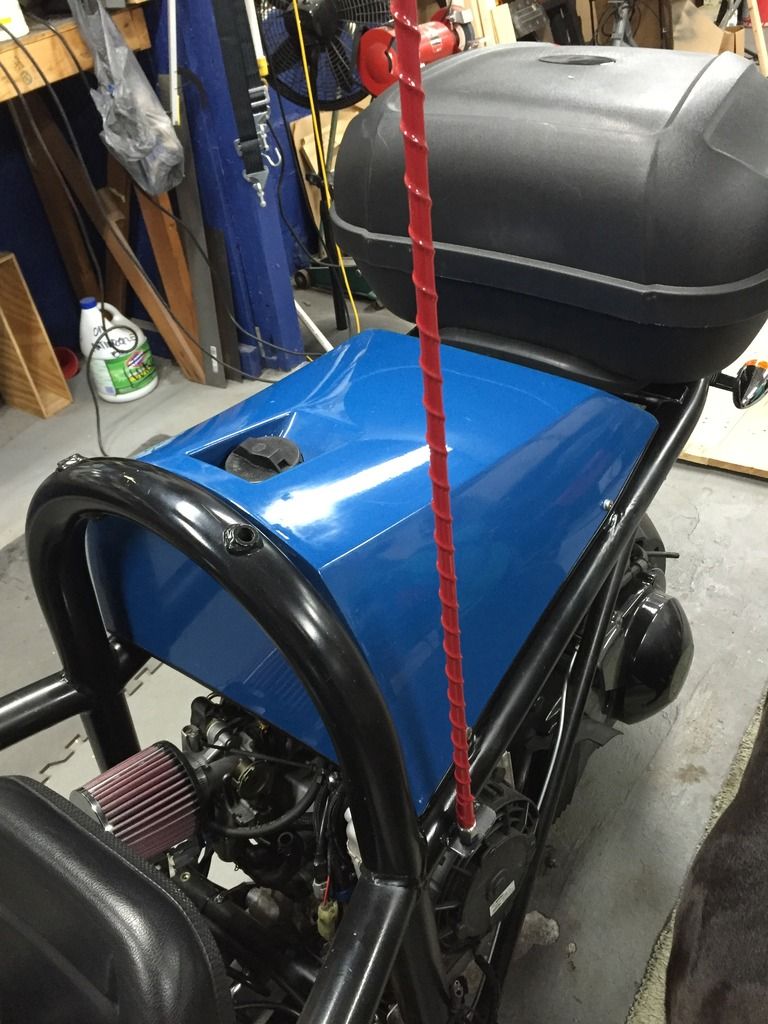 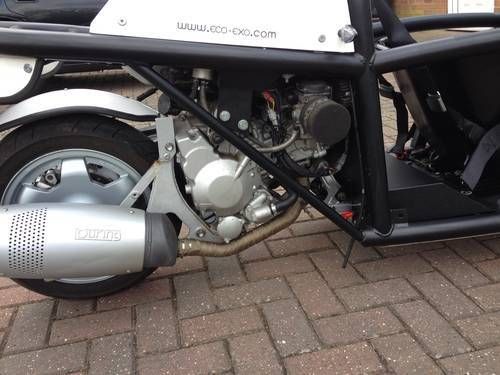 above pic .. (Exomotive's trike) how do you get the air intake / air filter to be aside of the engine instead of in front of it?? |
|
|
|
Post by davej98002 on Mar 20, 2016 1:02:38 GMT
Fred, on cutting the shield down start with sitting in the seat and have a buddy take a sharpie and make some dots down from the top till you think it would be at the height you want. You can cut too much off but can not put it back on. If you cut too much off you can add a deflector like Edward has on his.
Using blue painters tape, make some lines just under and just over the the dot you want to keep leaving a thin stripe of shield showing and in the shape of the shield that you want the top to be. Put enough tape to cover up a saber or scroll saw's foot so it can not scratch the plastic. Then on the inside also put some blue tape to help define the back.
Remove the shield from the trike if you have not done so. Now you have to decide to do it yourself or just take it to an automotive shop that does boats glass too. If you want to do it yourself then I'd advise to go slow and do NOT get in a hurry. Use a thin metal saw blade in the saw and letting the saw do the work slowly cut on the line. The finer the blade the smoother the cut. So do not use a WOOD blade. And do not use an "Oberting" saber saw.
I'll repeat this: DO NOT GET IN A HURRY. LET THE SAW DO THE WORK. DO NOT PUSH HARD, JUST GUIDE THE SAW ALONG THE LINE.
If you hurry or push hard it may crack the shield and 90% of the time it will crack in the wrong direction you need.
After the shield is cut down, take a sanding sponge and slowly sand the edge to remove all small cracks and slightly round over the edge. Do a final sanding with like 800 grit and some water to polish the edge. All the small cracks need to be gone as they leave a start for a larger crack to start.
|
|
|
|
Post by edvb on Mar 20, 2016 1:07:49 GMT
Those were earlier engines that did not have fuel injection. You can check with Roger how he did his intake as I used the stock airbox on mine. Roger also had some good ideas on how to cut the windshield.
Roger and Erik both can help with the windshield. A band saw with a fine tooth blade would be the way I would go but as Dave said there are other ways. The windshield can crack easily and are hard to find so you might want to get someone familiar with this type of work and has the proper tools to do it properly.
Edward
|
|
|
|
Post by edvb on Mar 20, 2016 1:53:41 GMT
The main reason for my shorter wind screen was styling. I wanted a sleek look so my windscreen is at the shallowest angle possible. The deflector was small and adjustable. It worked out perfect for me and gave it the streamlined look I was after.
Roger also just added a wind deflector to his and seems to like it as well.
Fred your windscreen is at a much higher angle the way you have it mounted so I think you can make it work. The hard part is getting just the right height so you look over the top but the wind flows over the top of your head.
It is a tricky balance and takes a bit of time to get the line at the correct height and properly curved and tapered on the sides.
Before you cut the line take a picture sitting in the trike from the front about 5' away with the lens at exactly the same height as your eyes and post it.
Roger, Erik, Dave and I will be able to let you know if it is about right.
I must of spent a week on mine talking with Roger until I found the right shape that would work. I already had the deflector in mind so I knew the minimum height I could go to make sure everything would work out at the end.
Edward
|
|
|
|
Post by roger32849 on Mar 20, 2016 11:00:41 GMT
Fred: I will piggyback on Eds comments. The air filter first: The entire carburetor... that's correct, "carburetor" not throttle body, on the white trike is mounted on a custom fabricated intake. It was rotated 90° to the right to clear the seat and place everything behind the roll bar. That's why the air filter is sticking out the side. My air filter is pointed down. I kept the OEM rubber elbow that was attached to the air box and rotated it downward just in front of the cylinder head. I DID NOT relocate the throttle body. I added a piece of stainless exhaust piping about 8 inches long and attached the filter to that. You can do the ssme thing only rotate the elbow and to the right. You will need to make a support bracket to hold it in place. Naturally the support will need secured to the engine and not the frame. The windshield: The Givi windshields are HUGE. Probably big enough to be used as a speed brake. Measure it as Ed suggested. In this case a picture is worth a dozen "ah s**ts". I cut mine down using a Dremel with a fiber cutting wheel. I bought the wheels from Harbor Freight. I bought the thin ones and used two of them at once, piggybacked. If you use this method it is nearly impossible to break or Crack the plastic. It will melt the plastic as it cuts. What I did was used painters tape on the windshield to protect the plastic but traced the pattern directly onto the screen. When I was about 1/3 of the way around I placed tape on the area I already cut just to hold it in place. The Dremel worked well for me and it was easy to dress the edge of the screen when I was finished. I have to admit, you've got a lot of windshield there and cutting it down to a desirable height is slow work. If you cut to much, it isn't the end of the world. For about $70.00 you can get an adjustable air diverter. Mine works well and keeps the cold air off of my face. It will come in handy when it is hot and I can divert air in my direction to stay cool. COOL HUH! www.madhornets.com has them. I know Ed really likes his. I installed mine a little over a week ago and have been out in cool weather with just a pair of regular glasses on and an open face helmet. They do work well. I hope this helps.. Roger Worcester, Massachusetts |
|
|
|
Post by erik on Mar 20, 2016 12:24:12 GMT
|
|
|
|
Post by roger32849 on Mar 20, 2016 16:59:19 GMT
Fred, the build information on the forum is not the bible by any stretch and the build manual doesn't address cutting down a huge Givi windshield. It isn't going to make a difference (or a whole lot of it) if the height you choose is different, or the same as Eriks. He did what he wanted to do, but it doesn't make it correct or incorrect. Cut, shape, measure, trim, finish any way you want. I believe looking at the build manuals or someone else's design inhibits creativity, and believe me, I've been creative... and so has Edward. Sometimes your best work comes from independent thinking. As a footnote, I enjoy the help I give on this forum. I am glad to do it and comes with skinned knuckles, grease beneath my nails and a lot of hours in the basement. It will never come on a silver platter Fred, but from a friend. Now get that chain saw out and whack that plexi down to size... Here is the link to Madhornets.com windshield deflector: www.madhornets.com/windshield-windscreen-deflector-transparent-spoiler-shield-universal-motorcycle-motobike-clear/?gclid=Cj0KEQjwlLm3BRDjnML3h9ic_vkBEiQABa5oea8rpfdlyvYa7I6tbdmkP7qI9Vn74CKZQzdwrBlwP_4aAlBn8P8HAQRoger Worcester, Massachusetts |
|
|
|
Post by erik on Mar 20, 2016 19:10:21 GMT
I believe looking at the build manuals or someone else's design inhibits creativity, and believe me, I've been creative... and so has Edward. Sometimes your best work comes from independent thinking. Roger Worcester, Massachusetts Depends how you read in between the lines. I use it as a tool to find the solutions other builders used and analise it. We have posted Do's and Don'ts and the don'ts give a wealth of information. It provides me the info which way not to head and find a way to do it right. It's all about analising, making up posibilitys, cancel out the worst and select the best route to go. I do this on all my projects. Fred placed the coolant bottle as I did because it's the best thing to do. Building like this added an aditional 9K Euro of value to my Exo and 20K to my tR1ke so : yes it's mandatory reading for me. The height of my screen is based on Internet information. Nose tip height will direct the airflow through my hair and not in my eyes and without a screen wiper this is the safest height to cut and it's probably the only legal option to do. It has been cut with a reason. Machining the screen to height is a bad option. The screen will break. |
|
|
|
Post by roger32849 on Mar 20, 2016 20:34:51 GMT
Erik....
I agree with you in the fact the methods you employed worked for YOU..... and while you say your methods added value to your build, your Eco-Exo-R has yet to be put forward to pass the MVSA inspection standard. The standard here in the US is not much different than anywhere else, but it is not universal from state to state. Pennsylvania, where Fred lives, is not as strict as Massachusetts or Wisconsin. It would stand to reason that if I or Edward offered advise to Fred doing a build in Pennsylvania, we may be in a good position to offer suggestions based on our builds passing our states inspection. We both have builds that passed a very strict and rigid standard. I have watched your build and it is obvious you departed from the manual and forum material as well. Your build is unique and you did it your way.
When I say what is on the forum or in the build manual inhibits creativity, I had to install a newer style engine in my ECO-EXO-R. Edward completely customized his. There was no information anywhere on how to proceed, so you take your best shot and hope you hit the mark. I believe both Edward and I came pretty darned close, and we each did it our way as well.
It is not my desire to errode your skill as a builder, After all, you tackled a very difficult project when you did the TR1ke, and that took some doing. By the same token, I am not passing myself off as a person who has a lot of experience as a builder. Truth be told, none of us are. I am however saying, I know what will and will not pass here in the states with some assurity.
I believe Edward offered a method on how to figure the screen height. It is premature for Fred to cut it just yet because he has not settled on a suitable seat. He doesn't know how low or high the newer seat will be until he installs it. After that is done then he can tackle the windshield. By the way, I have cut down 3 windshields with my Dremel and it works quite well. I have not broken one yet. I am not saying it will NEVER break, but it worked for me. I know you used a hacksaw blade to do yours. If it worked for you great... my way worked for me.
If I have learned one thing building my Eco-Exo-R, is that there is no specific RIGHT way to do a build. I read your suggestions, Edward's and Scott's very closely. I also had ideas of my own. I mostly built it my way just as Fred is doing and as Edward did his.
This isn't a competition, or a brainstorming session, but just a group of guys kicking around ideas to help someone get to the next level of their build. Again, I am NOT saying you are wrong at doing anything Erik, but you are not absolutely right either. There are many many ways to get the job done, you offered yours, Edward and I offered ours. It's that simple. You all helped me when I asked. Sometimes I used the advise, sometimes I did it my way. That is what this forum is all about. We are not here to offer anything on a silver plate period!
Roger
Worcester, Massachusetts
|
|
|
|
Post by franknbeans on Mar 24, 2016 21:07:41 GMT
Not to high-jack your thread, but I'm building a Mevabusa kit in the Pittsburgh area. I'm trying to find out the regulations on how high the head lights and brake lights have to be form the ground and how far apart they are suppose to be.
Have you found this info anywhere?
|
|


